

本文参考的源码(7.1.1_r6)
Launcher也是一个应用程序,和我们的App没有什么区别,当用户点击应用图标时候,启动其他的App,本文主要为分析Activity的启动流程打基础。
Launcher.java代码量比较多,大约4500多行,但是里面的逻辑并不复杂,不过我这里分析它的意义主要为了更好理解后面的知识,了解Launcher具体的流程才是重要的,不要沉迷代码中无法自拔!
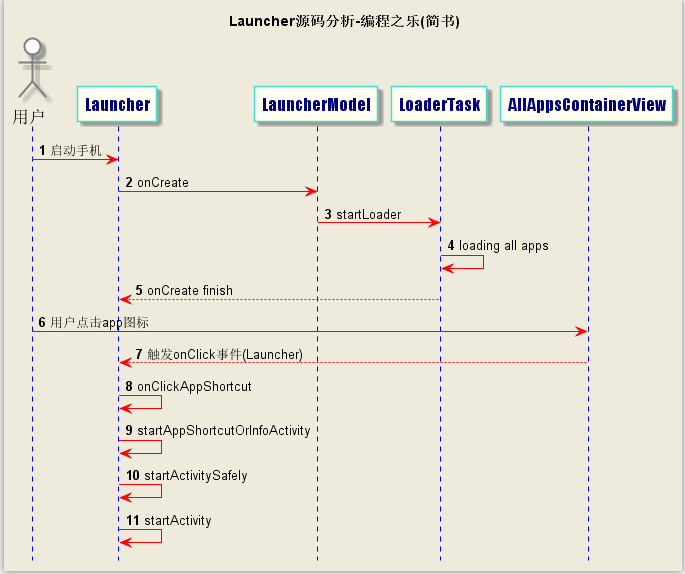
先来张图:
在线源码地址
AndroidManifest.xml Launcher.java LauncherModel.java AllAppsContainerView.java
分析
先看下它的manifest文件,这里面的内容不多,Launcher类是一个Activity,只是比我们普通的app多一个
<category android:name="android.intent.category.HOME" />
<?xml version="1.0" encoding="utf-8"?>

<manifest
    xmlns:android="http://schemas.android.com/apk/res/android"
    package="com.android.launcher3">
    <uses-sdk android:targetSdkVersion="23" android:minSdkVersion="21"/>

    <permission
        android:name="com.android.launcher3.permission.READ_SETTINGS"
        android:permissionGroup="android.permission-group.SYSTEM_TOOLS"
        android:protectionLevel="normal"
        android:label="@string/permlab_read_settings"
        android:description="@string/permdesc_read_settings"/>
    <permission
        android:name="com.android.launcher3.permission.WRITE_SETTINGS"
        android:permissionGroup="android.permission-group.SYSTEM_TOOLS"
        android:protectionLevel="signatureOrSystem"
        android:label="@string/permlab_write_settings"
        android:description="@string/permdesc_write_settings"/>

    <uses-permission android:name="com.android.launcher.permission.READ_SETTINGS" />
    <uses-permission android:name="com.android.launcher.permission.WRITE_SETTINGS" />
    <uses-permission android:name="com.android.launcher3.permission.READ_SETTINGS" />
    <uses-permission android:name="com.android.launcher3.permission.WRITE_SETTINGS" />

    <application
        android:backupAgent="com.android.launcher3.LauncherBackupAgent"
        android:fullBackupOnly="true"
        android:fullBackupContent="@xml/backupscheme"
        android:hardwareAccelerated="true"
        android:icon="@mipmap/ic_launcher_home"
        android:label="@string/derived_app_name"
        android:largeHeap="@bool/config_largeHeap"
        android:restoreAnyVersion="true"
        android:supportsRtl="true" >
        <activity
            android:name="com.android.launcher3.Launcher"
            android:launchMode="singleTask"
            android:clearTaskOnLaunch="true"
            android:stateNotNeeded="true"
            android:theme="@style/LauncherTheme"
            android:windowSoftInputMode="adjustPan"
            android:screenOrientation="nosensor"
            android:configChanges="keyboard|keyboardHidden|navigation"
            android:resumeWhilePausing="true"
            android:taskAffinity=""
            android:enabled="true">
            <intent-filter>
                <action android:name="android.intent.action.MAIN" />
                <category android:name="android.intent.category.HOME" />
                <category android:name="android.intent.category.DEFAULT" />
                <category android:name="android.intent.category.MONKEY"/>
            </intent-filter>
        </activity>

        <!--
        The settings activity. When extending keep the intent filter present
        -->
        <activity
            android:name="com.android.launcher3.SettingsActivity"
            android:label="@string/settings_button_text"
            android:autoRemoveFromRecents="true">
            <intent-filter>
                <action android:name="android.intent.action.APPLICATION_PREFERENCES" />
                <category android:name="android.intent.category.DEFAULT" />
            </intent-filter>
        </activity>

        <!--
        The settings provider contains Home's data, like the workspace favorites. The permissions
        should be changed to what is defined above. The authorities should also be changed to
        represent the package name.
        -->
        <provider
            android:name="com.android.launcher3.LauncherProvider"
            android:authorities="com.android.launcher3.settings"
            android:exported="true"
            android:writePermission="com.android.launcher3.permission.WRITE_SETTINGS"
            android:readPermission="com.android.launcher3.permission.READ_SETTINGS" />
    </application>
</manifest>
为了研究方便,删除了大量代码,完整的请查阅源码。
先查看onCreate方法
class Launcher {
    AllAppsContainerView mAppsView;// 桌面app的布局(重要)

   @Override
    protected void onCreate(Bundle savedInstanceState) {
        // 省略.....
        if (mLauncherCallbacks != null) {
            mLauncherCallbacks.preOnCreate();
        }

        super.onCreate(savedInstanceState);
        LauncherAppState app = LauncherAppState.getInstance();
        mModel = app.setLauncher(this);

        setContentView(R.layout.launcher);

        setupViews();

        lockAllApps();


        // We only load the page synchronously if the user rotates (or triggers a
        // configuration change) while launcher is in the foreground
        if (!mModel.startLoader(mWorkspace.getRestorePage())) {
            // If we are not binding synchronously, show a fade in animation when
            // the first page bind completes.
            mDragLayer.setAlpha(0);
        } else {
            setWorkspaceLoading(true);
        }

        // On large interfaces, or on devices that a user has specifically enabled screen rotation,
        // we want the screen to auto-rotate based on the current orientation
        setOrientation();
    }
}
跟踪mModel.startLoader() 方法,mModel是一个LauncherModel类,
class LauncherModel extends BroadcastReceiver
这个类是一个BroadcastReceiver,但是没有发现在Manifest中注册,注意上面的 app.setLauncher(this)方法,是的,它是在LauncherAppState 里面动态注册的
 class LauncherAppState {

	 private LauncherAppState() {
	   		// .....................
	        // Register intent receivers
	        IntentFilter filter = new IntentFilter();
	        filter.addAction(Intent.ACTION_LOCALE_CHANGED);
	        // For handling managed profiles
	        filter.addAction(Intent.ACTION_MANAGED_PROFILE_ADDED);
	        filter.addAction(Intent.ACTION_MANAGED_PROFILE_REMOVED);
	        filter.addAction(Intent.ACTION_MANAGED_PROFILE_AVAILABLE);
	        filter.addAction(Intent.ACTION_MANAGED_PROFILE_UNAVAILABLE);
	        filter.addAction(Intent.ACTION_MANAGED_PROFILE_UNLOCKED);
	        // For extracting colors from the wallpaper
	        if (Utilities.isNycOrAbove()) {
	            // TODO: add a broadcast entry to the manifest for pre-N.
	            filter.addAction(Intent.ACTION_WALLPAPER_CHANGED);
	        }

	        sContext.registerReceiver(mModel, filter);
	 }
}
这个不是重点,继续追踪mModel.startLoader()方法。
public boolean startLoader(int synchronousBindPage) {
    // Enable queue before starting loader. It will get disabled in Launcher#finishBindingItems
    InstallShortcutReceiver.enableInstallQueue();
    synchronized (mLock) {
        // Don't bother to start the thread if we know it's not going to do anything
        if (mCallbacks != null && mCallbacks.get() != null) {
            final Callbacks oldCallbacks = mCallbacks.get();
            // Clear any pending bind-runnables from the synchronized load process.
            runOnMainThread(new Runnable() {
                public void run() {
                    oldCallbacks.clearPendingBinds();
                }
            });

            // If there is already one running, tell it to stop.
            stopLoaderLocked();
            mLoaderTask = new LoaderTask(mApp.getContext(), synchronousBindPage);
            // TODO: mDeepShortcutsLoaded does not need to be true for synchronous bind.
            if (synchronousBindPage != PagedView.INVALID_RESTORE_PAGE && mAllAppsLoaded
                    && mWorkspaceLoaded && mDeepShortcutsLoaded && !mIsLoaderTaskRunning) {
                mLoaderTask.runBindSynchronousPage(synchronousBindPage);
                return true;
            } else {
                sWorkerThread.setPriority(Thread.NORM_PRIORITY);
                sWorker.post(mLoaderTask);
            }
        }
    }
    return false;
}
该类中synchronized 块有个mLoaderTask = new LoaderTask();查看LoaderTask源码,发现LoaderTask是LauncherModel的内部类,而且是Runnable 类型,直接查看其run方法。
private class LoaderTask implements Runnable {
    // .............
        public void run() {
            synchronized (mLock) {
                if (mStopped) {
                    return;
                }
                mIsLoaderTaskRunning = true;
            }
            // Optimize for end-user experience: if the Launcher is up and // running with the
            // All Apps interface in the foreground, load All Apps first. Otherwise, load the
            // workspace first (default).
            keep_running: {
                if (DEBUG_LOADERS) Log.d(TAG, "step 1: loading workspace");
                loadAndBindWorkspace();

                if (mStopped) {
                    break keep_running;
                }

                waitForIdle();

                // second step
                if (DEBUG_LOADERS) Log.d(TAG, "step 2: loading all apps");
                loadAndBindAllApps();

                waitForIdle();

                // third step
                if (DEBUG_LOADERS) Log.d(TAG, "step 3: loading deep shortcuts");
                loadAndBindDeepShortcuts();
            }

            // Clear out this reference, otherwise we end up holding it until all of the
            // callback runnables are done.
            mContext = null;

            synchronized (mLock) {
                // If we are still the last one to be scheduled, remove ourselves.
                if (mLoaderTask == this) {
                    mLoaderTask = null;
                }
                mIsLoaderTaskRunning = false;
                mHasLoaderCompletedOnce = true;
            }
        }
}
step 1: loading workspace step 2: loading all apps step 3: loading deep shortcuts 日志写的非常清楚,就是加载所有app,图标之类的。
private void loadAndBindAllApps() {
      // ............ 略
      loadAllApps();
}
下面逻辑是载入桌面所有app,并使用handler切换UI线程然后给所有应用bind回调函数。
private void loadAllApps() {
	// ............ 略
	mBgAllAppsList.clear();
	for (UserHandleCompat user : profiles) {
		// ............ 略
		final List<LauncherActivityInfoCompat> apps = mLauncherApps.getActivityList(null, user);
		for (int i = 0; i < apps.size(); i++) {
		    LauncherActivityInfoCompat app = apps.get(i);
		    // This builds the icon bitmaps.
		    mBgAllAppsList.add(new AppInfo(mContext, app, user, mIconCache, quietMode));
		}
		// ............ 略
	}

	final ArrayList<AppInfo> added = mBgAllAppsList.added;
	callbacks.bindAllApplications(added);

	mHandler.post(new Runnable() {
		final Callbacks callbacks = tryGetCallbacks(oldCallbacks);
		if (callbacks != null) {
			callbacks.bindAllApplications(added);
		}
	}
}
Launcher的布局控件 我们最开始提到Launcher的一个成员变量,AllAppsContainerView,这个类是一个自定义ViewGroup,如下:
/**
 * The all apps view container.
 */
public class AllAppsContainerView extends BaseContainerView implements DragSource,
        LauncherTransitionable, View.OnLongClickListener, AllAppsSearchBarController.Callbacks {

    private static final int MIN_ROWS_IN_MERGED_SECTION_PHONE = 3;
    private static final int MAX_NUM_MERGES_PHONE = 2;

    private final Launcher mLauncher;
    private final AlphabeticalAppsList mApps;
    private final AllAppsGridAdapter mAdapter;
    private final RecyclerView.LayoutManager mLayoutManager;
    private final RecyclerView.ItemDecoration mItemDecoration;

    // The computed bounds of the container
    private final Rect mContentBounds = new Rect();

    private AllAppsRecyclerView mAppsRecyclerView;
其中BaseContainerView extends FrameLayout,比较简单。
我们看下它的成员变量-> AllAppsRecyclerView,这是个自定义的RecyclerView,说明它是用RecyclerView对桌面apps布局的。
查看AllAppsGridAdapter ,因为RecyclerView的事件监听 一般是在这里面设置的:
public AllAppsGridAdapter(Launcher launcher, AlphabeticalAppsList apps, View.OnClickListener
            iconClickListener, View.OnLongClickListener iconLongClickListener) {
    // 略 ..............
}
AllAppsGridAdapter的构造函数的参数和AllAppsContainerView的构造函数的方法体来次对比:
 public AllAppsContainerView(Context context, AttributeSet attrs, int defStyleAttr) {
    super(context, attrs, defStyleAttr);
    // 略 ....
    mLauncher = Launcher.getLauncher(context);
    mApps = new AlphabeticalAppsList(context);
    mAdapter = new AllAppsGridAdapter(mLauncher, mApps, mLauncher, this);
    mApps.setAdapter(mAdapter);
}
惊喜发现-> AllAppsGridAdapter 构造函数的第三个参数是mLauncher,而且是View.OnClickListener类型。
再次回到Launcher,Launcher实现了 View.OnClickListener,直接找到
public void onClick(View v)方法,到这步就非常简单了,next->next->next...
这些步骤的代码就无须贴了,最终会执行到startActivity,即分析 Activity启动流程的重要入口。
onClick->onClickAppShortcut->startAppShortcutOrInfoActivity->startActivitySafely->startActivity
