

效果图
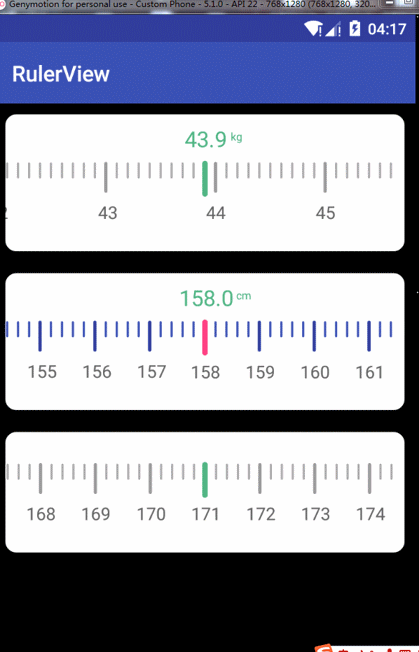
RulerViewGif.gif
支持设置的属性
        <attr name="rulerHeight" format="dimension" />               <!--尺子的高度-->
        <attr name="rulerToResultgap" format="dimension" />          <!--尺子距离结果的高度-->
        <attr name="scaleGap" format="dimension" />                  <!--刻度间距-->
        <attr name="scaleCount" format="integer" />                  <!--刻度数-->
        <attr name="firstScale" format="float" />                    <!--默认选中的刻度-->
        <attr name="maxScale" format="integer" />                    <!--最大刻度-->
        <attr name="minScale" format="integer" />                    <!--最小刻度-->
        <attr name="bgColor" format="color" />                       <!--背景色-->
        <attr name="smallScaleColor" format="color" />               <!--小刻度的颜色-->
        <attr name="midScaleColor" format="color" />                 <!--中刻度的颜色-->
        <attr name="largeScaleColor" format="color" />               <!--大刻度的颜色-->
        <attr name="scaleNumColor" format="color" />                 <!--刻度数的颜色-->
        <attr name="resultNumColor" format="color" />                <!--结果字体的颜色-->
        <attr name="unit" format="string" />                         <!--单位-->
        <attr name="unitColor" format="color" />                     <!--单位颜色-->
        <attr name="smallScaleStroke" format="dimension" />          <!--小刻度的宽度-->
        <attr name="midScaleStroke" format="dimension" />            <!--中刻度的宽度-->
        <attr name="largeScaleStroke" format="dimension" />          <!--大刻度的宽度-->
        <attr name="resultNumTextSize" format="dimension" />         <!--结果字体大小-->
        <attr name="scaleNumTextSize" format="dimension" />          <!--刻度字体大小-->
        <attr name="unitTextSize" format="dimension" />              <!--单位字体大小-->
        <attr name="showScaleResult" format="boolean" />             <!--是否显示结果值-->
        <attr name="isBgRoundRect" format="boolean" />               <!--背景是否圆角-->
使用
compile 'com.github.superSp:RulerView:v1.2'
实现思路
- 初始化画笔,以及其他需要的参数
- 重写
onMeasuer()确定尺子的大小 - 重写
onDraw()绘画出静态尺子,并且将一些滑动时需要改变的参数设置为变量 - 重写
onTouchEvent()处理滑动,增加滑动速率监听VelocityTracker以及惯性滑动以及抬起手指时指针落在刻度上面需要的属性动画ValueAnimator
实现过程
测量
控件的高度=尺子的高度+结果值的高度+尺子距离结果值的高度 控件的宽度=屏幕宽度或者固定宽度
@Override
    protected void onMeasure(int widthMeasureSpec, int heightMeasureSpec) {
        super.onMeasure(widthMeasureSpec, heightMeasureSpec);
        int heightModule = MeasureSpec.getMode(heightMeasureSpec);
        int heightSize = MeasureSpec.getSize(heightMeasureSpec);
        int widthSize = MeasureSpec.getSize(widthMeasureSpec);

        switch (heightModule) {
            case MeasureSpec.AT_MOST:
                height = rulerHeight + (showScaleResult ? resultNumRect.height() : 0) + rulerToResultgap * 2 + getPaddingTop() + getPaddingBottom();
                break;
            case MeasureSpec.UNSPECIFIED:
            case MeasureSpec.EXACTLY:
                height = heightSize + getPaddingTop() + getPaddingBottom();
                break;
        }

        width = widthSize + getPaddingLeft() + getPaddingRight();

        setMeasuredDimension(width, height);

    }
绘制静态尺子
- 绘制背景
drawRect() - 绘制尺子
这一步是绘制控件中最为复杂的一步,需要考虑初始如何默认选中初始刻度,手指抬起时候尺子需要滑动到的位置,计算当前所处刻度等等。
绘制滑动类型的view时,当初的想法是一次性绘制出全部内容,之后使用
canvas.clipRect()裁剪掉不可见区域,但是如果内容区域比较大,例如需要绘制1000个内容,则没滑动一次for循环需要执行1000次。因此换了另外一种思路,只绘制当前屏幕可见区域内容,滑动时,通过不断刷新来模拟滑动,做到以假乱真的效果。。。
        rulerRight = 0;

        //只绘制一个屏幕内容
        while (rulerRight < width) {
            if (num1 % scaleCount == 0) {
                if ((moveX >= 0 && rulerRight < moveX - scaleGap) || width / 2 - rulerRight <= getWhichScalMovex(maxScale + 1) - moveX) {   //去除左右边界

                } else {
                    canvas.drawLine(0, 0, 0, midScaleHeight, midScalePaint);
                    scaleNumPaint.getTextBounds(num1 / scaleGap + minScale + "", 0, (num1 / scaleGap + minScale + "").length(), scaleNumRect);
                    canvas.drawText(num1 / scaleCount + minScale + "", -scaleNumRect.width() / 2, lagScaleHeight +
                            (rulerHeight - lagScaleHeight) / 2 + scaleNumRect.height(), scaleNumPaint);
                }

            } else {
                if ((moveX >= 0 && rulerRight < moveX) || width / 2 - rulerRight < getWhichScalMovex(maxScale) - moveX) {   //去除左右边界

                } else {
                    canvas.drawLine(0, 0, 0, smallScaleHeight, smallScalePaint);
                }
            }
            ++num1;
            rulerRight += scaleGap;
            canvas.translate(scaleGap, 0);
        }

        canvas.restore();
        canvas.drawLine(width / 2, 0, width / 2, lagScaleHeight, lagScalePaint);
绘制结果
drawText()
增加结果回调
一个是手指抬起时落到的刻度,一个是滑动时不断产生的刻度
public interface OnChooseResulterListener {
        void onEndResult(String result);
        void onScrollResult(String result);
    }
最后再贴一下使用以及地址
compile 'com.github.superSp:RulerView:v1.2'
HenCoder「仿写酷界面」活动——征稿 当初也是看到这里有感而写。。。
