

0、背景
因为 hadoop 环境需要 master 能免密码 ssh localhost,所以我们需要建立与本机 localhost 的互信,方法很简单:
1. ssh-keygen -t rsa
   #Press enter for each line
2. cat ~/.ssh/id_rsa.pub >> ~/.ssh/authorized_keys
3. chmod og-wx ~/.ssh/authorized_keys
这三步执行下来就能顺利 ssh localhost 免密码登录了,但是昨天刚建好的互信,今天下午突然不能用了,ssh localhost 需要密码,第一反应是可能哪里设置和配置被改动了,看了下文件版本、配置修改时间都无变化,然而登录时的提示信息又过于简单,这个时候排查陷入僵局了。
work@test_zz_Master 192.168.187.213 18:45:18 ~ >
ssh localhost
work@localhost's password:

work@test_zz_Master 192.168.187.213 18:45:24 ~ >
1、怎么排查?
1.1 debug 日志
首先还是要拿到明细 debug 日志,看看卡在哪里了。linux 下的不少命令都自带调试功能,比如 ssh 就自带 debug 功能:
ssh -vvv localhost
OpenSSH_5.3p1, OpenSSL 1.0.1e-fips 11 Feb 2013
debug1: Reading configuration data /etc/ssh/ssh_config
debug1: Applying options for *
debug2: ssh_connect: needpriv 0
debug1: Connecting to localhost [127.0.0.1] port 22.
debug1: Connection established.
debug1: identity file /home/work/.ssh/identity type -1
debug1: identity file /home/work/.ssh/identity-cert type -1
...
debug3: remaining preferred: keyboard-interactive,password
// 启用公钥登录
debug3: authmethod_is_enabled publickey
debug1: Next authentication method: publickey
debug1: Trying private key: /home/work/.ssh/identity
debug3: no such identity: /home/work/.ssh/identity
debug1: Offering public key: /home/work/.ssh/id_rsa
debug3: send_pubkey_test
// 发送公钥包,等待服务器认证响应
debug2: we sent a publickey packet, wait for reply
debug3: Wrote 368 bytes for a total of 1741
debug1: Authentications that can continue: publickey,gssapi-keyex,gssapi-with-mic,password
debug1: Trying private key: /home/work/.ssh/id_dsa
debug3: no such identity: /home/work/.ssh/id_dsa
debug1: Trying private key: /home/work/.ssh/id_ecdsa
debug3: no such identity: /home/work/.ssh/id_ecdsa
// 没通过认证,禁用该认证方法
debug2: we did not send a packet, disable method
debug3: authmethod_lookup password
debug3: remaining preferred: ,password
debug3: authmethod_is_enabled password
// 下一个认证方法:启用密码登录
debug1: Next authentication method: password
work@localhost's password:
可以看到,确实是认证失败了,但是仅凭一句 we did not send a packet, disable method,咱们还是无法看到失败的深层次原因,那咱们再对比下正常的认证流程应该是怎样的:
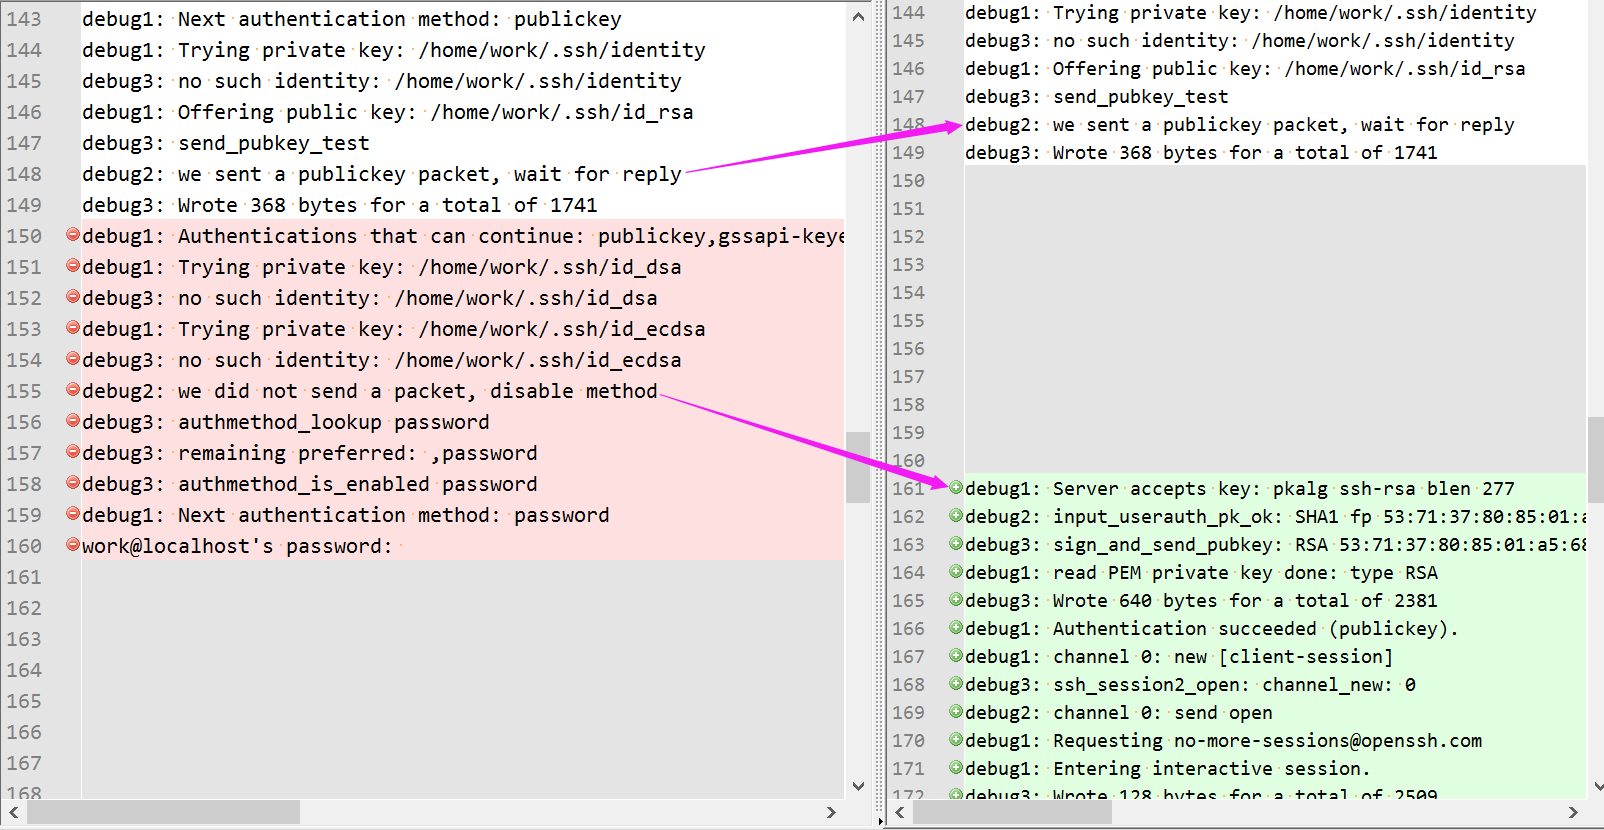
可以看到右边正常的会接受公钥,左边的则没有得到响应,继续走别的认证方式。
1.2 检查配置
打开服务器的 /etc/ssh/sshd_config
确认下面几行是这样的:
RSAAuthentication yes
PubkeyAuthentication yes
AuthorizedKeysFile      .ssh/authorized_keys

#GSSAPIAuthentication yes
#GSSAPICleanupCredentials yes
配置没问题,此路还是不通。
1.3 Debugging SSH public key
在B机器上,we sent a public key packet, wait for reply 之后则是紧跟着"debug1: Server accepts key: pkalg ssh-rsa blen 277"。由此可以看出,是A机器的sshd不认可publickey。
至于为什么不认可,在google上查了许多,毫无头绪,直到使用类似“ssh publickey ignore debug diagnose”这样的关键词,发现这个页面,其中的第二条和第六条给出了解答:
2. Debugging on the remote host by running sshd in debug mode: Run ‘/usr/sbin/sshd -d -p 2222′ on the remote host and connect to it. ’2222′ here is the port number of the sshd process you started on the remote host.
6. Check the permissions on your home directory, .ssh directory, and the authorized_keys file: If your ssh server is running with ‘StrictModes on’, it will refuse to use your public keys in the ~/.ssh/authorized_keys file. Your home directory should be writable only by you, ~/.ssh should be 700, and authorized_keys should be 600.
通过执行 /usr/sbin/sshd -d -p 2222 (在2222端口启动一个带debug输出的sshd) ,
然后 ssh -vv localhost -p 2222 ,可以看到 sshd 的输出:
[root(hostname)@bjdhj-187-213 ~]# /usr/sbin/sshd -d -p 2222
debug1: sshd version OpenSSH_5.3p1
debug1: read PEM private key done: type RSA
...
debug1: trying public key file /home/work/.ssh/authorized_keys
debug1: fd 4 clearing O_NONBLOCK
Authentication refused: bad ownership or modes for directory /home/work
debug1: restore_uid: 0/0
debug1: temporarily_use_uid: 500/500 (e=0/0)
debug1: trying public key file /home/work/.ssh/authorized_keys
debug1: fd 4 clearing O_NONBLOCK
Authentication refused: bad ownership or modes for directory /home/work
debug1: restore_uid: 0/0
Failed publickey for work from 127.0.0.1 port 45548 ssh2
可以看到倒数第三行:Authentication refused: bad ownership or modes for directory /home/work,
正好与那第六条相对应,再检查一下 /home/work ,其权限是否是其他组可读写。
同时,咱们也能从 /var/log/secure 看到明细的 debug 日志:
[root(hostname)@bjdhj-187-213 ~]# tail -f /var/log/secure
Sep  1 18:52:20 bjdhj-187-213 sshd[30936]: Server listening on 0.0.0.0 port 22.
Sep  1 18:52:23 bjdhj-187-213 sshd[30944]: Authentication refused: bad ownership or modes for directory /home/work
Sep  1 18:52:23 bjdhj-187-213 sshd[30944]: Authentication refused: bad ownership or modes for directory /home/work
Sep  1 18:52:25 bjdhj-187-213 sshd[30948]: Connection closed by 127.0.0.1
2、最终解决方案
ssh 为了保证通信安全,防止 key 被篡改或窃取,对目录和文件的权限要求相当严格,
咱们最终需要确保相关目录权限与下述一致:
chmod 0755 ~               # 或 chmod g-w ~
chmod 700 ~/.ssh
chmod 600 ~/.ssh/authorized_keys

sudo service sshd restart
后记:
当然了,这篇文章所反映的问题虽然很小,最后的答案也很简单,但是其展现的排查思路和方法却很独特,值得借鉴,毕竟很多时候咱们不能像平时一样,直接 debug 源码。
Refer:
[1] 记一次sshd异常:无法通过建立信任关系登录
[2] ssh公钥登录无效
[3] Debugging SSH public key authentication problems
