[译] TensorFlow 教程 #11 - 对抗样本

1,268 阅读14分钟

注:作者未提供教程#10,以后若有更新将补充。
本文主要演示了如何给图像增加“对抗噪声”,以此欺骗模型,使其误分类。

01 - 简单线性模型 | 02 - 卷积神经网络 | 03 - PrettyTensor | 04 - 保存& 恢复
05 - 集成学习 | 06 - CIFAR 10 | 07 - Inception 模型 | 08 - 迁移学习
09 - 视频数据

by Magnus Erik Hvass Pedersen / GitHub / Videos on YouTube
中文翻译 thrillerist / Github

如有转载,请附上本文链接。


介绍

之前的教程中,我们用几种不用的深度神经网络来分类图像,取得不同程度的成功。在这篇教程里,我们将会看到一个寻找对抗样本的简单方法,它会使一个最先进的神经网络误分类任何输入图像,不管选的是什么类别。这通过简单地向输入图像添加小部分“特定”噪声完成。人类不会觉察到这些变化,但它却能戏弄神经网络。

本文基于之前的教程。你需要大概地熟悉神经网络(教程#01和#02),了解Inception模型(教程#07)也很有帮助。

流程图

我们使用教程#07中的Inception模型,然后修改/黑掉TensorFlow图,来寻找引起Inception模型误分类输入图像的对抗样本。

在下面的流程图中,我们在《查理和巧克力工厂》图像上添加了一些噪声,然后作为Inception模型的输入。最终目标是找到使Inception模型将图像误分类成我们目标类型的噪声,这边选择书柜类型(分类号300)。

我们也为图添加一个新的损失函数,来计算cross-entropy,它是Inception模型分类噪声图像的性能度量。

由于Inception模型是由很多相结合的基本数学运算构造的,使用微分链式法则,TensorFlow让我们很快就能找到损失函数的梯度。

我们使用损失函数关于输入图像的梯度,来寻找对抗噪声。要寻找的是那些可以增加'书柜'类别而不是输入图像原始类别的评分(即概率)的噪声。

这本质上是用梯度下降法来执行优化的,后面会实现它。

from IPython.display import Image, display
Image('images/11_adversarial_examples_flowchart.png')

导入

%matplotlib inline
import matplotlib.pyplot as plt
import tensorflow as tf
import numpy as np
import os

# Functions and classes for loading and using the Inception model.
import inception

使用Python3.5.2(Anaconda)开发,TensorFlow版本是:

tf.__version__

'0.11.0rc0'

Inception 模型

从网上下载Inception模型。

从网上下载Inception模型。这是你保存数据文件的默认文件夹。如果文件夹不存在就自动创建。

# inception.data_dir = 'inception/'

如果文件夹中不存在Inception模型,就自动下载。 它有85MB。

inception.maybe_download()

Downloading Inception v3 Model ...
Data has apparently already been downloaded and unpacked.

载入Inception模型

载入模型,为图像分类做准备。

注意warning信息,以后可能会导致程序运行失败。

model = inception.Inception()

获取Inception模型的输入和输出

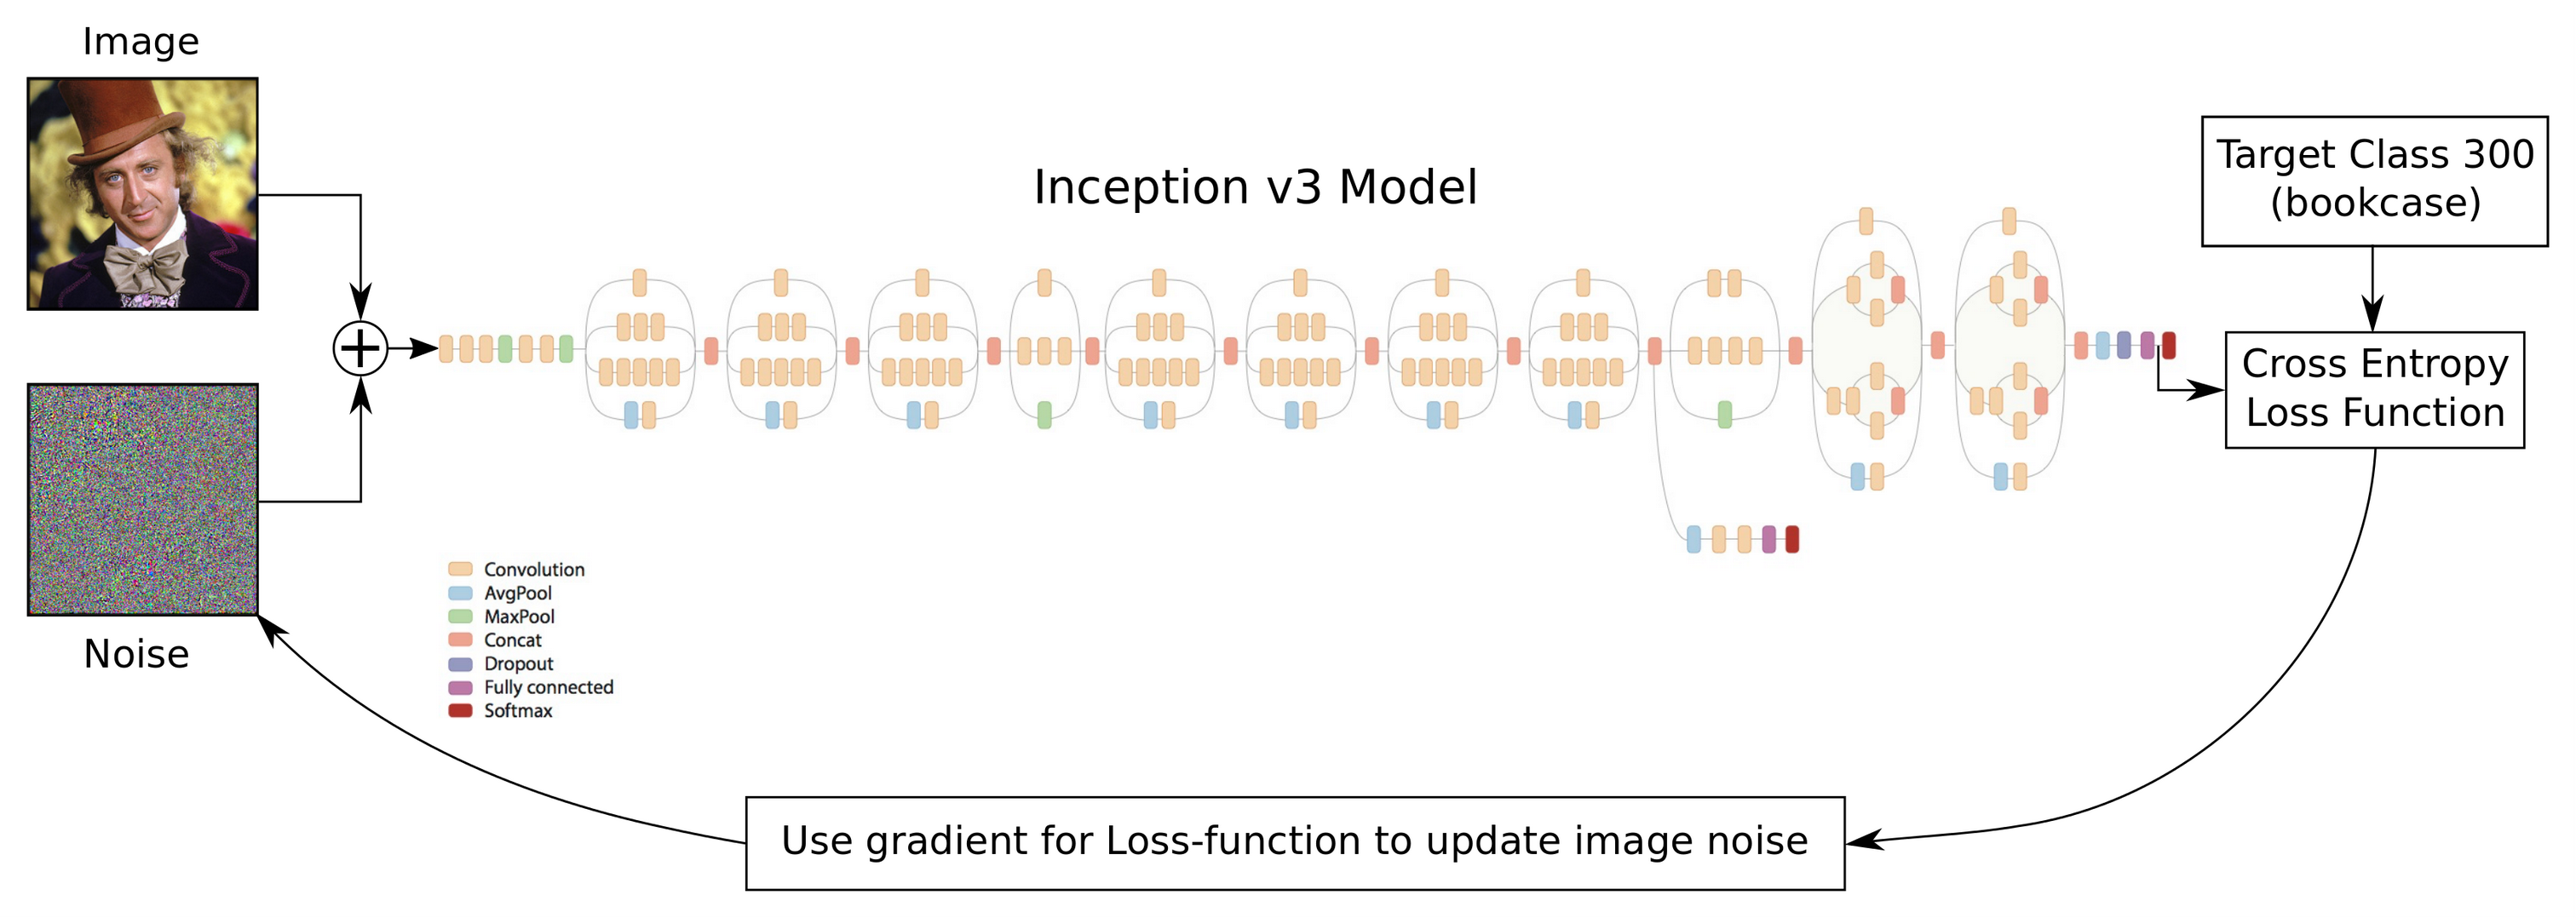
取得Inception模型输入张量的引用。这个张量是用来保存调整大小后的图像,即299 x 299像素并带有3个颜色通道。我们会在调整大小后的图像上添加噪声,然后还是用这个张量将结果传到图(graph)中,因此需要确保调整大小的算法没有引入噪声。

resized_image = model.resized_image

获取Inception模型softmax分类器输出的引用。

y_pred = model.y_pred

获取Inception模型softmax分类器未经尺度变化的(unscaled)输出的引用。这通常称为“logits”。由于我们会在graph上添加一个新的损失函数,其中用到这些未经变化的输出,因此logits是必要的。

y_logits = model.y_logits

黑掉Inception模型

为了找到对抗样本,需要为Inception模型的图添加一个新的损失函数。我们还需要这个损失函数关于输入图像的梯度。

# Set the graph for the Inception model as the default graph,
# so that all changes inside this with-block are done to that graph.
with model.graph.as_default():
    # Add a placeholder variable for the target class-number.
    # This will be set to e.g. 300 for the 'bookcase' class.
    pl_cls_target = tf.placeholder(dtype=tf.int32)

    # Add a new loss-function. This is the cross-entropy.
    # See Tutorial #01 for an explanation of cross-entropy.
    loss = tf.nn.sparse_softmax_cross_entropy_with_logits(logits=y_logits, labels=[pl_cls_target])

    # Get the gradient for the loss-function with regard to
    # the resized input image.
    gradient = tf.gradients(loss, resized_image)

TensorFlow 会话

我们需要一个TensorFlow会话来运行图。

session = tf.Session(graph=model.graph)

帮助函数用来寻找对抗噪声

下面的函数找出了要添加到输入图像上的噪声,这样(输入图像)就会被分类到想要的目标类型。

这个函数本质上是用梯度下降来执行优化。噪声被初始化为零,然后用损失函数关于输入噪声图像的梯度来逐步优化,这样,每次迭代噪声都使分类更接近于想要的目标类型。当分类评分达到要求(比如99%)或者执行了最大迭代次数时,就停止优化。

def find_adversary_noise(image_path, cls_target, noise_limit=3.0,
                         required_score=0.99, max_iterations=100):
    """
    Find the noise that must be added to the given image so
    that it is classified as the target-class.

    image_path: File-path to the input-image (must be *.jpg).
    cls_target: Target class-number (integer between 1-1000).
    noise_limit: Limit for pixel-values in the noise.
    required_score: Stop when target-class score reaches this.
    max_iterations: Max number of optimization iterations to perform.
    """

    # Create a feed-dict with the image.
    feed_dict = model._create_feed_dict(image_path=image_path)

    # Use TensorFlow to calculate the predicted class-scores
    # (aka. probabilities) as well as the resized image.
    pred, image = session.run([y_pred, resized_image],
                              feed_dict=feed_dict)

    # Convert to one-dimensional array.
    pred = np.squeeze(pred)

    # Predicted class-number.
    cls_source = np.argmax(pred)

    # Score for the predicted class (aka. probability or confidence).
    score_source_org = pred.max()

    # Names for the source and target classes.
    name_source = model.name_lookup.cls_to_name(cls_source,
                                                only_first_name=True)
    name_target = model.name_lookup.cls_to_name(cls_target,
                                                only_first_name=True)

    # Initialize the noise to zero.
    noise = 0

    # Perform a number of optimization iterations to find
    # the noise that causes mis-classification of the input image.
    for i in range(max_iterations):
        print("Iteration:", i)

        # The noisy image is just the sum of the input image and noise.
        noisy_image = image + noise

        # Ensure the pixel-values of the noisy image are between
        # 0 and 255 like a real image. If we allowed pixel-values
        # outside this range then maybe the mis-classification would
        # be due to this 'illegal' input breaking the Inception model.
        noisy_image = np.clip(a=noisy_image, a_min=0.0, a_max=255.0)

        # Create a feed-dict. This feeds the noisy image to the
        # tensor in the graph that holds the resized image, because
        # this is the final stage for inputting raw image data.
        # This also feeds the target class-number that we desire.
        feed_dict = {model.tensor_name_resized_image: noisy_image,
                     pl_cls_target: cls_target}

        # Calculate the predicted class-scores as well as the gradient.
        pred, grad = session.run([y_pred, gradient],
                                 feed_dict=feed_dict)

        # Convert the predicted class-scores to a one-dim array.
        pred = np.squeeze(pred)

        # The scores (probabilities) for the source and target classes.
        score_source = pred[cls_source]
        score_target = pred[cls_target]

        # Squeeze the dimensionality for the gradient-array.
        grad = np.array(grad).squeeze()

        # The gradient now tells us how much we need to change the
        # noisy input image in order to move the predicted class
        # closer to the desired target-class.

        # Calculate the max of the absolute gradient values.
        # This is used to calculate the step-size.
        grad_absmax = np.abs(grad).max()

        # If the gradient is very small then use a lower limit,
        # because we will use it as a divisor.
        if grad_absmax < 1e-10:
            grad_absmax = 1e-10

        # Calculate the step-size for updating the image-noise.
        # This ensures that at least one pixel colour is changed by 7.
        # Recall that pixel colours can have 255 different values.
        # This step-size was found to give fast convergence.
        step_size = 7 / grad_absmax

        # Print the score etc. for the source-class.
        msg = "Source score: {0:>7.2%}, class-number: {1:>4}, class-name: {2}"
        print(msg.format(score_source, cls_source, name_source))

        # Print the score etc. for the target-class.
        msg = "Target score: {0:>7.2%}, class-number: {1:>4}, class-name: {2}"
        print(msg.format(score_target, cls_target, name_target))

        # Print statistics for the gradient.
        msg = "Gradient min: {0:>9.6f}, max: {1:>9.6f}, stepsize: {2:>9.2f}"
        print(msg.format(grad.min(), grad.max(), step_size))

        # Newline.
        print()

        # If the score for the target-class is not high enough.
        if score_target < required_score:
            # Update the image-noise by subtracting the gradient
            # scaled by the step-size.
            noise -= step_size * grad

            # Ensure the noise is within the desired range.
            # This avoids distorting the image too much.
            noise = np.clip(a=noise,
                            a_min=-noise_limit,
                            a_max=noise_limit)
        else:
            # Abort the optimization because the score is high enough.
            break

    return image.squeeze(), noisy_image.squeeze(), noise, \
           name_source, name_target, \
           score_source, score_source_org, score_target

绘制图像和噪声的帮助函数

函数对输入做归一化,则输入值在0.0到1.0之间,这样才能正确的显示出噪声。

def normalize_image(x):
    # Get the min and max values for all pixels in the input.
    x_min = x.min()
    x_max = x.max()

    # Normalize so all values are between 0.0 and 1.0
    x_norm = (x - x_min) / (x_max - x_min)

    return x_norm

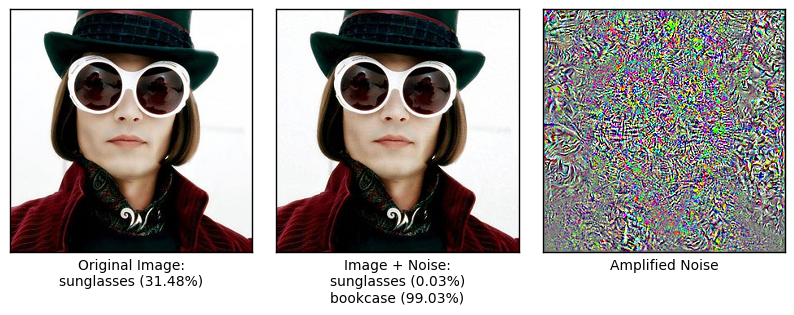
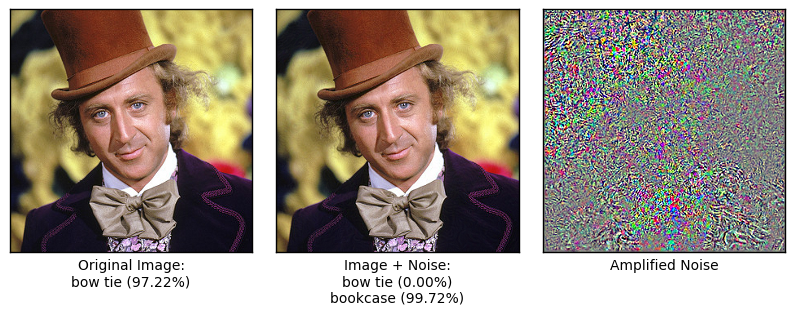
这个函数绘制了原始图像、噪声图像,以及噪声。它也显示了类别名和评分。

def plot_images(image, noise, noisy_image,
                name_source, name_target,
                score_source, score_source_org, score_target):
    """
    Plot the image, the noisy image and the noise.
    Also shows the class-names and scores.

    Note that the noise is amplified to use the full range of
    colours, otherwise if the noise is very low it would be
    hard to see.

    image: Original input image.
    noise: Noise that has been added to the image.
    noisy_image: Input image + noise.
    name_source: Name of the source-class.
    name_target: Name of the target-class.
    score_source: Score for the source-class.
    score_source_org: Original score for the source-class.
    score_target: Score for the target-class.
    """

    # Create figure with sub-plots.
    fig, axes = plt.subplots(1, 3, figsize=(10,10))

    # Adjust vertical spacing.
    fig.subplots_adjust(hspace=0.1, wspace=0.1)

    # Use interpolation to smooth pixels?
    smooth = True

    # Interpolation type.
    if smooth:
        interpolation = 'spline16'
    else:
        interpolation = 'nearest'

    # Plot the original image.
    # Note that the pixel-values are normalized to the [0.0, 1.0]
    # range by dividing with 255.
    ax = axes.flat[0]
    ax.imshow(image / 255.0, interpolation=interpolation)
    msg = "Original Image:\n{0} ({1:.2%})"
    xlabel = msg.format(name_source, score_source_org)
    ax.set_xlabel(xlabel)

    # Plot the noisy image.
    ax = axes.flat[1]
    ax.imshow(noisy_image / 255.0, interpolation=interpolation)
    msg = "Image + Noise:\n{0} ({1:.2%})\n{2} ({3:.2%})"
    xlabel = msg.format(name_source, score_source, name_target, score_target)
    ax.set_xlabel(xlabel)

    # Plot the noise.
    # The colours are amplified otherwise they would be hard to see.
    ax = axes.flat[2]
    ax.imshow(normalize_image(noise), interpolation=interpolation)
    xlabel = "Amplified Noise"
    ax.set_xlabel(xlabel)

    # Remove ticks from all the plots.
    for ax in axes.flat:
        ax.set_xticks([])
        ax.set_yticks([])

    # Ensure the plot is shown correctly with multiple plots
    # in a single Notebook cell.
    plt.show()

寻找并绘制对抗样本的帮助函数

这个函数结合了上面的两个方法。它先找到对抗噪声,然后画出图像和噪声。

def adversary_example(image_path, cls_target,
                      noise_limit, required_score):
    """
    Find and plot adversarial noise for the given image.

    image_path: File-path to the input-image (must be *.jpg).
    cls_target: Target class-number (integer between 1-1000).
    noise_limit: Limit for pixel-values in the noise.
    required_score: Stop when target-class score reaches this.
    """

    # Find the adversarial noise.
    image, noisy_image, noise, \
    name_source, name_target, \
    score_source, score_source_org, score_target = \
        find_adversary_noise(image_path=image_path,
                             cls_target=cls_target,
                             noise_limit=noise_limit,
                             required_score=required_score)

    # Plot the image and the noise.
    plot_images(image=image, noise=noise, noisy_image=noisy_image,
                name_source=name_source, name_target=name_target,
                score_source=score_source,
                score_source_org=score_source_org,
                score_target=score_target)

    # Print some statistics for the noise.
    msg = "Noise min: {0:.3f}, max: {1:.3f}, mean: {2:.3f}, std: {3:.3f}"
    print(msg.format(noise.min(), noise.max(),
                     noise.mean(), noise.std()))

结果

鹦鹉

这个例子将一张鹦鹉图作为输入,然后找到对抗噪声,使得Inception模型将图像误分类成一个书架(类别号300)。

噪声界限设为3.0,这表示只允许每个像素颜色在3.0范围内波动。像素颜色在0到255之间,因此3.0的浮动对应大约1.2%的可能范围。这样的少量噪声对人眼是不可见的,因此噪声图像和原始图像看起来基本一致,如下所示。

要求评分设为0.99,这表示当目标分类的评分大于等于0.99时,用来寻找对抗噪声的优化器就会停止,这样Inception模型几乎确定了噪声图像展示的是期望的目标类别。

image_path = "images/parrot_cropped1.jpg"

adversary_example(image_path=image_path,
                  cls_target=300,
                  noise_limit=3.0,
                  required_score=0.99)
Iteration: 0
Source score:  97.38%, class-number:  409, class-name: macaw
Target score:   0.00%, class-number:  300, class-name: bookcase
Gradient min: -0.001329, max:  0.001370, stepsize:   5110.94

Iteration: 1
Source score: 88.87%, class-number: 409, class-name: macaw
Target score: 0.01%, class-number: 300, class-name: bookcase
Gradient min: -0.001499, max: 0.001401, stepsize: 4668.28

Iteration: 2
Source score: 68.47%, class-number: 409, class-name: macaw
Target score: 0.06%, class-number: 300, class-name: bookcase
Gradient min: -0.003093, max: 0.002587, stepsize: 2262.91

Iteration: 3
Source score: 16.76%, class-number: 409, class-name: macaw
Target score: 0.22%, class-number: 300, class-name: bookcase
Gradient min: -0.001077, max: 0.001047, stepsize: 6499.39

...
Iteration: 23
Source score: 0.01%, class-number: 409, class-name: macaw
Target score: 95.90%, class-number: 300, class-name: bookcase
Gradient min: -0.000111, max: 0.000142, stepsize: 49346.70

Iteration: 24
Source score: 0.00%, class-number: 409, class-name: macaw
Target score: 98.98%, class-number: 300, class-name: bookcase
Gradient min: -0.000029, max: 0.000025, stepsize: 245266.90

Iteration: 25
Source score: 0.00%, class-number: 409, class-name: macaw
Target score: 99.12%, class-number: 300, class-name: bookcase
Gradient min: -0.000019, max: 0.000022, stepsize: 311258.06

Noise min: -3.000, max: 3.000, mean: 0.001, std: 1.492

如上所示,鹦鹉的原始图像与噪声图像看起来几乎一致。人眼无法区分开两张图像。原始图被Inception模型正确地分类成金刚鹦鹉(鹦鹉),评分为97.38%。但噪声图像对金刚鹦鹉的分类评分是0.00%,对书架的评分是99.12%。

这样,我们糊弄了Inception模型,让它相信一张鹦鹉图像展示的是一个书架。只是添加了一些“特定的”噪声就导致了这个误分类。

注意,上面展示的噪声是被放大数倍的。实际上,噪声只在输入图像每个像素颜色强度的最多1.2%范围内调整图像(假定噪声界限像上面的函数一样设置为3.0)。由于噪声很弱,人类观察不到,但它导致Inception模型完全误分类的输入图像。

Elon Musk

我们也找到了Elon Mask图像的对抗噪声。目标类别再次设为“书柜”(类别号300),噪声界限和要求分数也与上面的相同。

image_path = "images/elon_musk.jpg"

adversary_example(image_path=image_path,
                  cls_target=300,
                  noise_limit=3.0,
                  required_score=0.99)

Iteration: 0
Source score: 19.73%, class-number: 837, class-name: sweatshirt
Target score: 0.01%, class-number: 300, class-name: bookcase
Gradient min: -0.008348, max: 0.005946, stepsize: 838.48

Iteration: 1
Source score: 1.77%, class-number: 837, class-name: sweatshirt
Target score: 0.24%, class-number: 300, class-name: bookcase
Gradient min: -0.002952, max: 0.005907, stepsize: 1185.13

Iteration: 2
Source score: 0.52%, class-number: 837, class-name: sweatshirt
Target score: 10.06%, class-number: 300, class-name: bookcase
Gradient min: -0.006741, max: 0.006555, stepsize: 1038.46

...
Iteration: 21
Source score: 0.03%, class-number: 535, class-name: sunglasses
Target score: 98.31%, class-number: 300, class-name: bookcase
Gradient min: -0.000033, max: 0.000026, stepsize: 213124.72

Iteration: 22
Source score: 0.03%, class-number: 535, class-name: sunglasses
Target score: 98.80%, class-number: 300, class-name: bookcase
Gradient min: -0.000023, max: 0.000027, stepsize: 260036.19

Iteration: 23
Source score: 0.03%, class-number: 535, class-name: sunglasses
Target score: 99.03%, class-number: 300, class-name: bookcase
Gradient min: -0.000022, max: 0.000024, stepsize: 294094.62


Noise min: -3.000, max: 3.000, mean: 0.010, std: 1.534

在上面的《查理和巧克力工厂》图像中(新版电影),原先Inception模型将图像分类成“太阳镜”(评分31.48%)。但再一次,我们能够生成让模型将图像分类成“书架”的对抗噪声(评分99.03%)。

两张图像看起来一样。但你可以倾斜电脑屏幕,看到白色区域一些轻微变化的噪声图样。

查理和巧克力工厂 (旧版)

image_path = "images/willy_wonka_old.jpg"

adversary_example(image_path=image_path,
                  cls_target=300,
                  noise_limit=3.0,
                  required_score=0.99)

Iteration: 0
Source score: 97.22%, class-number: 817, class-name: bow tie
Target score: 0.00%, class-number: 300, class-name: bookcase
Gradient min: -0.002479, max: 0.003469, stepsize: 2017.94

Iteration: 1
Source score: 10.65%, class-number: 817, class-name: bow tie
Target score: 0.08%, class-number: 300, class-name: bookcase
Gradient min: -0.000859, max: 0.001458, stepsize: 4799.50

Iteration: 2
Source score: 2.21%, class-number: 817, class-name: bow tie
Target score: 0.25%, class-number: 300, class-name: bookcase
Gradient min: -0.000415, max: 0.000617, stepsize: 11350.70

...
Iteration: 13
Source score: 0.00%, class-number: 817, class-name: bow tie
Target score: 98.09%, class-number: 300, class-name: bookcase
Gradient min: -0.000037, max: 0.000041, stepsize: 168840.03

Iteration: 14
Source score: 0.07%, class-number: 817, class-name: bow tie
Target score: 95.18%, class-number: 300, class-name: bookcase
Gradient min: -0.000212, max: 0.000168, stepsize: 32997.19

Iteration: 15
Source score: 0.00%, class-number: 817, class-name: bow tie
Target score: 99.72%, class-number: 300, class-name: bookcase
Gradient min: -0.000004, max: 0.000004, stepsize: 1590352.60

Noise min: -3.000, max: 3.000, mean: -0.000, std: 1.309

《查理和巧克力工厂》图像(旧版电影)原先被Inception模型分类成“蝴蝶领结”。同样,加了噪声之后,它被分类成“书架”(评分99.72%)。

关闭TensorFlow会话

现在我们已经用TensorFlow完成了任务,关闭session,释放资源。注意,我们需要关闭两个TensorFlow-session,每个模型对象各有一个。

# This has been commented out in case you want to modify and experiment
# with the Notebook without having to restart it.
# session.close()
# model.close()

总结

我们演示了如何寻找导致Inception模型误分类图像的对抗样本。通过一个简单的流程,我们发现将噪声添加到输入图像上会使模型错误地分类图像,即使每个像素只做了轻微的改变,而且人眼无法察觉这些变化。

更进一步,优化后的噪声可以给出一个接近100%的评分(概率或确信度)。因此,输入图像不仅被误分类了,神经网络还很确信自己正确地分类了图像。

这是神经网络的一个普遍的问题,并且是一个很严肃的问题!我们无法在关键应用中相信神经网络,直到能够理解为什么会发生上述问题或如何解决它。想象一下自动驾驶汽车由于其神经网络误分类了输入图像而忽视停止标志或穿过马路的行人。

对这个问题的研究正在进行中,鼓励你在网上搜索一下这个课题的最新论文。也许你可以找到问题的解决方案?

练习

下面使一些可能会让你提升TensorFlow技能的一些建议练习。为了学习如何更合适地使用TensorFlow,实践经验是很重要的。

在你对这个Notebook进行修改之前,可能需要先备份一下。

  • 试着使用自己的图像。
  • 试着在 adversary_example()中使用其他的参数。试试其它的目标类别、噪声界限和评分要求。结果是怎样的?
  • 你认为对于所有的目标类别都能生成它的对抗噪声吗?如何证明你的理论?
  • 试着在find_adversary_noise()中使用不同的公式来计算step-size。你能使优化更快吗?
  • 试着在噪声图像输入到神经网络之前对它进行模糊处理。它能去掉对抗噪声,并且导致再一次的正确分类吗?
  • 试着降低噪声图像的颜色深度,而不是对它做模糊。它会去除对抗噪声并导致正确分类吗?比如将图像的RGB限制在16或32位里,通常是有255位的。
  • 你认为你的噪声消除对MNIST数据集的手写数字或奇特的几何形状有效吗?有时将这些称为'fooling images',上网搜索看看。
  • 你能找到对所有图像都有效的对抗噪声吗?这样就不用为每张图像寻找特定的噪声了。你会怎么做?
  • 你能直接用TensorFlow而不是Numpy来实现find_adversary_noise()吗?需要在TensorFlow图中创建一个噪声变量,这样它就能被优化。
  • 向朋友解释什么是对抗样本以及程序如何找到它们。