

有些人剛開始學iOS開發,都會通過Storyboard等可視化的工具來寫進行排版,相對經常通過code來撰寫App的人來說,可能對於UIKit中的座標系統只有很初步的認識。
如果未來想要更輕鬆迅速的通過code來進行constraint的設置、動畫的製作、互動效果的建立,這勢必要非常了解座標系統的原理。
我們從這裡開始
 <img class="alignnone wp-image-629 size-large" src="https://ios.devdon.com/wp-content/uploads/2017/03/Swift-UIView-1-1024x731.png" alt="" width="640" height="457" srcset="https://ios.devdon.com/wp-content/uploads/2017/03/Swift-UIView-1-1024x731.png 1024w, https://ios.devdon.com/wp-content/uploads/2017/03/Swift-UIView-1-300x214.png 300w, https://ios.devdon.com/wp-content/uploads/2017/03/Swift-UIView-1-768x548.png 768w, https://ios.devdon.com/wp-content/uploads/2017/03/Swift-UIView-1.png 1160w" sizes="(max-width: 640px) 100vw, 640px" />
 <img class="alignnone wp-image-629 size-large" src="https://ios.devdon.com/wp-content/uploads/2017/03/Swift-UIView-1-1024x731.png" alt="" width="640" height="457" srcset="https://ios.devdon.com/wp-content/uploads/2017/03/Swift-UIView-1-1024x731.png 1024w, https://ios.devdon.com/wp-content/uploads/2017/03/Swift-UIView-1-300x214.png 300w, https://ios.devdon.com/wp-content/uploads/2017/03/Swift-UIView-1-768x548.png 768w, https://ios.devdon.com/wp-content/uploads/2017/03/Swift-UIView-1.png 1160w" sizes="(max-width: 640px) 100vw, 640px" />
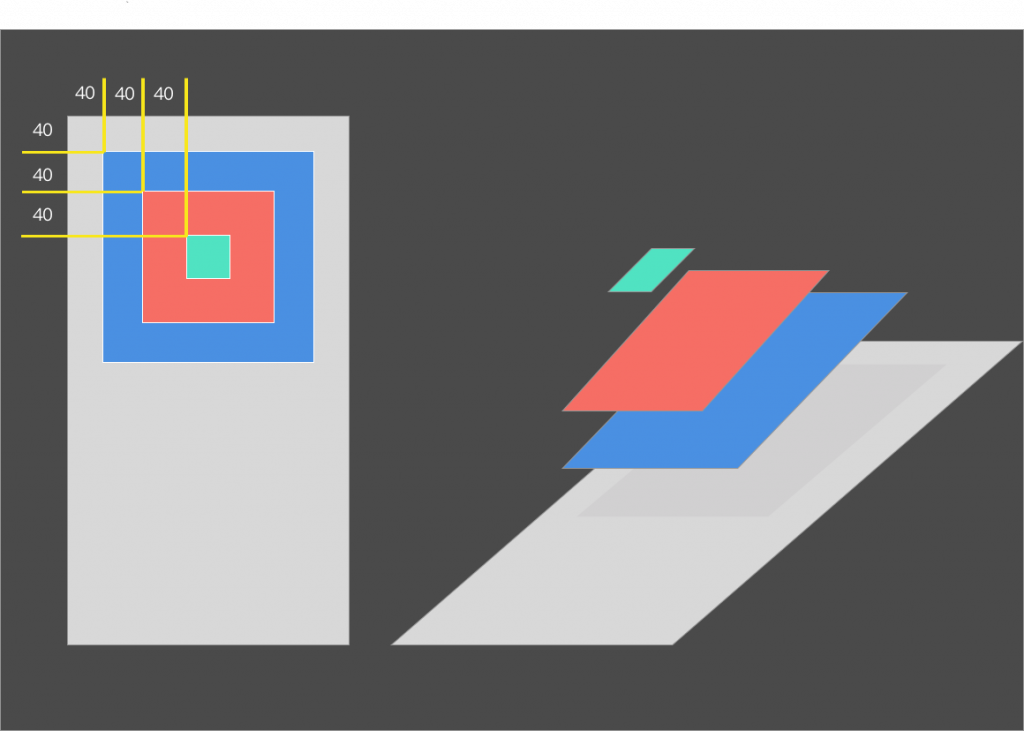
- 左邊可以看到每一個View之間的原點距離都是(40, 40),灰色的最左上角為( 0, 0 )。
- 右邊說明greenView放在redView上、redView放在blueView上、blueView放在view(灰色)上。
如果直接print(blue.frame),大家都知道會得到(40, 40, 250, 250)。
但是,如果綠色的長寬都為50,此時print(greenView.frame),你知道會得到什麼嗎?
如果你認為結果是(120, 120, 50, 50),那看來真的需要好好了解一下座標系統的原理了。
對了,你應該知道iOS座標系統的原點在左上角,而CoreGraphics座標系統的原點在左下角吧,雖然這次不會講到CG的部分。
UIKit座標系統
 <img class="alignnone wp-image-630 size-large" src="https://ios.devdon.com/wp-content/uploads/2017/03/Two-View-Coordinates-1024x797.png" alt="" width="640" height="498" srcset="https://ios.devdon.com/wp-content/uploads/2017/03/Two-View-Coordinates-1024x797.png 1024w, https://ios.devdon.com/wp-content/uploads/2017/03/Two-View-Coordinates-300x234.png 300w, https://ios.devdon.com/wp-content/uploads/2017/03/Two-View-Coordinates-768x598.png 768w, https://ios.devdon.com/wp-content/uploads/2017/03/Two-View-Coordinates.png 1062w" sizes="(max-width: 640px) 100vw, 640px" />
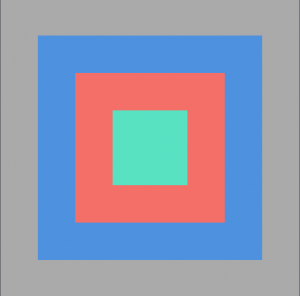
其實每一個View都有各自的座標系統,而frame的值是根據superView的座標系統而來的。根據上面的圖我們來舉例子。
注:View之間的間距仍然為 (40, 40)
Frame
Frame的值,是根據superView的座標系統而來。superView的左上角為原點(0, 0)。
- 左邊的圖中,blueView是redView的superView,所以redView.frame的值為( 40, 40, 100, 100)。
- 右邊的圖中,redView是greenView的superView,所以greenView.frame的值為( 40, 40, 50, 50)。
Bounds
Bounds的值,根據自身的座標系統而來。即初始化狀態自身左上角為原點(0, 0)。
- 左邊的圖中,blueView.bounds的值為( 0, 0, 100, 100)
- 右邊的圖中,greenView.bounds值為(40, 40, 50, 50)
座標轉換
 <img class="alignnone wp-image-631 size-medium" src="https://ios.devdon.com/wp-content/uploads/2017/03/UIView-e1489906143473-300x296.png" alt="" width="300" height="296" srcset="https://ios.devdon.com/wp-content/uploads/2017/03/UIView-e1489906143473-300x296.png 300w, https://ios.devdon.com/wp-content/uploads/2017/03/UIView-e1489906143473.png 642w" sizes="(max-width: 300px) 100vw, 300px" />
還是這張圖,我們可以很容易得到一個View相對superView的座標(通過「.frame」),但請思考看看。
- 如何取得grrenView在blueView座標體系中的frame?
- 畫面中View的間距是 40。
CALayer給不同座標系之間的圖層轉換提供了一些方法,通過這些方法可以快速的進行座標的轉換。
    open func convert(_ point: CGPoint, to view: UIView?) -> CGPoint
    open func convert(_ point: CGPoint, from view: UIView?) -> CGPoint
    open func convert(_ rect: CGRect, to view: UIView?) -> CGRect
    open func convert(_ rect: CGRect, from view: UIView?) -> CGRect
我們要如何拿到greenView在blueView座標體系中的frame呢?
如果直接print(greenView.frame)我們會得到( 40, 40, 80, 80),因為greenView的superView是redView。
那麼我們要拿到greenView位於blueView座標體系中的frame,就可以通過下面兩個方法。
convertedFrame = blueView.convert(greenView.frame, from: redView)
convertedFrame = redView.convert(greenView.frame, to: view)
此時print(convertedFrame) 會得到 ( 120, 120, 80, 80)。
判斷包含或重疊狀況
 <img class="alignnone wp-image-631 size-medium" src="https://ios.devdon.com/wp-content/uploads/2017/03/UIView-e1489906143473-300x296.png" alt="" width="300" height="296" srcset="https://ios.devdon.com/wp-content/uploads/2017/03/UIView-e1489906143473-300x296.png 300w, https://ios.devdon.com/wp-content/uploads/2017/03/UIView-e1489906143473.png 642w" sizes="(max-width: 300px) 100vw, 300px" />
在同一個座標系中
判斷是否包含
func contains(_ rect2: CGRect) -> Bool根據上圖的例子:
        // contain test
        var isContain = false
        isContain = blueView.subviews.contains(redView) // true
        isContain = blueView.subviews.contains(greenView) // false
        isContain = greenView.subviews.contains(redView) // false
判斷是否重疊
func intersects(_ rect2: CGRect) -> Bool根據上圖的例子:
        var isIntersect = false
        isIntersect = blueView.frame.intersects(redView.frame) // ture
        isIntersect = blueView.frame.intersects(greenView.frame) // true
Playground
為了方便你更好的研究座標轉換的關係,建議可以在playground上操作試試看。
import UIKit
import PlaygroundSupport


class CoordinateController: UIViewController {
    override func viewDidLoad() {
        view.frame = CGRect(x: 0, y: 0, width: 320, height: 320)
        view.backgroundColor = UIColor.lightGray

        // blueView
        let blueView = UIView(frame: CGRect(x: 40, y: 40, width: 240, height: 240))
        blueView.backgroundColor = UIColor(red: 74/255, green: 144/255, blue: 226/255, alpha: 1)
        view.addSubview(blueView)

        // redView
        let redView = UIView(frame: CGRect(x: 40, y: 40, width: 160, height: 160))
        redView.backgroundColor = UIColor(red: 246/255, green: 110/255, blue: 101/255, alpha: 1)
        blueView.addSubview(redView)

        // greenView
        let greenView = UIView(frame: CGRect(x: 40, y: 40, width: 80, height: 80))
        greenView.backgroundColor = UIColor(red: 80/255, green: 227/255, blue: 194/255, alpha: 1)
        redView.addSubview(greenView)

        // whiteBox & convertedFrame
        let whiteBoxView = UIView(frame: CGRect(x: 20, y: 20, width: 100, height: 40))
        whiteBoxView.backgroundColor = UIColor.white
        whiteBoxView.layer.borderColor = UIColor.black.cgColor
        whiteBoxView.layer.borderWidth = 2
//        blueView.addSubview(whiteBoxView)

        var convertedFrame = CGRect.zero

        // convert
        convertedFrame = view.convert(whiteBoxView.frame, from: blueView)
//        convertedFrame = blueView.convert(whiteBoxView.frame, to: view)
//        convertedFrame = view.convert(greenView.frame, from: redView)
//        convertedFrame = redView.convert(greenView.frame, to: view)
//        convertedFrame = view.convert(redView.frame, from: blueView)
//        convertedFrame = blueView.convert(greenView.frame, from: redView)


        // add randomFrame
        whiteBoxView.frame = convertedFrame
        view.addSubview(whiteBoxView)


    }
}

var viewController = CoordinateController()
PlaygroundPage.current.liveView = viewController.view
推薦和參考
- 歡迎分享本文「UIView座標系統」 – https://ios.devdon.com/archives/620
- Apple Coordinate system
