

最近在研究java源码,就是看一看别人写好的东西,也不算是研究。知根知底的对以后的学习会有很大的帮助,我先去了解一下java集合框架,从总体上对这个组织和操作数据的数据结构有个浅显得的了解。
从网上看了很多资料,发现这一张图总结的还算不错就引用过来了。但是最上面的Map和Collection之间的关系应该是依赖,不是Produces。

一、java集合框架概述
从上面的集合框架图可以看到,Java集合框架主要包括两种类型的容器.
一种是集合(Collection),存储一个元素集合,另一种是图(Map),存储键/值对映射。Collection接口又有3种子类型,List、Set和Queue,再下面是一些抽象类,最后是具体实现类,常用的有ArrayList、LinkedList、HashSet、LinkedHashSet、HashMap、LinkedHashMap等等.
二、Collection接口
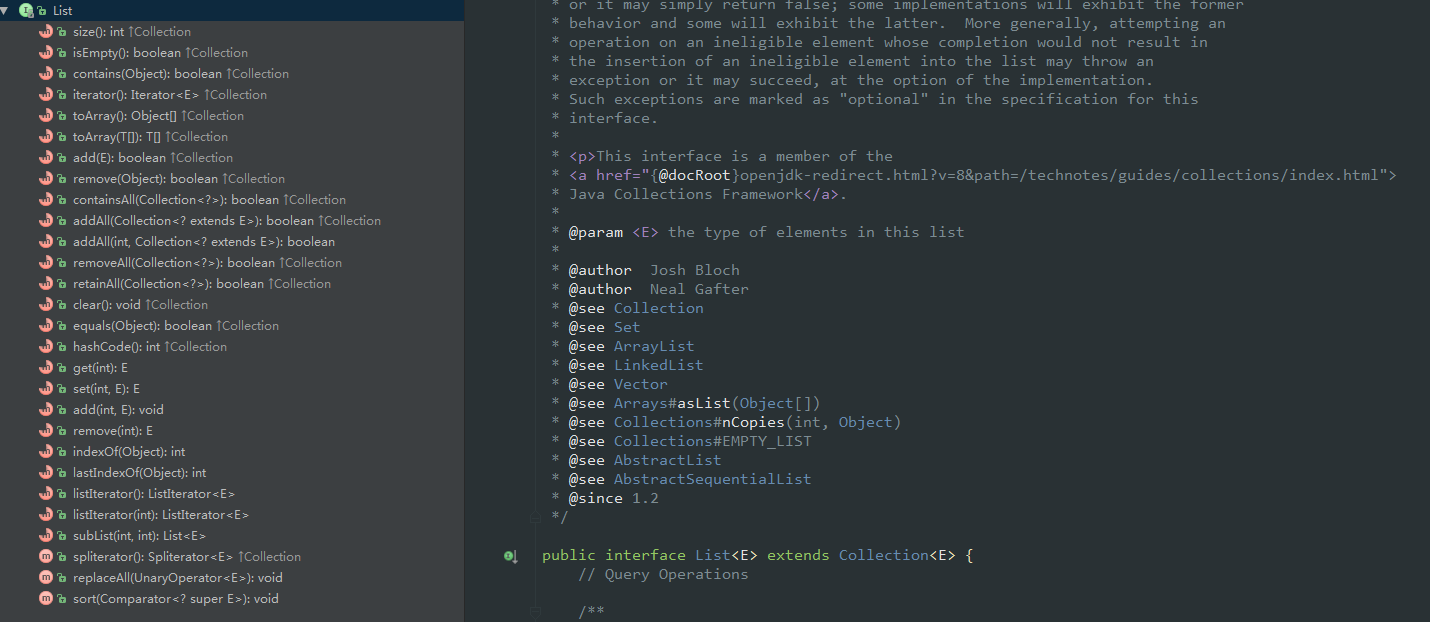
首先看一下Collection的结构:

Collection接口是处理对象集合的根接口,其中定义了很多对元素进行操作的方法,AbstractCollection是提供Collection部分实现的抽象类。上图展示了Collection接口中的全部方法。
有几个比较常用的方法,比如方法:
- add()添加一个元素到集合中,
- addAll()将指定集合中的所有元素添加到集合中,
- contains()方法检测集合中是否包含指定的元素,
- toArray()方法返回一个表示集合的数组。
Collection接口有三个子接口,下面详细介绍。
1.List
List接口扩展自Collection,它可以定义一个允许重复的有序集合,从List接口中的方法来看,List接口主要是增加了面向位置的操作,允许在指定位置上操作元素,同时增加了一个能够双向遍历线性表的新列表迭代器ListIterator。AbstractList类提供了List接口的部分实现,AbstractSequentialList扩展自AbstractList,主要是提供对链表的支持。下面介绍List接口的两个重要的具体实现类,也是我们可能最常用的类,ArrayList和LinkedList。
ArrayList
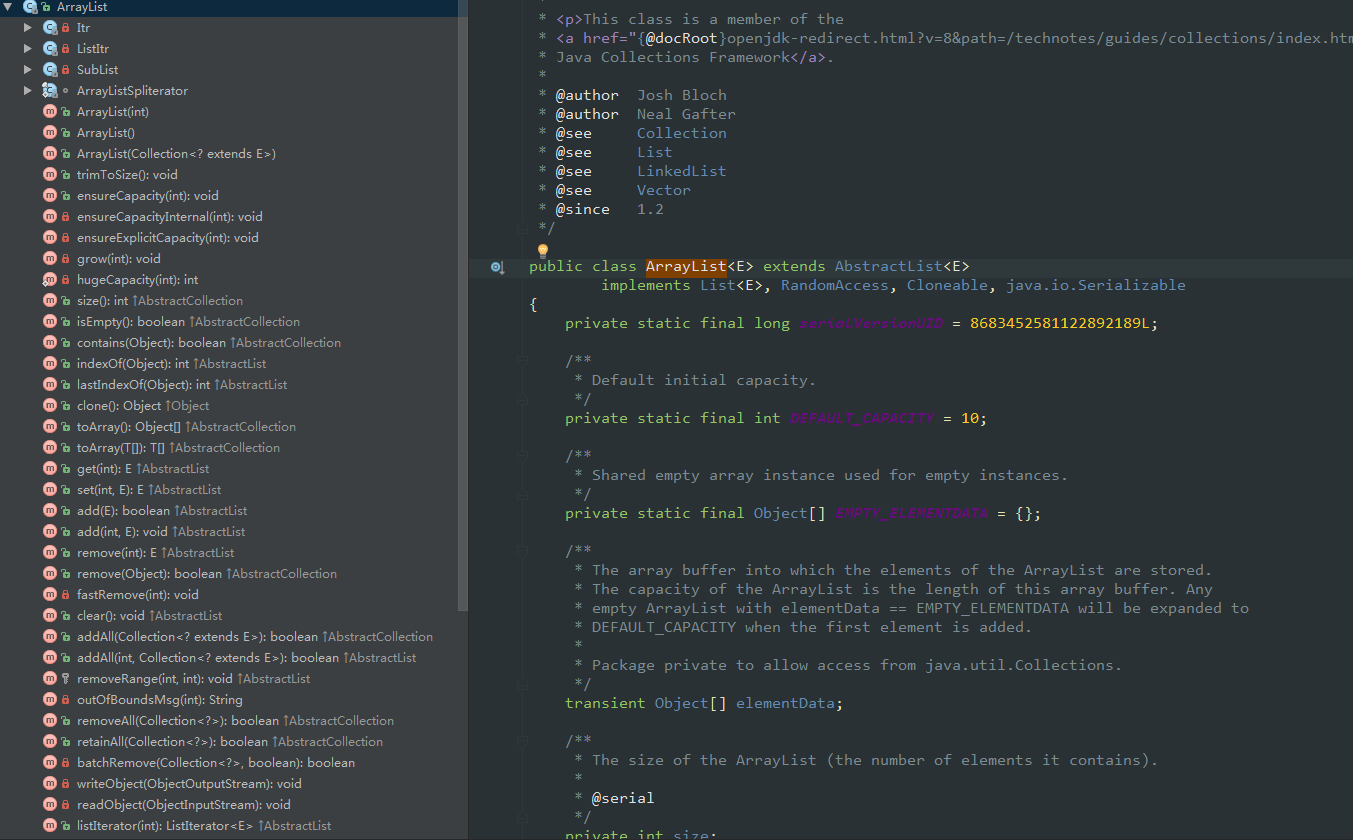
通过查看ArrayList的源码,我们可以很清楚地看到里面的逻辑,它是用数组存储元素的,这个数组可以动态创建,如果元素个数超过了数组的容量,那么就创建一个更大的新数组(可以看出默认是10个),并将当前数组中的所有元素都复制到新数组中。假设第一次是集合没有任何元素,下面以插入一个元素为例看看源码的实现。
1、方法add(int index, E element) 向集合中指定位置添加指定元素。
  public void add(int index, E element) {
        if (index > size || index < 0)
            throw new IndexOutOfBoundsException(outOfBoundsMsg(index));

        ensureCapacityInternal(size + 1);  // Increments modCount!!
        System.arraycopy(elementData, index, elementData, index + 1,
                         size - index);
        elementData[index] = element;
        size++;
    }
2、此方法主要是确定将要创建的数组大小。
 private void ensureCapacityInternal(int minCapacity) {
        if (elementData == EMPTY_ELEMENTDATA) {
            minCapacity = Math.max(DEFAULT_CAPACITY, minCapacity);
        }

        ensureExplicitCapacity(minCapacity);
    }

    private void ensureExplicitCapacity(int minCapacity) {
        modCount++;

        // overflow-conscious code
        if (minCapacity - elementData.length > 0)
            grow(minCapacity);
    }
3、之后是创建数组,可以明显的看到先是确定了添加元素后的大小之后将元素复制到新数组中。
  private void grow(int minCapacity) {
        // overflow-conscious code
        int oldCapacity = elementData.length;
        int newCapacity = oldCapacity + (oldCapacity >> 1);
        if (newCapacity - minCapacity < 0)
            newCapacity = minCapacity;
        if (newCapacity - MAX_ARRAY_SIZE > 0)
            newCapacity = hugeCapacity(minCapacity);
        // minCapacity is usually close to size, so this is a win:
        elementData = Arrays.copyOf(elementData, newCapacity);
    }
4、最后是处理数组,System.arraycopy()可以使用它来实现数组之间的复制,将元素复制到新数组中。
/**
     * The char[] specialized version of arraycopy().
     *
     * @hide internal use only
     */
    public static void arraycopy(char[] src, int srcPos, char[] dst, int dstPos, int length) {
        if (src == null) {
            throw new NullPointerException("src == null");
        }
        if (dst == null) {
            throw new NullPointerException("dst == null");
        }
        if (srcPos < 0 || dstPos < 0 || length < 0 ||
            srcPos > src.length - length || dstPos > dst.length - length) {
            throw new ArrayIndexOutOfBoundsException(
                "src.length=" + src.length + " srcPos=" + srcPos +
                " dst.length=" + dst.length + " dstPos=" + dstPos + " length=" + length);
        }
        if (length <= ARRAYCOPY_SHORT_CHAR_ARRAY_THRESHOLD) {
            // Copy char by char for shorter arrays.
            if (src == dst && srcPos < dstPos && dstPos < srcPos + length) {
                // Copy backward (to avoid overwriting elements before
                // they are copied in case of an overlap on the same
                // array.)
                for (int i = length - 1; i >= 0; --i) {
                    dst[dstPos + i] = src[srcPos + i];
                }
            } else {
                // Copy forward.
                for (int i = 0; i < length; ++i) {
                    dst[dstPos + i] = src[srcPos + i];
                }
            }
        } else {
            // Call the native version for longer arrays.
            arraycopyCharUnchecked(src, srcPos, dst, dstPos, length);
        }
    }
LinkedList
LinkedList是在一个链表中存储元素。
在学习数据结构的时候,我们知道链表和数组的最大区别在于它们对元素的存储方式的不同导致它们在对数据进行不同操作时的效率不同,同样,ArrayList与LinkedList也是如此,实际使用中我们需要根据特定的需求选用合适的类,如果除了在末尾外不能在其他位置插入或者删除元素,那么ArrayList效率更高,如果需要经常插入或者删除元素,就选择LinkedList。
2.Set
Set接口扩展自Collection,它与List的不同之处在于,规定Set的实例不包含重复的元素。在一个规则集内,一定不存在两个相等的元素。AbstractSet是一个实现Set接口的抽象类,Set接口有三个具体实现类,分别是散列集HashSet、链式散列集LinkedHashSet和树形集TreeSet。
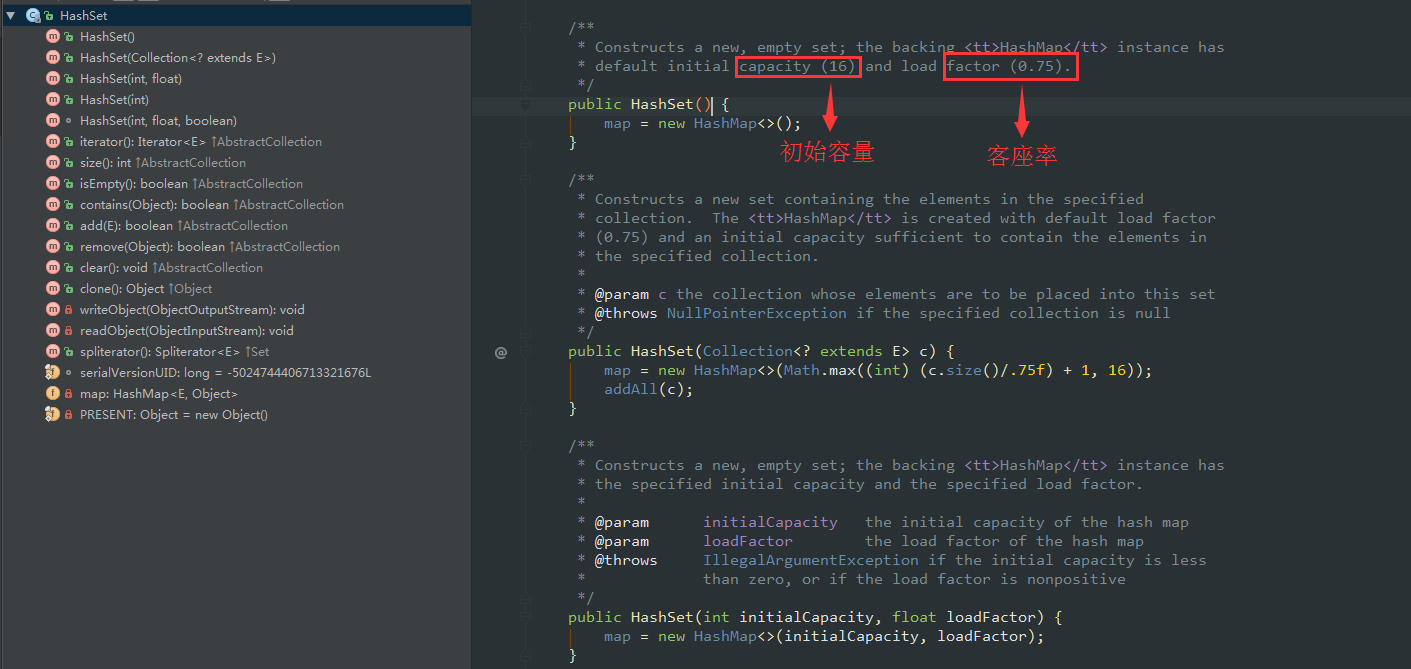
HashSet
散列集HashSet是一个用于实现Set接口的具体类,可以使用它的无参构造方法来创建空的散列集,也可以由一个现有的集合创建散列集。在散列集中,有两个名词需要关注,初始容量和客座率。客座率是确定在增加规则集之前,该规则集的饱满程度,当元素个数超过了容量与客座率的乘积时,容量就会自动翻倍。
下面看一个HashSet的例子。
import java.util.HashSet;
import java.util.Set;
/**
 * @author ShanCanCan
 */
public class HashSetTest {
    public static void main(String[] args) {

        Set<String> set = new HashSet<>();

        set.add("11111");
        set.add("22222");
        set.add("33333");
        set.add("44444");
        set.add("22222");
        set.add("99999");
        set.add("00000");

        System.out.println(set.size());

        for (String e : set) {
            System.out.println(e);
        }

    }
}
看一下输出结果:

从输出结果我们可以看到,规则集里最后有6个元素,而且在输出时元素还是无序的。
LinkedHashSet
LinkedHashSet是用一个链表实现来扩展HashSet类,它支持对规则集内的元素排序。HashSet中的元素是没有被排序的,而LinkedHashSet中的元素可以按照它们插入规则集的顺序提取。

TreeSet
TreeSet扩展自AbstractSet,并实现了NavigableSet,AbstractSet扩展自AbstractCollection,树形集是一个有序的Set,其底层是一颗树,这样就能从Set里面提取一个有序序列了。在实例化TreeSet时,我们可以给TreeSet指定一个比较器Comparator来指定树形集中的元素顺序。树形集中提供了很多便捷的方法。
下面是一个TreeSet的例子。
import java.util.TreeSet;
/**
* @author ShanCanCan
*/
public class TreeSetTest {
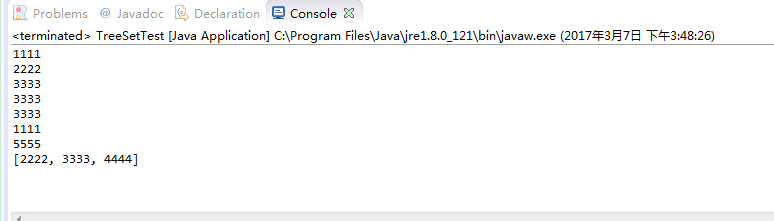
public static void main(String[] args) {
TreeSet<Integer> set = new TreeSet<>();
set.add(1111);
set.add(2222);
set.add(3333);
set.add(4444);
set.add(5555);
System.out.println(set.first()); // 输出第一个元素
System.out.println(set.lower(3333)); // 小于3333的最大元素
System.out.println(set.higher(2222)); // 大于2222的最大元素
System.out.println(set.floor(3333)); // 不大于3333的最大元素
System.out.println(set.ceiling(3333)); // 不小于3333的最大元素
System.out.println(set.pollFirst()); // 删除第一个元素
System.out.println(set.pollLast()); // 删除最后一个元素
System.out.println(set);
}
}看一下输出结果:
3.Queue
队列是一种先进先出的数据结构,元素在队列末尾添加,在队列头部删除。Queue接口扩展自Collection,并提供插入、提取、检验等操作。

上图中,方法offer表示向队列添加一个元素,poll()与remove()方法都是移除队列头部的元素,两者的区别在于如果队列为空,那么poll()返回的是null,而remove()会抛出一个异常。方法element()与peek()主要是获取头部元素,不删除。
接口Deque,是一个扩展自Queue的双端队列,它支持在两端插入和删除元素,因为LinkedList类实现了Deque接口,所以通常我们可以使用LinkedList来创建一个队列。PriorityQueue类实现了一个优先队列,优先队列中元素被赋予优先级,拥有高优先级的先被删除。
下面是一个Queue的例子。
import java.util.LinkedList;
import java.util.Queue;
/**
 * @author ShanCanCan
 */
public class QueueTest {
    public static void main(String[] args) {

        Queue<String> queue = new LinkedList<>();

        queue.offer("aaaa");
        queue.offer("bbbb");
        queue.offer("cccc");
        queue.offer("dddd");
        queue.offer("eeee");
        queue.offer("ffff");

        while (queue.size() > 0) {
            System.out.println(queue.remove() + "");
        }
    }
}
看一下输出结果:

三、Map接口
Map,图,是一种存储键值对映射的容器类,在Map中键可以是任意类型的对象,但不能有重复的键,每个键都对应一个值,真正存储在图中的是键值构成的条目。
下面是接口Map的类结构。
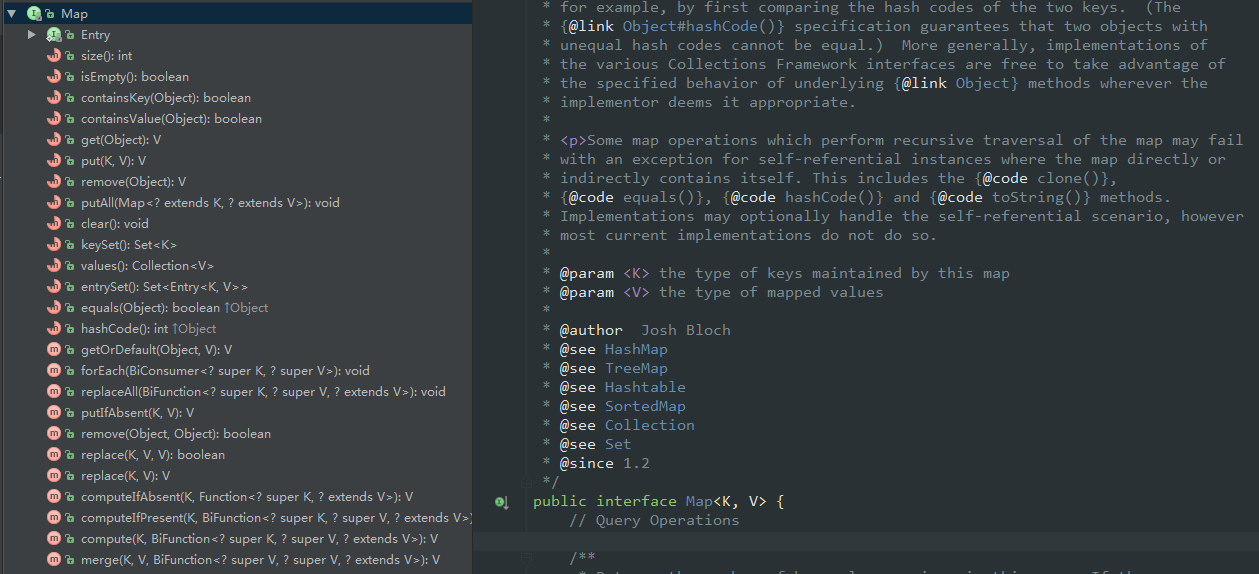
从上面这张图中我们可以看到接口Map提供了很多查询、更新和获取存储的键值对的方法,更新包括方法clear()、put()、putAll()、remove()等等,查询方法包括containsKey、containsValue等等。Map接口常用的有三个具体实现类,分别是HashMap、LinkedHashMap、TreeMap。
1.HashMap
HashMap是基于哈希表的Map接口的非同步实现,继承自AbstractMap,AbstractMap是部分实现Map接口的抽象类。在平时的开发中,HashMap的使用还是比较多的。我们知道ArrayList主要是用数组来存储元素的,LinkedList是用链表来存储的,那么HashMap的实现原理是什么呢?先看下面这张图:
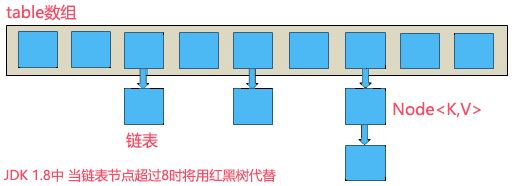
在之前的版本中,HashMap采用数组+链表实现,即使用链表处理冲突,同一hash值的链表都存储在一个链表里。但是当链表中的元素较多,即hash值相等的元素较多时,通过key值依次查找的效率较低。而JDK1.8中,HashMap采用数组+链表+红黑树实现,当链表长度超过阈值(8)时,将链表转换为红黑树,这样大大减少了查找时间。
下面主要通过源码介绍一下它的实现原理。
HashMap存储元素的数组
transient HashMapEntry<K,V>[] table = (HashMapEntry<K,V>[]) EMPTY_TABLE;
数组的元素类型是HashMapEntry
/** @hide */  // Android added.
    static class HashMapEntry<K,V> implements Map.Entry<K,V> {
        final K key;
        V value;
        HashMapEntry<K,V> next;
        int hash;

        /**
         * Creates new entry.
         */
        HashMapEntry(int h, K k, V v, HashMapEntry<K,V> n) {
            value = v;
            next = n;
            key = k;
            hash = h;
        }

        public final K getKey() {
            return key;
        }

        public final V getValue() {
            return value;
        }

        public final V setValue(V newValue) {
            V oldValue = value;
            value = newValue;
            return oldValue;
        }

        public final boolean equals(Object o) {
            if (!(o instanceof Map.Entry))
                return false;
            Map.Entry e = (Map.Entry)o;
            Object k1 = getKey();
            Object k2 = e.getKey();
            if (k1 == k2 || (k1 != null && k1.equals(k2))) {
                Object v1 = getValue();
                Object v2 = e.getValue();
                if (v1 == v2 || (v1 != null && v1.equals(v2)))
                    return true;
            }
            return false;
        }

        public final int hashCode() {
            return Objects.hashCode(getKey()) ^ Objects.hashCode(getValue());
        }
接下来我们看下HashMap的put操作。
    /**
     * Associates the specified value with the specified key in this map.
     * If the map previously contained a mapping for the key, the old
     * value is replaced.
     *
     * @param key key with which the specified value is to be associated
     * @param value value to be associated with the specified key
     * @return the previous value associated with <tt>key</tt>, or
     *         <tt>null</tt> if there was no mapping for <tt>key</tt>.
     *         (A <tt>null</tt> return can also indicate that the map
     *         previously associated <tt>null</tt> with <tt>key</tt>.)
     */
    public V put(K key, V value) {
        if (table == EMPTY_TABLE) {
            inflateTable(threshold);
        }
        if (key == null)
            return putForNullKey(value);
        int hash = sun.misc.Hashing.singleWordWangJenkinsHash(key);
        int i = indexFor(hash, table.length);
        for (HashMapEntry<K,V> e = table[i]; e != null; e = e.next) {
            Object k;
            if (e.hash == hash && ((k = e.key) == key || key.equals(k))) {
                V oldValue = e.value;
                e.value = value;
                e.recordAccess(this);
                return oldValue;
            }
        }

        modCount++;
        addEntry(hash, key, value, i);
        return null;
    }
     /**
     * Offloaded version of put for null keys
     */
    private V putForNullKey(V value) {
        for (HashMapEntry<K,V> e = table[0]; e != null; e = e.next) {
            if (e.key == null) {
                V oldValue = e.value;
                e.value = value;
                e.recordAccess(this);
                return oldValue;
            }
        }
        modCount++;
        addEntry(0, null, value, 0);
        return null;
    }
接下来我们看下HashMap的get操作。
 /**
     * Returns the value to which the specified key is mapped,
     * or {@code null} if this map contains no mapping for the key.
     *
     * <p>More formally, if this map contains a mapping from a key
     * {@code k} to a value {@code v} such that {@code (key==null ? k==null :
     * key.equals(k))}, then this method returns {@code v}; otherwise
     * it returns {@code null}.  (There can be at most one such mapping.)
     *
     * <p>A return value of {@code null} does not <i>necessarily</i>
     * indicate that the map contains no mapping for the key; it's also
     * possible that the map explicitly maps the key to {@code null}.
     * The {@link #containsKey containsKey} operation may be used to
     * distinguish these two cases.
     *
     * @see #put(Object, Object)
     */
    public V get(Object key) {
        if (key == null)
            return getForNullKey();
        Entry<K,V> entry = getEntry(key);

        return null == entry ? null : entry.getValue();
    }

    /**
     * Offloaded version of get() to look up null keys.  Null keys map
     * to index 0.  This null case is split out into separate methods
     * for the sake of performance in the two most commonly used
     * operations (get and put), but incorporated with conditionals in
     * others.
     */
    private V getForNullKey() {
        if (size == 0) {
            return null;
        }
        for (HashMapEntry<K,V> e = table[0]; e != null; e = e.next) {
            if (e.key == null)
                return e.value;
        }
        return null;
    }

    /**
     * Returns <tt>true</tt> if this map contains a mapping for the
     * specified key.
     *
     * @param   key   The key whose presence in this map is to be tested
     * @return <tt>true</tt> if this map contains a mapping for the specified
     * key.
     */
    public boolean containsKey(Object key) {
        return getEntry(key) != null;
    }

    /**
     * Returns the entry associated with the specified key in the
     * HashMap.  Returns null if the HashMap contains no mapping
     * for the key.
     */
    final Entry<K,V> getEntry(Object key) {
        if (size == 0) {
            return null;
        }

        int hash = (key == null) ? 0 : sun.misc.Hashing.singleWordWangJenkinsHash(key);
        for (HashMapEntry<K,V> e = table[indexFor(hash, table.length)];
             e != null;
             e = e.next) {
            Object k;
            if (e.hash == hash &&
                ((k = e.key) == key || (key != null && key.equals(k))))
                return e;
        }
        return null;
    }
到这里HashMap的大致实现原理应该很清楚了,有几个需要关注的重点是:HashMap存储元素的方式以及根据Hash值确定映射在数组中的位置还有JDK 1.8之后加入的红黑树的。
在HashMap中要找到某个元素,需要根据key的hash值来求得对应数组中的位置。对于任意给定的对象,只要它的hashCode()返回值相同,那么程序调用hash(int h)方法所计算得到的hash码值总是相同的。我们首先想到的就是把hash值对数组长度取模运算,这样一来,元素的分布相对来说是比较均匀的。但是,“模”运算的消耗还是比较大的,在HashMap中,(n - 1) & hash 用于计算对象应该保存在table数组的哪个索引处。HashMap底层数组的长度总是2的n次方,当数组长度为2的n次幂的时候,(n - 1) & hash 算得的index相同的几率较小,数据在数组上分布就比较均匀,也就是说碰撞的几率小,相对的,查询的时候就不用遍历某个位置上的链表,这样查询效率也就较高了。
2.LinkedHashMap
LinkedHashMap继承自HashMap,它主要是用链表实现来扩展HashMap类,HashMap中条目是没有顺序的,但是在LinkedHashMap中元素既可以按照它们插入图的顺序排序,也可以按它们最后一次被访问的顺序排序。
3.TreeMap
TreeMap基于红黑树数据结构的实现,键值可以使用Comparable或Comparator接口来排序。TreeMap继承自AbstractMap,同时实现了接口NavigableMap,而接口NavigableMap则继承自SortedMap。SortedMap是Map的子接口,使用它可以确保图中的条目是排好序的。
在实际使用中,如果更新图时不需要保持图中元素的顺序,就使用HashMap,如果需要保持图中元素的插入顺序或者访问顺序,就使用LinkedHashMap,如果需要使图按照键值排序,就使用TreeMap。
四、其它集合类
上面主要对Java集合框架作了详细的介绍,包括Collection和Map两个接口及它们的抽象类和常用的具体实现类,下面主要介绍一下其它几个特殊的集合类,Vector、Stack、HashTable、ConcurrentHashMap以及CopyOnWriteArrayList。
1.Vector
前面我们已经提到,Java设计者们在对之前的容器类进行重新设计时保留了一些数据结构,其中就有Vector。用法上,Vector与ArrayList基本一致,不同之处在于Vector使用了关键字synchronized将访问和修改向量的方法都变成同步的了,所以对于不需要同步的应用程序来说,类ArrayList比类Vector更高效。
2.Stack
Stack,栈类,是Java2之前引入的,继承自类Vector。
3.HashTable
HashTable和前面介绍的HashMap很类似,它也是一个散列表,存储的内容是键值对映射,不同之处在于,HashTable是继承自Dictionary的,HashTable中的函数都是同步的,这意味着它也是线程安全的,另外,HashTable中key和value都不可以为null。
上面的三个集合类都是在Java2之前推出的容器类,可以看到,尽管在使用中效率比较低,但是它们都是线程安全的。下面介绍两个特殊的集合类。
4.ConcurrentHashMap
Concurrent,并发,从名字就可以看出来ConcurrentHashMap是HashMap的线程安全版。同HashMap相比,ConcurrentHashMap不仅保证了访问的线程安全性,而且在效率上与HashTable相比,也有较大的提高。关于ConcurrentHashMap的设计,我将会在下一篇关于并发编程的博客中介绍,敬请关注。
5.CopyOnWriteArrayList
CopyOnWriteArrayList,是一个线程安全的List接口的实现,它使用了ReentrantLock锁来保证在并发情况下提供高性能的并发读取。
五、总结
到这里,对于Java集合框架的总结就结束了,还有很多集合类没有在这里提到,更多的还是需要大家自己去查去用。通过阅读源码,查阅资料,收获很大。
-
Java集合框架主要包括Collection和Map两种类型。其中Collection又有3种子类型,分别是List、Set、Queue。Map中存储的主要是键值对映射。
-
规则集Set中存储的是不重复的元素,线性表中存储可以包括重复的元素,Queue队列描述的是先进先出的数据结构,可以用LinkedList来实现队列。效率上,规则集比线性表更高效。
-
ArrayList主要是用数组来存储元素,LinkedList主要是用链表来存储元素,HashMap的底层实现主要是借助数组+链表+红黑树来实现。
-
Vector、HashTable等集合类效率比较低但都是线程安全的。包java.util.concurrent下包含了大量线程安全的集合类,效率上有较大提升。
本文引用了简书文章,但是对里面的内容做了很多更新,源码均来自jdk1.8.0_121。可以给你带来更新,更好的理解。
