

本文接之前的《Spring Cloud构建微服务架构(四)分布式配置中心》,继续来说说Spring Cloud Config的使用。
先来回顾一下,在前文中我们完成了什么:
- 构建了config-server,连接到Git仓库
- 在Git上创建了一个config-repo目录,用来存储配置信息
- 构建了config-client,来获取Git中的配置信息
在本文中,我们继续来看看Spring Cloud Config的一些其他能力。
高可用问题
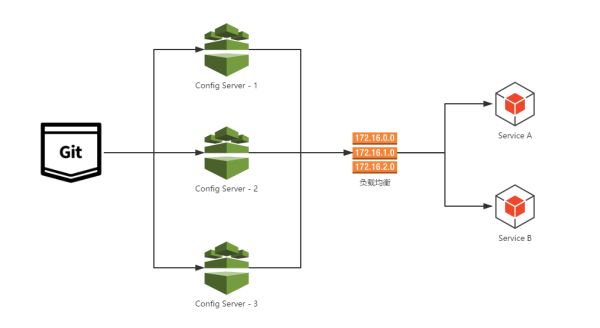
传统作法
通常在生产环境,Config Server与服务注册中心一样,我们也需要将其扩展为高可用的集群。在之前实现的config-server基础上来实现高可用非常简单,不需要我们为这些服务端做任何额外的配置,只需要遵守一个配置规则:将所有的Config Server都指向同一个Git仓库,这样所有的配置内容就通过统一的共享文件系统来维护,而客户端在指定Config Server位置时,只要配置Config Server外的均衡负载即可,就像如下图所示的结构:
注册为服务
虽然通过服务端负载均衡已经能够实现,但是作为架构内的配置管理,本身其实也是可以看作架构中的一个微服务。所以,另外一种方式更为简单的方法就是把config-server也注册为服务,这样所有客户端就能以服务的方式进行访问。通过这种方法,只需要启动多个指向同一Git仓库位置的config-server就能实现高可用了。
配置过程也非常简单,具体如下:
config-server配置
- 在pom.xml的dependencies节点中引入如下依赖,相比之前的config-server就,加入了spring-cloud-starter-eureka,用来注册服务
		org.springframework.cloud
		spring-cloud-config-server


		org.springframework.cloud
		spring-cloud-starter-eureka
- 在application.properties中配置参数eureka.client.serviceUrl.defaultZone以指定服务注册中心的位置,详细内容如下:
spring.application.name=config-server
server.port=7001
# 配置服务注册中心
eureka.client.serviceUrl.defaultZone=http://localhost:1111/eureka/
# git仓库配置
spring.cloud.config.server.git.uri=http://git.oschina.net/didispace/SpringCloud-Learning/
spring.cloud.config.server.git.searchPaths=Chapter1-1-8/config-repo
spring.cloud.config.server.git.username=username
spring.cloud.config.server.git.password=password
- 在应用主类中,新增@EnableDiscoveryClient注解,用来将config-server注册到上面配置的服务注册中心上去。
@EnableDiscoveryClient
@EnableConfigServer
@SpringBootApplication
public class Application {
	public static void main(String[] args) {
		new SpringApplicationBuilder(Application.class).web(true).run(args);
	}
}
- 启动该应用,并访问http://localhost:1111/,可以在Eureka Server的信息面板中看到config-server已经被注册了。

config-client配置
- 同config-server一样,在pom.xml的dependencies节点中新增spring-cloud-starter-eureka依赖,用来注册服务:
		org.springframework.boot
		spring-boot-starter-web


		org.springframework.cloud
		spring-cloud-starter-config


		org.springframework.cloud
		spring-cloud-starter-eureka
- 在bootstrap.properties中,按如下配置:
spring.application.name=didispace
server.port=7002
eureka.client.serviceUrl.defaultZone=http://localhost:1111/eureka/
spring.cloud.config.discovery.enabled=true
spring.cloud.config.discovery.serviceId=config-server
spring.cloud.config.profile=dev
其中,通过eureka.client.serviceUrl.defaultZone参数指定服务注册中心,用于服务的注册与发现,再将spring.cloud.config.discovery.enabled参数设置为true,开启通过服务来访问Config Server的功能,最后利用spring.cloud.config.discovery.serviceId参数来指定Config Server注册的服务名。这里的spring.application.name和spring.cloud.config.profile如之前通过URI的方式访问时候一样,用来定位Git中的资源。
- 在应用主类中,增加@EnableDiscoveryClient注解,用来发现config-server服务,利用其来加载应用配置
@EnableDiscoveryClient
@SpringBootApplication
public class Application {
	public static void main(String[] args) {
		new SpringApplicationBuilder(Application.class).web(true).run(args);
	}
}
- 沿用之前我们创建的Controller来加载Git中的配置信息
@RefreshScope
@RestController
public class TestController {
    @Value("${from}")
    private String from;
    @RequestMapping("/from")
    public String from() {
        return this.from;
    }
}
- 完成了上述配置之后,我们启动该客户端应用。若启动成功,访问http://localhost:1111/,可以在Eureka Server的信息面板中看到该应用已经被注册成功了。

- 访问客户端应用提供的服务:http://localhost:7002/from,此时,我们会返回在Git仓库中didispace-dev.properties文件配置的from属性内容:”git-dev-1.0”。
配置刷新
有时候,我们需要对配置内容做一些实时更新的场景,那么Spring Cloud Config是否可以实现呢?答案显然是可以的。下面,我们看看如何进行改造来实现配置内容的实时更新。
在改造程序之前,我们先将config-server和config-client都启动起来,并访问客户端提供的REST APIhttp://localhost:7002/from来获取配置信息,可以获得返回内容为:git-dev-1.0。接着,我们可以尝试使用Git工具修改当前配置的内容,比如,将config-repo/didispace-dev.properties中的from的值从from=git-dev-1.0修改为from=git-dev-2.0,再访问http://localhost:7002/from,可以看到其返回内容还是git-dev-1.0。
下面,我们将在config-client端增加一些内容和操作以实现配置的刷新:
- 在config-clinet的pom.xml中新增spring-boot-starter-actuator监控模块,其中包含了/refresh刷新API。
    org.springframework.boot
    spring-boot-starter-actuator
- 重新启动config-clinet,访问一次http://localhost:7002/from,可以看到当前的配置值
- 修改Git仓库config-repo/didispace-dev.properties文件中from的值
- 再次访问一次http://localhost:7002/from,可以看到配置值没有改变
- 通过POST请求发送到http://localhost:7002/refresh,我们可以看到返回内容如下,代表from参数的配置内容被更新了
[
  "from"
]
- 再次访问一次http://localhost:7002/from,可以看到配置值已经是更新后的值了
通过上面的介绍,大家不难想到,该功能还可以同Git仓库的Web Hook功能进行关联,当有Git提交变化时,就给对应的配置主机发送/refresh请求来实现配置信息的实时更新。但是,当我们的系统发展壮大之后,维护这样的刷新清单也将成为一个非常大的负担,而且很容易犯错,那么有什么办法可以解决这个复杂度呢?后续我们将继续介绍如何通过Spring Cloud Bus来实现以消息总线的方式进行通知配置信息的变化,完成集群上的自动化更新。
本文完整示例:
往期文章
- Spring Cloud构建微服务架构(四)分布式配置中心
- Spring Cloud构建微服务架构(三)断路器
- Spring Cloud构建微服务架构(二)服务消费者
- Spring Cloud构建微服务架构(一)服务注册与发现
本文由 程序猿DD-翟永超 创作,采用 CC BY 3.0 CN协议 进行许可。 可自由转载、引用,但需署名作者且注明文章出处。如转载至微信公众号,请在文末添加作者公众号二维码。

