

这两天一直在忙一个Android studio插件的事,为的是简化android开发,所以在这里我总结一下关于插件开发的相关知识,感兴趣的开发者可以自己试一下,对于一个android开发者来说还是很有必要的。
准备
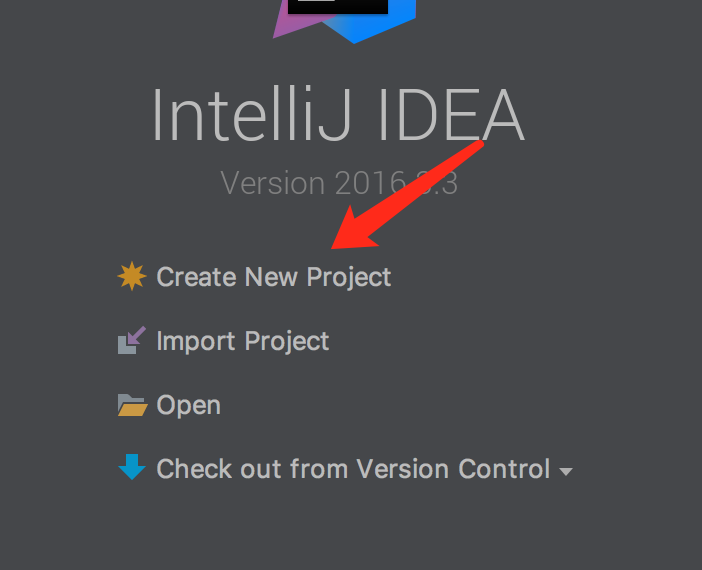
android studio的插件开发必须用IntelliJ IDEA,不能直接在android studio中直接开发,所以首先下载IntelliJ IDEA。
创建新工程
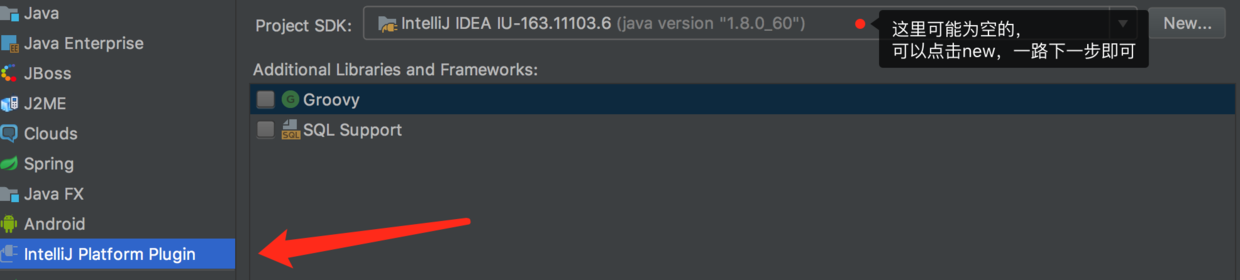
选择工程类型:
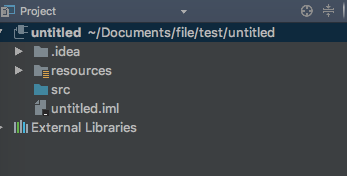
创建完毕
创建一个行为
右键点击src,New->Action(在偏下面的位置)
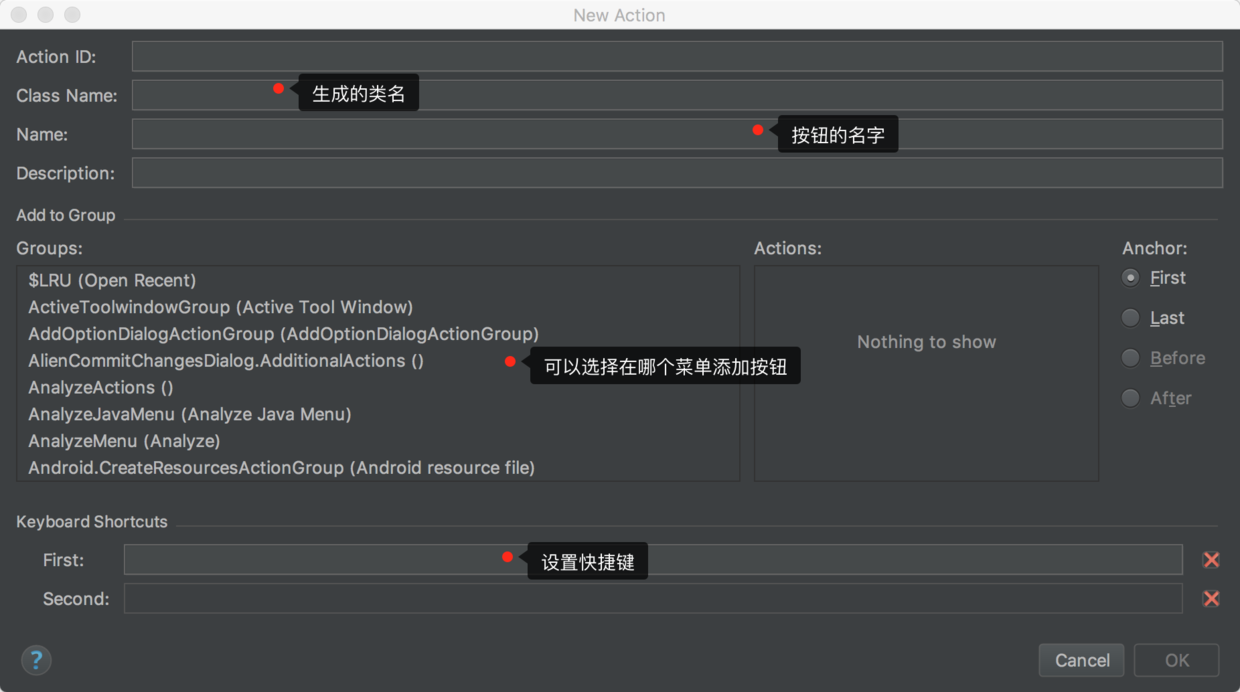
在弹出的对话框(如上图所示)中填写内容:
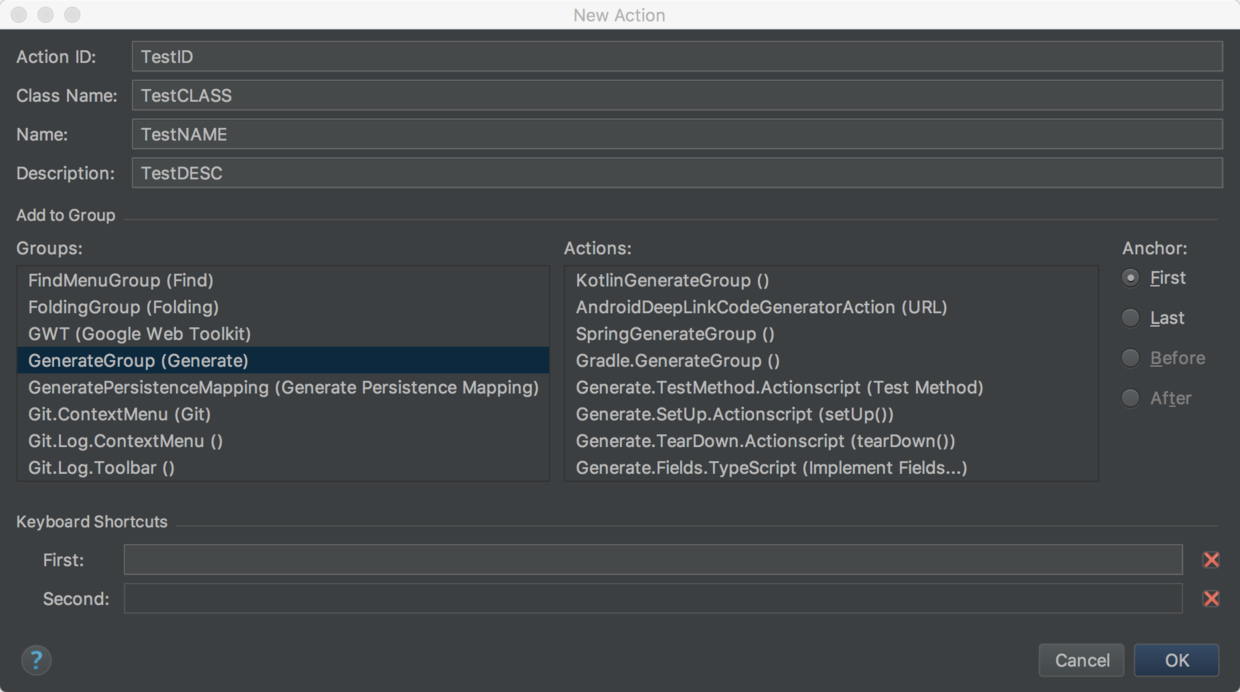
我选择的是GenerateGroup,也就是程序中邮件菜单中的generate选项。当然你也可以添加到AS的顶部菜单中,如File,Code等等。
这时会生成一个Class:
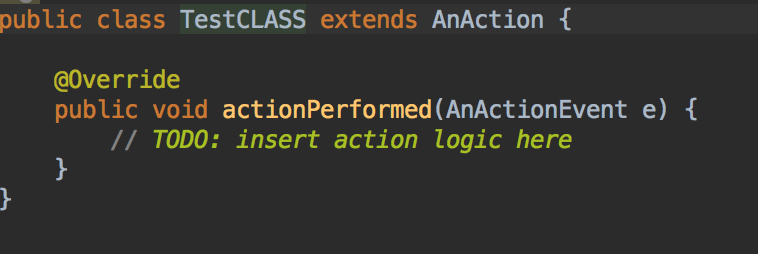
现在我们可以做个测试,修改代码:
 @Override
    public void actionPerformed(AnActionEvent e) {
      System.out.printf("okokokokoko");
    }
点击运行。
这时会启动一个IntelliJ IDEA的程序,你随便新建一个就能进去。
这时我们新建一个文件,然后在文件内点击右键,选择Generate,会弹出如下一个菜单:
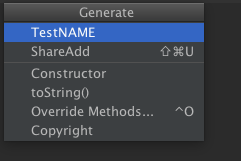
这就是我们刚刚添加进去的TESTNAME,点击,回去看下控制台发现打印了我们刚才写的东西:

功能描述
上面介绍完了怎么在IDE中插入一个按钮行为,但是我们能进行什么操作呢?下面就介绍一下。(需要将继承的AnAction改成BaseGenerateAction)
在代码中插入方法:
插入代码需要一个调用一个类WriteCommandAction.Simple。
我们新建一个类继承WriteCommandAction.Simple:
public class LayoutCreator extends WriteCommandAction.Simple{
    private Project project;
    private PsiFile file;
    private PsiClass targetClass;
    private PsiElementFactory factory;

    public LayoutCreator(Project project, PsiClass targetClass, PsiElementFactory factory, PsiFile... files) {
        super(project, files);
        this.project = project;
        this.file = files[0];
        this.targetClass = targetClass;
        this.factory = factory;
    }

    @Override
    protected void run() throws Throwable {

    }
}
我们可以在run方法中进行插入操作。
例如我们插入一个方法
 @Override
    protected void run() throws Throwable {
        // 将弹出dialog的方法写在StringBuilder里
        StringBuilder dialog = new StringBuilder();
        dialog.append("public void showDialog(){");
        dialog.append("   android.support.v7.app.AlertDialog.Builder builder = new AlertDialog.Builder(this);");
        dialog.append("    builder.setTitle(\"Title\")\n");
        dialog.append(".setMessage(\"Dialog content\")\n");
        dialog.append(".setPositiveButton(\"OK\", new android.content.DialogInterface.OnClickListener() {\n" +
                "@Override\n" +
                "public void onClick(DialogInterface dialog, int which) {\n" +
                "\t\n" +
                "}" +
                "})\n");
        dialog.append(".setNegativeButton(\"Cancel\", new DialogInterface.OnClickListener() {\n" +
                "@Override\n" +
                "public void onClick(DialogInterface dialog, int which) {\n" +
                "\t\n" +
                "}" +
                "})\n");
        dialog.append(".show();");
        dialog.append("}");
       targetClass.add(factory.createMethodFromText(dialog.toString(), targetClass));
        JavaCodeStyleManager styleManager = JavaCodeStyleManager.getInstance(project);
        styleManager.optimizeImports(file);
        styleManager.shortenClassReferences(targetClass);
    }
然后再看一下这个方法怎么调用:
 @Override
    public void actionPerformed(AnActionEvent e) {
        Project project = e.getData(PlatformDataKeys.PROJECT);
        Editor editor = e.getData(PlatformDataKeys.EDITOR);
        PsiFile file = PsiUtilBase.getPsiFileInEditor(editor, project);
        PsiClass targetClass = getTargetClass(editor, file);
        PsiElementFactory factory = JavaPsiFacade.getElementFactory(project);
        new LayoutCreator(project, targetClass, factory, file).execute();
    }
这样就可以插入一个方法。
弹出一个提示
我们也可以在IDE中弹出一个错误提示:
 public static void showNotification(Project project, MessageType type, String text) {
        StatusBar statusBar = WindowManager.getInstance().getStatusBar(project);

        JBPopupFactory.getInstance()
                .createHtmlTextBalloonBuilder(text, type, null)
                .setFadeoutTime(7500)
                .createBalloon()
                .show(RelativePoint.getCenterOf(statusBar.getComponent()), Balloon.Position.atRight);
    }
工程中查找一个文件
 public static void findFile(Project project,String name){
        PsiFile[] mPsiFiles = FilenameIndex.getFilesByName(project,name, GlobalSearchScope.allScope(project));
       System.out.printf("length="+mPsiFiles.length);
    }
获取用户选中内容
     Editor editor = e.getData(PlatformDataKeys.EDITOR);
        if (null == editor) {
            return;
        }

        SelectionModel model = editor.getSelectionModel();
        //获取选中内容
        final String selectedText = model.getSelectedText();
解析xml文件
public static ArrayList<Element> getIDsFromLayout(final PsiFile file, final ArrayList<Element> elements) {
        file.accept(new XmlRecursiveElementVisitor() {

            @Override
            public void visitElement(final PsiElement element) {
                super.visitElement(element);
                //解析XML标签
                if (element instanceof XmlTag) {
                    XmlTag tag = (XmlTag) element;
                  //解析include标签
                    if (tag.getName().equalsIgnoreCase("include")) {
                        XmlAttribute layout = tag.getAttribute("layout", null);

                        if (layout != null) {
                            Project project = file.getProject();
//                            PsiFile include = findLayoutResource(file, project, getLayoutName(layout.getValue()));
                            PsiFile include = null;
                            PsiFile[] mPsiFiles = FilenameIndex.getFilesByName(project, getLayoutName(layout.getValue())+".xml", GlobalSearchScope.allScope(project));
                            if (mPsiFiles.length>0){
                                include = mPsiFiles[0];
                            }

                            if (include != null) {
                                getIDsFromLayout(include, elements);

                                return;
                            }
                        }
                    }

                    // get element ID
                    XmlAttribute id = tag.getAttribute("android:id", null);
                    if (id == null) {
                        return; // missing android:id attribute
                    }
                    String value = id.getValue();
                    if (value == null) {
                        return; // empty value
                    }

                    // check if there is defined custom class
                    String name = tag.getName();
                    XmlAttribute clazz = tag.getAttribute("class", null);
                    if (clazz != null) {
                        name = clazz.getValue();
                    }

                    try {
                        Element e = new Element(name, value, tag);
                        elements.add(e);
                    } catch (IllegalArgumentException e) {
                        // TODO log
                    }
                }
            }
        });


        return elements;
    }

    public static String getLayoutName(String layout) {
        if (layout == null || !layout.startsWith("@") || !layout.contains("/")) {
            return null; // it's not layout identifier
        }

        String[] parts = layout.split("/");
        if (parts.length != 2) {
            return null; // not enough parts
        }

        return parts[1];
    }
其他方法
FilenameIndex.getFilesByName()   //通过给定名称(不包含具体路径)搜索对应文件
ReferencesSearch.search()  //类似于IDE中的Find Usages操作
RefactoringFactory.createRename()  //重命名
FileContentUtil.reparseFiles()  //通过VirtualFile重建PSI
ClassInheritorsSearch.search()  //搜索一个类的所有子类
JavaPsiFacade.findClass()  //通过类名查找类
PsiShortNamesCache.getInstance().getClassesByName()  //通过一个短名称(例如LogUtil)查找类
PsiClass.getSuperClass()  //查找一个类的直接父类
JavaPsiFacade.getInstance().findPackage()  //获取Java类所在的Package
OverridingMethodsSearch.search()  //查找被特定方法重写的方法
生成插件
工程开发完毕,可以点击Build->Prepare plugin Module 'xxx' For Deployment,之后便会在工程下生成对应的xxx.jar
安装插件
打开你的Android Studio,选择Preferences,如图所示:
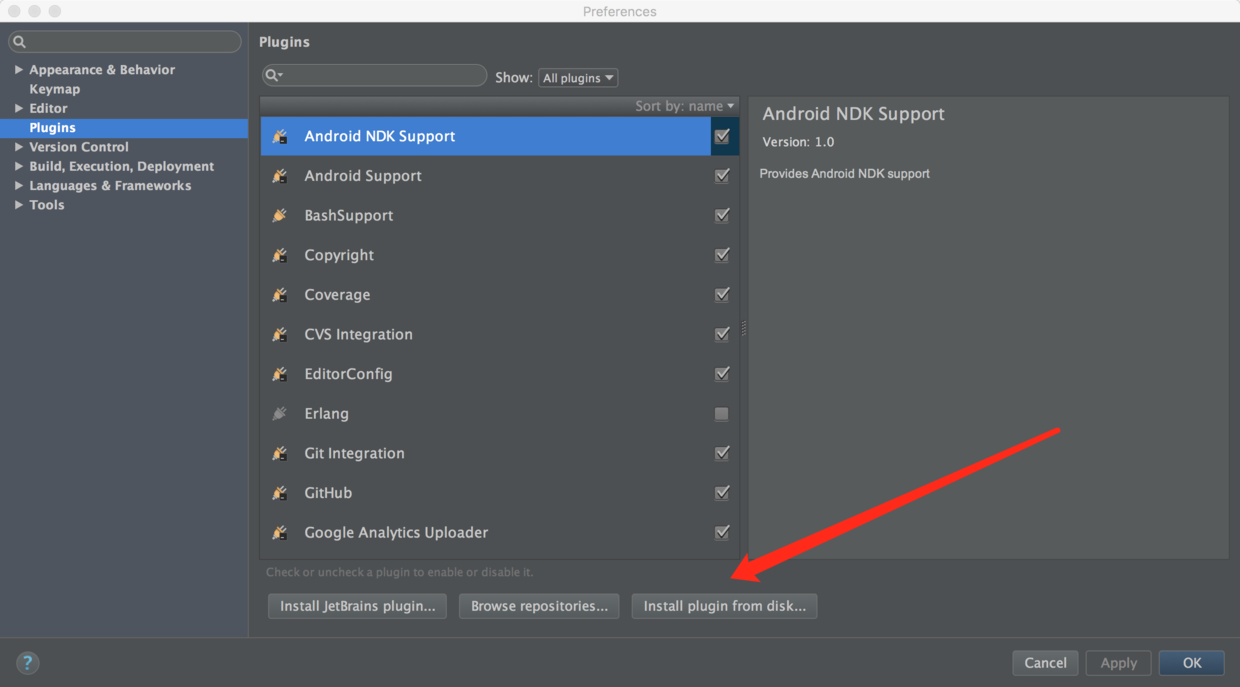
如上图所示,选择Plugins,选择上图指示的按钮,在选择你刚才生成的jar即可。
总结
基本上本文提到的方法可以实现基本的操作,熟练掌握插件的开发,可以加快Android开发的速度。
这里说一下我在开发中遇到的问题
遇到的问题
添加了Action但是调试的时候发现,找不到新建的Action,可能是由于你的IntelliJ IDEA版本过高,可以在plugin.xml中,找到idea-version标签,将版本改到141.0或以下即可。
插入一个方法,但是运行报错,提示不正确的方法,这是由于你在使用上文提到的插入方法时,插入的要是一个完整的方法以public 或private或protected开头,在开头不能有空格,而且注意大括号不能缺失。
