
外观模式(Facade Pattern)也叫门面模式,总觉得叫门面模式有点土,哈哈。虽然可能听着不如单例模式,观察者模式来得熟悉,但是在实际开发中使用频率还是很高的。特别是三方的SDK大概都会使用它。我们在平时的开发中可能已经使用了外观模式,只是还没有从理论上来认识它。
外观模式介绍
UML结构图
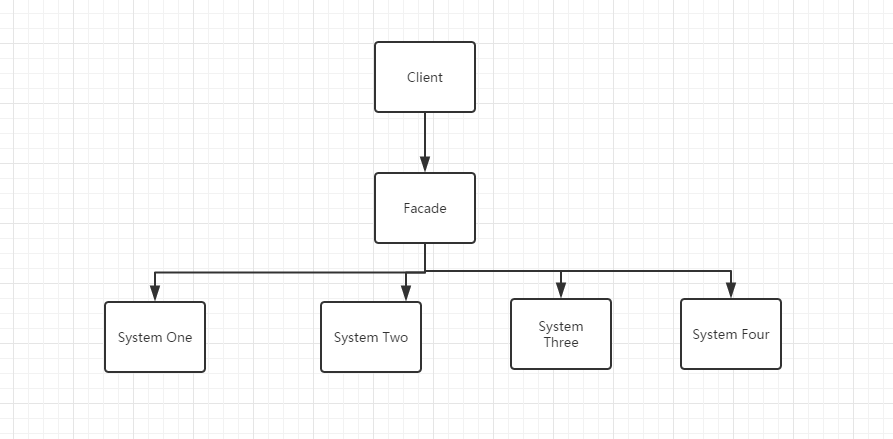
外观模式没有一个一般化的类图,就用一个一般的结构图表示。
角色介绍
- Client : 客户端程序
- Facade : 对外的统一入口,即外观对象
- System One : 子系统1(类的集合)
- System Two : 子系统2(类的集合)
- System Three: 子系统 3(类的集合)
- System Four :子系统 4(类的集合)
特点
外观模式提供一个统一的接口,用来访问子系统中的一群接口,外观定义了一个高层接口,让子系统更容易使用。
使用场景: - 为一个复杂子系统提供一个简单接口。Facade 可以提供一个简单统一的接口,对外隐藏子系统的具体实现、隔离变化。
- 当需要构建一个层次结构的子系统时,使用 Facade 模式定义子系统中每层的入口点。如果子系统之间是相互依赖,你可以让他们仅通过 Facade 接口进行通信,从而简化了它们之间的依赖关系。
在上面外观模式的结构图中如果没有中间的外观类的话,那么客户端使用各个系统的功能会比较复杂,需要和各个子系统进行交互,使得系统的稳定性受到影响,用户的使用成本也会相对高。简单实现例子
比如人要看电视,现在都肯定不用十几二十看大头黑白电视那样,想换台了还要跑到电视面前去转那个手动的电视换台按钮,声音大了又要跑到电视面前去转动声音调节按钮。现在都是用遥控器对吧。人就是这个客户端,电视是就什么电视台系统,音乐系统的集合,而遥控板就是那个外观类。
ChannelSystem简化成一个类:
public class ChannelSystem {
    public void nextChannel() {
        System.out.println("下一个频道");
    }

    public void prevChannel() {
        System.out.println("上一频道");
    }
}
VoiceSystem简化成一个类:
public class VoiceSystem {
    public void turnUp() {
        System.out.println("音量增大");
    }

    public void turnDown() {
        System.out.println("音量减小");
    }
}
电源系统简化成一个类:
public class PowerSystem {
    public void powerOn() {
        System.out.println("开机");
    }

    public void powerOff() {
        System.out.println("关机");
    }
}
遥控板相当于外观类:
public class TvController {
    private PowerSystem mPowerSystem = new PowerSystem();
    private VoiceSystem mVoiceSystem = new VoiceSystem();
    private ChannelSystem mChannelSystem = new ChannelSystem();

    public void powerOn() {
        mPowerSystem.powerOn();
    }

    public void powerOff() {
        mPowerSystem.powerOff();
    }

    public void turnUp() {
        mVoiceSystem.turnUp();
    }

    public void turnDown() {
        mVoiceSystem.turnDown();
    }

    public void nextChannel() {
        mChannelSystem.nextChannel();
    }

    public void prevChannel() {
        mChannelSystem.prevChannel();
    }
}
android中外观模式的实现
在Android中Context类族是比较重要的,它提供了应用环境信息的接口。我们可以通过它访问到应用资源和类,以及进行一些系统级别的操作,像什么加载activity,发送广播和接收Intent,Context类给我们提供了一站式服务,这里就是应用了外观模式。
在应用启动时,首先会fork一个子进程,并且调用ActivityThread.main方法启动该进程。ActivityThread又会构建Application对象,然后和Activity、ContextImpl关联起来,然后再调用Activity的onCreate、onStart、onResume函数使Activity运行起来。我们看看下面的相关代码:
private final void handleLaunchActivity(ActivityClientRecord r, Intent customIntent) {
        // 代码省略

        // 1、创建并且加载Activity,调用其onCreate函数
        Activity a = performLaunchActivity(r, customIntent);

        if (a != null) {
            r.createdConfig = new Configuration(mConfiguration);
            Bundle oldState = r.state;
            // 2、调用Activity的onResume方法,使Activity变得可见
            handleResumeActivity(r.token, false, r.isForward);

        }
    }


     private final Activity performLaunchActivity(ActivityClientRecord r, Intent customIntent) {
        // System.out.println("##### [" + System.currentTimeMillis() + "] ActivityThread.performLaunchActivity(" + r + ")");
        // 代码省略

        Activity activity = null;
        try {
            java.lang.ClassLoader cl = r.packageInfo.getClassLoader();
            // 1、创建Activity
            activity = mInstrumentation.newActivity(
                    cl, component.getClassName(), r.intent);
            r.intent.setExtrasClassLoader(cl);
            if (r.state != null) {
                r.state.setClassLoader(cl);
            }
        } catch (Exception e) {
            if (!mInstrumentation.onException(activity, e)) {
                throw new RuntimeException(
                    "Unable to instantiate activity " + component
                    + ": " + e.toString(), e);
            }
        }

        try {
            // 2、创建Application
            Application app = r.packageInfo.makeApplication(false, mInstrumentation);

            if (activity != null) {
                // ***** 构建ContextImpl  ******
                ContextImpl appContext = new ContextImpl();
                appContext.init(r.packageInfo, r.token, this);
                appContext.setOuterContext(activity);
                // 获取Activity的title
                CharSequence title = r.activityInfo.loadLabel(appContext.getPackageManager());
                Configuration config = new Configuration(mConfiguration);

                 // 3、Activity与context, Application关联起来
                activity.attach(appContext, this, getInstrumentation(), r.token,
                        r.ident, app, r.intent, r.activityInfo, title, r.parent,
                        r.embeddedID, r.lastNonConfigurationInstance,
                        r.lastNonConfigurationChildInstances, config);
                // 代码省略

                // 4、回调Activity的onCreate方法
                mInstrumentation.callActivityOnCreate(activity, r.state);

                // 代码省略
            }
            r.paused = true;

            mActivities.put(r.token, r);

        } catch (SuperNotCalledException e) {
            throw e;

        } catch (Exception e) {

        }

        return activity;
    }


    final void handleResumeActivity(IBinder token, boolean clearHide, boolean isForward) {

        unscheduleGcIdler();

        // 1、最终调用Activity的onResume方法
        ActivityClientRecord r = performResumeActivity(token, clearHide);
        // 代码省略
        // 2、这里是重点,在这里使DecorView变得可见
        if (r.window == null && !a.mFinished && willBeVisible) {
                // 获取Window,即PhoneWindow类型
                r.window = r.activity.getWindow();
                // 3、获取Window的顶级视图,并且使它可见
                View decor = r.window.getDecorView();
                decor.setVisibility(View.INVISIBLE);
                // 4、获取WindowManager
                ViewManager wm = a.getWindowManager();
                // 5、构建LayoutParams参数
                WindowManager.LayoutParams l = r.window.getAttributes();
                a.mDecor = decor;
                l.type = WindowManager.LayoutParams.TYPE_BASE_APPLICATION;
                l.softInputMode |= forwardBit;
                if (a.mVisibleFromClient) {
                    a.mWindowAdded = true;
                    // 6、将DecorView添加到WindowManager中,最终的操作是通过WindowManagerService的addView来操作
                    wm.addView(decor, l);
                }
            } else if (!willBeVisible) {
                if (localLOGV) Slog.v(
                    TAG, "Launch " + r + " mStartedActivity set");
                r.hideForNow = true;
            }
            // 代码省略
    }

 public final ActivityClientRecord performResumeActivity(IBinder token,
            boolean clearHide) {
        ActivityClientRecord r = mActivities.get(token);

        if (r != null && !r.activity.mFinished) {
                try {
                // 代码省略
                // 执行onResume
                r.activity.performResume();
                // 代码省略
            } catch (Exception e) {

            }
        }
        return r;
    }
Activity启动之后,Android给我们提供了操作系统服务的统一入口,也就是Activity本身。这些工作并不是Activity自己实现的,而是将操作委托给Activity父类ContextThemeWrapper的mBase对象,这个对象的实现类就是ContextImpl ( 也就是performLaunchActivity方法中构建的ContextImpl )。
class ContextImpl extends Context {
private final static String TAG = "ApplicationContext";
private final static boolean DEBUG = false;
private final static boolean DEBUG_ICONS = false;
private static final Object sSync = new Object();
private static AlarmManager sAlarmManager;
private static PowerManager sPowerManager;
private static ConnectivityManager sConnectivityManager;
private AudioManager mAudioManager;
LoadedApk mPackageInfo;
private Resources mResources;
private PackageManager mPackageManager;
private NotificationManager mNotificationManager = null;
private ActivityManager mActivityManager = null;
// 代码省略
@Override
public void sendBroadcast(Intent intent) {
String resolvedType = intent.resolveTypeIfNeeded(getContentResolver());
try {
ActivityManagerNative.getDefault().broadcastIntent(
mMainThread.getApplicationThread(), intent, resolvedType, null,
Activity.RESULT_OK, null, null, null, false, false);
} catch (RemoteException e) {
}
}
@Override
public void startActivity(Intent intent) {
if ((intent.getFlags()&Intent.FLAG_ACTIVITY_NEW_TASK) == 0) {
throw new AndroidRuntimeException(
"Calling startActivity() from outside of an Activity "
+ " context requires the FLAG_ACTIVITY_NEW_TASK flag."
+ " Is this really what you want?");
}
mMainThread.getInstrumentation().execStartActivity(
getOuterContext(), mMainThread.getApplicationThread(), null, null, intent, -1);
}
@Override
public ComponentName startService(Intent service) {
try {
ComponentName cn = ActivityManagerNative.getDefault().startService(
mMainThread.getApplicationThread(), service,
service.resolveTypeIfNeeded(getContentResolver()));
if (cn != null && cn.getPackageName().equals("!")) {
throw new SecurityException(
"Not allowed to start service " + service
+ " without permission " + cn.getClassName());
}
return cn;
} catch (RemoteException e) {
return null;
}
}
@Override
public String getPackageName() {
if (mPackageInfo != null) {
return mPackageInfo.getPackageName();
}
throw new RuntimeException("Not supported in system context");
}
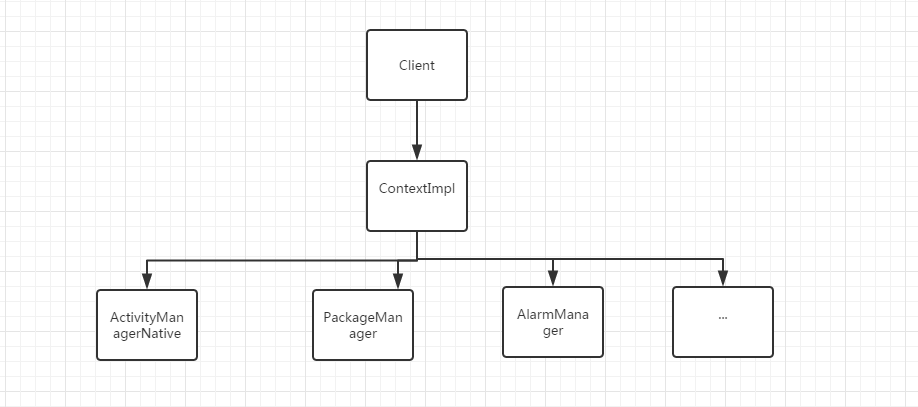
}可以看到,ContextImpl内部有很多xxxManager类的对象,也就是我们上文所说的各种子系统的角色。ContextImpl内部封装了一些系统级别的操作,有的子系统功能虽然没有实现,但是也提供了访问该子系统的接口,比如获取ActivityManager的getActivityManager方法。
比如我们要启动一个Activity的时候,我们调用的是startActivity方法,这个功能的内部实现实际上是Instrumentation完成的。ContextImpl封装了这个功能,使得用户根本不需要知晓Instrumentation相关的信息,直接使用startActivity即可完成相应的工作。其他的子系统功能也是类似的实现,比如启动Service和发送广播内部使用的是ActivityManagerNative等。ContextImpl的结构图如下
:
优缺点
优点:
对客户程序隐藏子系统细节,因而减少了客户对于子系统的耦合,能够拥抱变化;
外观类对子系统的接口封装,使得系统更易于使用;
更好的划分访问层次,通过合理使用Facade,可以帮助我们更好地划分访问的层次。有些方法是对系统外的,有些方法是系统内部使用的。把需要暴露给外部的功能集中到外观类中,这样既方便客户端使用,也很好地隐藏了内部的细节。
缺点:
外观类接口膨胀,由于子系统的接口都由外观类统一对外暴露,使得外观类的 API 接口较多,在一定程度上增加了用户使用成本;
外观类没有遵循开闭原则(对扩展开放,对修改关闭),当业务出现变更时,可能需要直接修改外观类。