

最近在学习Android自定义View,看到一个自定义音频条形图的例子,遂学习了一下并且在此基础上扩展了一点,在此记录一下,来帮助到需要的人。先放上一张效果图,看着还不错吧,接下来就开始一步步实现这个小例子。
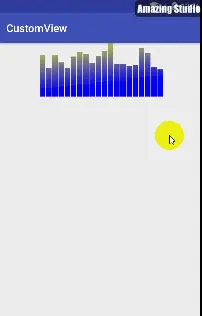
音频条形图
先说说这个自定义View的基本思路,首先最主要其实就是绘制一个个小矩形,这里主要是涉及到绘制时的坐标计算,然后为了让其动起来,我们使用随机数来作为每个小矩形的高度,同时为了效果更逼真,我们还可以在每次View进行重绘时加一个延时,还可以利用
LinearGradient来让不同的小矩形有一个颜色渐变,最后为了定制性更好,还可以增加自定义属性,大致思路就是这样,让我们一步步实现吧。
一、定义类继承自View并修改构造方法
我们必须创建一个类,来修改其中的构造方法之间的调用,让一个参数的构造方法中调用两个参数构造方法,在扫那个参数的构造方法中调用两个参数的构造方法,然后在第三个构造方法中写一些变量初始化的代码即可,这样,无论别人是通过代码,还是通过在xml文件中使用我们的自定义View还是使用了我们自定义View的自定义属性,这些代码都会被调用,要是大家还不太清楚三个构造方法在何时调用,可以看看下面的注释。
/**
 * 代码中直接new时调用
 * @param context
 */
public AudioBarGraph(Context context) {
    this(context, null);
}

/**
 * 在xml中使用自定义View并且没有自定义属性时调用
 * @param context
 * @param attrs
 */
public AudioBarGraph(Context context, AttributeSet attrs) {
    this(context, attrs, 0);
}

/**
 * 在xml中使用自定义View并且使用自定义属性时调用
 * @param context
 * @param attrs
 * @param defStyleAttr
 */
public AudioBarGraph(Context context, AttributeSet attrs, int defStyleAttr) {
    super(context, attrs, defStyleAttr);
}
二、在布局文件中引用自定义View
注意这里的引用必须使用全路径
<com.codekong.customview.view.AudioBarGraph
    android:id="@+id/id_abg"
    android:layout_width="match_parent"
    android:layout_height="wrap_content"/>
三、定义成员变量以备后面使用
每个成员变量都有注释
//小矩形的数目
private int mRectCount;
//每个小矩形的宽度
private int mRectWidth;
//每个小矩形的高度
private int mRectHeight;
//每个小矩形之间的偏移量
private float mOffset;
//绘制小矩形的画笔
private Paint mPaint;
//View的宽度
private int mViewWidth;
//产生渐变效果
private LinearGradient mLinearGradient;
//每个小矩形的当前高度
private float[] mCurrentHeight;

//渐变色顶部颜色
private int mTopColor;
//渐变色底部颜色
private int mBottomColor;
//View重绘延时时间
private int mDelayTime;
四、在xml文件中定义自定义属性
在
attrs.xml文件中定义一些属性,一边后面使用时可以自由配置
<declare-styleable name="AudioBarGraph">
    <attr name="rectCount" format="integer"/>         <!-- 小矩形的数目 -->
    <attr name="rectOffset" format="float"/>          <!-- 每一个小矩形之间的偏移量 -->
    <attr name="topColor" format="color"/>            <!-- 一个小矩形渐变的顶部颜色 -->
    <attr name="bottomColor" format="color"/>         <!-- 一个小矩形渐变的底部颜色 -->
    <attr name="delayTime" format="integer"/>         <!-- 小矩形变化的延时时间(毫秒) -->
</declare-styleable>
五、获取自定义属性,并初始化变量
我们在三个参数的构造方法中初始化画笔并且获取我们的自定义属性,由于TypedArray对象是共享的资源,所以在获取完值之后必须要调用
recycle()方法来回收。
public AudioBarGraph(Context context, AttributeSet attrs, int defStyleAttr) {
    super(context, attrs, defStyleAttr);
    //初始化画笔设置抗锯齿
    mPaint = new Paint();
    mPaint.setAntiAlias(true);
    mPaint.setStyle(Paint.Style.FILL);

    TypedArray ta = context.obtainStyledAttributes(attrs, R.styleable.AudioBarGraph);
    mRectCount = ta.getInt(R.styleable.AudioBarGraph_rectCount, 10);
    mOffset = ta.getFloat(R.styleable.AudioBarGraph_rectOffset, 3);
    mDelayTime = ta.getInt(R.styleable.AudioBarGraph_delayTime, 300);
    mTopColor = ta.getColor(R.styleable.AudioBarGraph_topColor, Color.YELLOW);
    mBottomColor = ta.getColor(R.styleable.AudioBarGraph_bottomColor, Color.BLUE);
    ta.recycle();
}六、重写onMeasure()方法
此处重写
onMeasure()方法是为了让其在wrap_content的情况下有一个默认的宽高
@Override
protected void onMeasure(int widthMeasureSpec, int heightMeasureSpec) {
    int widthMode = MeasureSpec.getMode(widthMeasureSpec);
    int heightMode = MeasureSpec.getMode(heightMeasureSpec);
    int widthSize = MeasureSpec.getSize(widthMeasureSpec);
    int heightSize = MeasureSpec.getSize(heightMeasureSpec);
    //默认的宽高
    int width = 200;
    int height = 200;

    setMeasuredDimension(widthMode == MeasureSpec.EXACTLY ? widthSize : width,
            heightMode == MeasureSpec.EXACTLY ? heightSize : height);
}七、重写onSizeChanged()方法
在
onSizeChanged()方法中我们获取到View的宽高及初始化一个LinearGradient,为后面的绘制做准备
@Override
protected void onSizeChanged(int w, int h, int oldw, int oldh) {
    super.onSizeChanged(w, h, oldw, oldh);
    mViewWidth = getMeasuredWidth();
    mRectHeight = getMeasuredHeight();
    mRectWidth = (int) (mViewWidth * 0.6 / mRectCount);
    mLinearGradient = new LinearGradient(0, 0, mRectWidth, mRectHeight,
            mTopColor, mBottomColor, Shader.TileMode.CLAMP);
    //给画笔设置Shader
    mPaint.setShader(mLinearGradient);
}八、重写onDraw()方法开始绘制View
前面准备了那么多,现在终于要开始绘制小矩形了,其实这里最主要的就是一个坐标的计算,对于每个小矩形的高度,我们后面会留有公开的方法可以让用户去设置,如果用户没有提供每个小矩形的高度,我们则将使用随机的高度。
@Override
protected void onDraw(Canvas canvas) {
    super.onDraw(canvas);
    if (mCurrentHeight != null){
        //使用者指定了每个小矩形当前的高度则使用
        for (int i = 0; i < mRectCount; i++) {
            int random = (int) (Math.random() * 50);
            canvas.drawRect((float) (mViewWidth * 0.4 / 2 + mRectWidth * i + mOffset), mCurrentHeight[i] + random,
                    (float) (mViewWidth * 0.4 / 2 + mRectWidth * (i + 1)), mRectHeight, mPaint);
        }
    }else{
        //没有指定则使用随机数的高度
        for (int i = 0; i < mRectCount; i++) {
            int currentHeight = 0;
            canvas.drawRect((float) (mViewWidth * 0.4 / 2 + mRectWidth * i + mOffset), currentHeight,
                    (float) (mViewWidth * 0.4 / 2 + mRectWidth * (i + 1)), mRectHeight, mPaint);
        }
    }
    //让View延时mDelayTime毫秒再重绘
    postInvalidateDelayed(mDelayTime);
}
九、公开方法使使用者可以定义每个小矩形的高度
/**
 * 公开方法设置小矩形高度
 * @param currentHeight
 */
public void setCurrentHeight(float[] currentHeight){
    mCurrentHeight = currentHeight;
}
十、使用自定义view
<?xml version="1.0" encoding="utf-8"?>
<LinearLayout xmlns:android="http://schemas.android.com/apk/res/android"
    xmlns:app="http://schemas.android.com/apk/res-auto"
    android:layout_width="match_parent"
    android:layout_height="match_parent">
    <com.codekong.customview.view.AudioBarGraph
        android:id="@+id/id_abg"
        android:layout_width="match_parent"
        android:layout_height="wrap_content"
        app:rectCount="20"/>
</LinearLayout>
final AudioBarGraph audioBarGraph = (AudioBarGraph) findViewById(R.id.id_abg);
final float[] m = new float[20];
new Thread(new Runnable() {
@Override
public void run() {
while (true){
for (int i = 0; i < m.length; i++) {
m[i] = (float) (Math.random() * 100);
}
audioBarGraph.setCurrentHeight(m);
try {
Thread.sleep(300);
} catch (InterruptedException e) {
e.printStackTrace();
}
}
}
}).start();上面为了模拟音频的高低,开了一个子线程用来产生随机数并且设置给我们的自定义View,真实的环境中我们可以获取正式的音频高度来进行设置
后记
这只是一个简单的自定义View,查看源代码及更多自定义View,大家可以查看我的
GitHub地址, github.com/codekongs/C… 上面有详细的使用说明,欢迎大家start和fork,你也可以贡献自己的自定义View,使其更加丰富
