

淘宝我的界面波浪线
先看图片
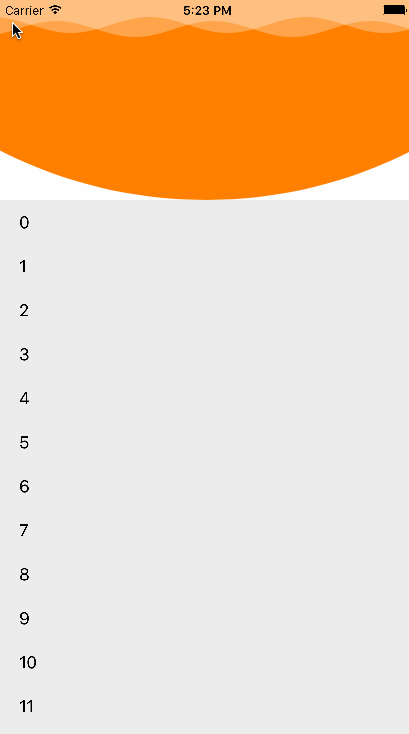
模仿淘宝.gif
demo没进行封装,内容的实现主要使用了CADisplayLink定时器,UIBezierPath结合CAShaperLayer 实现的双波浪效果,用了Model转场动画实现的下拉跳转界面
整体来说不是太难 难的地方在于用UIBezierPath绘制下面的弧形时需要手动计算弧形的坐标。
实现方法 :
一、 首先要知道下面这个公式:
y = Asin(wx+Q) + S;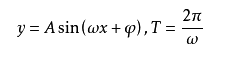
55969228-C38F-42FC-8B4D-25D49C54EE4F.png
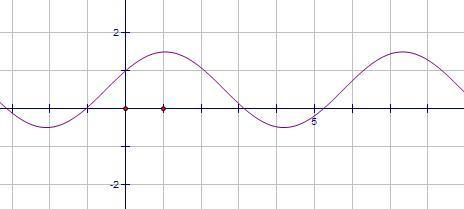
对应的曲线是这样的
u=2166549996,3486693099&fm=23&gp=0.jpg
A 表示峰值,忘记数学怎么称呼了(知道的大咖给说下,谢谢) 及最大值和最小值 由于sin(wx + Q)的区间是[-1,1];所以Asin(wx + Q)的区间就是[-A,A];W 表示周期 w越大周期T越小 我取的是0.04;Q 是用来调整曲线的左右位置S 是用来调整上下的位置二、绘制波浪线
- (UIBezierPath *)getWavePath:(CGFloat)A W:(CGFloat)w d:(CGFloat)d dong:(CGFloat)dong{

    UIBezierPath *path = [UIBezierPath bezierPath];
    [path moveToPoint:CGPointMake(0, 0)];
    [path addLineToPoint:CGPointMake(0, 50)];

    for (int i = 0; i < [UIScreen mainScreen].bounds.size.width; i++) {

        // 这个是波浪线绘制的主要代码
        CGFloat y = A*sinf(i*w +dong+self.dong)+d;


        [path addLineToPoint:CGPointMake(i, y)];
    }

    [path addLineToPoint:CGPointMake([UIScreen mainScreen].bounds.size.width, 0)];
    [path closePath];
    return path;

}
接着先创建一个TableView的头视图View
    UIView *view = [[UIView alloc] initWithFrame:CGRectMake(0, 0, [UIScreen mainScreen].bounds.size.width, 260)];
    view.backgroundColor = [UIColor whiteColor];
    self.headerView = view;
    self.tableView.tableHeaderView = self.headerView;
创建CAShaperLayer 添加到TableView的头视图上 这样就创建了一个波浪线
    CAShapeLayer *layer = [CAShapeLayer layer];
    layer.fillColor = [UIColor whiteColor].CGColor;
    layer.frame = view.bounds;
    layer.opacity = 0.3; // 透明度
    layer.shouldRasterize = YES;  // 加个注释 这个是让曲线能平滑过渡,防止有锯齿状
    layer.path = [self getWavePath:8 W:0.04 d:25+60 dong:0].CGPath;
    self.shapeLayer = layer;
    [view.layer addSublayer:layer];
因为淘宝有两个波浪线 还需要创建一个 没封装 所以又粘贴了一遍
  CAShapeLayer *layer1 = [CAShapeLayer layer];
    layer1.fillColor = [UIColor whiteColor].CGColor;
    layer1.frame = view.bounds;
    layer1.opacity = 0.3;
    layer1.shouldRasterize = YES;
    layer1.path = [self getWavePath:8 W:0.04 d:29+60 dong:10].CGPath;
    self.shapeLayer1 = layer1;
    [view.layer addSublayer:layer1];
但是淘宝的波浪会动啊 怎么办? 这个时候我们就需要定时器 CADisplayLink 来控制波浪的波动,这个主要用来动画的处理,NSTimer貌似会简短,具体的区别请看:(CADisplayLink)
    _displayLink = [CADisplayLink displayLinkWithTarget:self selector:@selector(disPlayLink:)];
    [_displayLink addToRunLoop:[NSRunLoop currentRunLoop] forMode:NSRunLoopCommonModes];

- (void)disPlayLink:(CADisplayLink *)displayLink {
    self.dong = self.dong+0.05;
    self.shapeLayer.path = [self getWavePath:8 W:0.04 d:25+60 dong:0].CGPath;
    self.shapeLayer1.path = [self getWavePath:8 W:0.04 d:29+60 dong:10].CGPath;
}
这样你会神器的发现双波浪动画就实现了
三、绘制下面的圆弧(具体点的位置可以根据自己的方法计算)
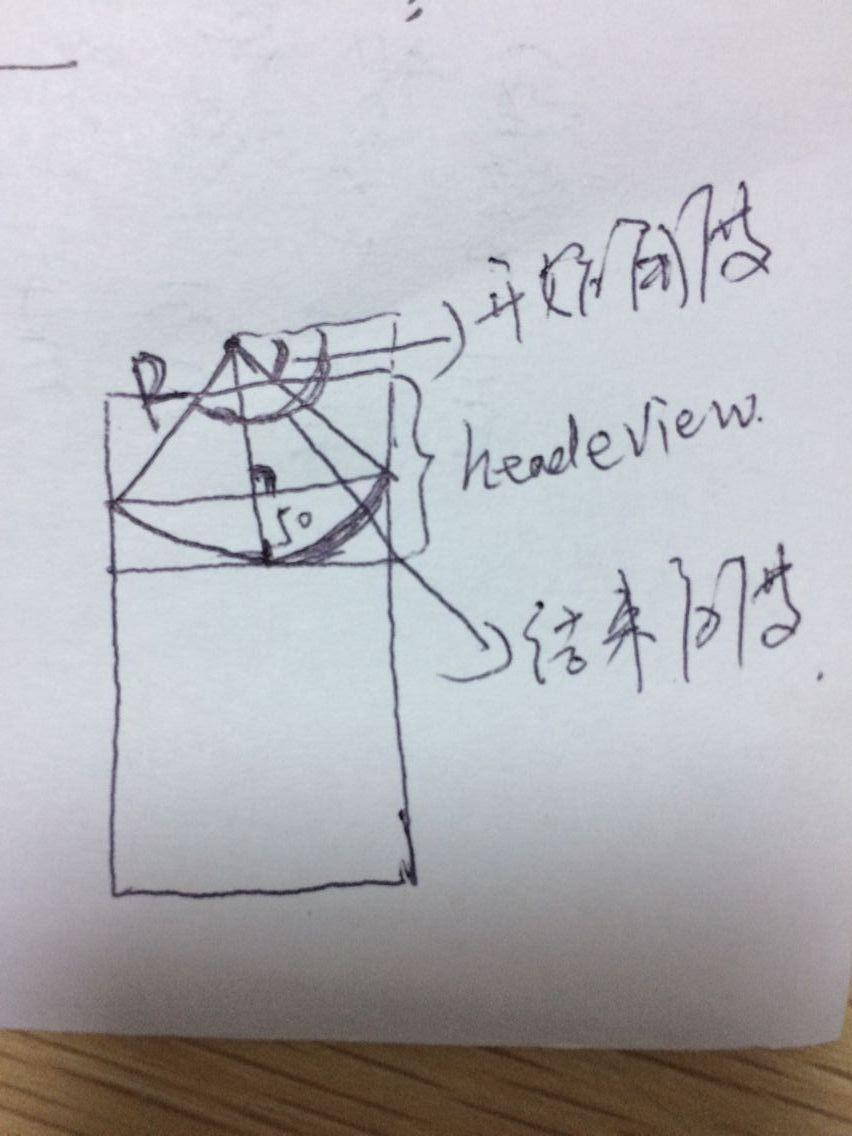
5550717FD6EF24BA22462D927FD0F25D.jpg
代码
- (UIBezierPath *)getLayerBezierPath {

    CGFloat width = [UIScreen mainScreen].bounds.size.width;
    CGFloat R = 25+pow(width, 2)/400.0f;
    CGPoint centerArc = CGPointMake(width/2.0f,260-R);

    UIBezierPath *bezierPath = [UIBezierPath bezierPath];
    [bezierPath moveToPoint:CGPointMake(0, 0)];
    [bezierPath addLineToPoint:CGPointMake(0, 210)];

    // acos() 这个就是数学里面的arccos();
    [bezierPath addArcWithCenter:centerArc radius:R startAngle:acos(width/(2*R)) endAngle:(M_PI-acos(width/(2*R))) clockwise:YES];
    [bezierPath addLineToPoint:CGPointMake(width, 210)];
    [bezierPath addLineToPoint:CGPointMake(width, 0)];
    [bezierPath closePath];

    return bezierPath;

}
创建一个layer扔到headerView上
    CAShapeLayer *layer2 = [CAShapeLayer layer];
    layer2.fillColor = [UIColor orangeColor].CGColor;
    layer2.frame = view.bounds;
    layer2.shouldRasterize = YES;
    layer2.path = [self getLayerBezierPath].CGPath;
    [view.layer addSublayer:layer2];
四、下面开始做转场动画
1、创建一个类、继承NSObject 下面是.h中的代码
#import <Foundation/Foundation.h>
#import <UIKit/UIKit.h>

typedef NS_ENUM(NSInteger, CLImitationTaoBaoModelType) {
    CLImitationTaoBaoModelTypePresent,
    CLImitationTaoBaoModelTypeDismiss
};


@interface CLImitationTaoBao : NSObject <UIViewControllerAnimatedTransitioning>

+ (CLImitationTaoBao *)imitationTaoBao:(CLImitationTaoBaoModelType)modelType;


@end
2、实现两个协议
// 具体动画在这里面操作
- (void)animateTransition:(id<UIViewControllerContextTransitioning>)transitionContext;

// 动画跳转时长
- (NSTimeInterval)transitionDuration:(id<UIViewControllerContextTransitioning>)transitionContext
3、转场动画的操作过程()
// 跳转时的方法
- (void)present:(id<UIViewControllerContextTransitioning>)transitionContext {

    UIView *fromeView = [transitionContext viewForKey:UITransitionContextFromViewKey];
    UIView *toView = [transitionContext viewForKey:UITransitionContextToViewKey];
    UIView *containerView = [transitionContext containerView];

    [containerView addSubview:fromeView];
    [containerView addSubview:toView];

    fromeView.frame = containerView.frame;
    toView.frame = CGRectMake(0, -containerView.frame.size.height, containerView.frame.size.width, containerView.frame.size.height);

    [UIView animateWithDuration:[self transitionDuration:transitionContext] animations:^{

        fromeView.frame = CGRectMake(0, containerView.frame.size.height*4/5.0f, containerView.frame.size.width, containerView.frame.size.height);
        toView.frame = CGRectMake(0, 0, containerView.frame.size.width, containerView.frame.size.height);

    } completion:^(BOOL finished) {

        [transitionContext completeTransition:YES];

    }];

}
// 返回时的方法
- (void)dismiss:(id<UIViewControllerContextTransitioning>)transitionContext {
UIView *fromeView = [transitionContext viewForKey:UITransitionContextFromViewKey];
UIView *toView = [transitionContext viewForKey:UITransitionContextToViewKey];
UIView *containerView = [transitionContext containerView];
[containerView addSubview:fromeView];
[containerView addSubview:toView];
fromeView.frame = containerView.frame;
toView.frame = CGRectMake(0, containerView.frame.size.height, containerView.frame.size.width, containerView.frame.size.height);
[UIView animateWithDuration:[self transitionDuration:transitionContext] animations:^{
fromeView.frame = CGRectMake(0, -containerView.frame.size.height, containerView.frame.size.width, containerView.frame.size.height);
toView.frame = CGRectMake(0, 0, containerView.frame.size.width, containerView.frame.size.height);
} completion:^(BOOL finished) {
[transitionContext completeTransition:YES];
}];
}+ (CLImitationTaoBao *)imitationTaoBao:(CLImitationTaoBaoModelType)modelType {
CLImitationTaoBao *imitation = [[CLImitationTaoBao alloc] init];
imitation.modelType = modelType;
return imitation;
}
- (void)animateTransition:(id<UIViewControllerContextTransitioning>)transitionContext {
if (self.modelType == CLImitationTaoBaoModelTypePresent) {
[self present:transitionContext];
} else {
[self dismiss:transitionContext];
}
}
- (NSTimeInterval)transitionDuration:(id<UIViewControllerContextTransitioning>)transitionContext {
return 0.5;
}转场动画的具体学习以后再做笔记。
最后附Demo地址:github.com/qcl901028/m…
