

一、概述
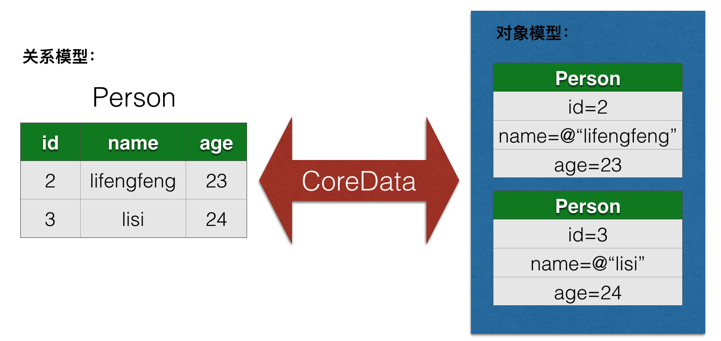
Core Data框架提供了对象-关系映射(ORM)的功能,即能够将OC对象转化成数据,保存在SQLite3数据库文件中,也能够将保存在数据库中的数据还原成OC对象。在此数据操作期间,不需要编写任何SQL语句。使用此功能,要添加CoreData.framework和导入主头文件 <CoreData/CoreData.h>。
二、相关内容及功能
1、NSManagedObject
通过Core Data从数据库取出的对象,默认情况下都是NSManagedObject对象,NSManagedObject的工作模式有点类似于NSDictionary对象,通过键-值对来存取所有的实体属性。
(1)setValue:forKey: 存储属性值(属性名为key)
(2)valueForKey: 获取属性值(属性名为key)
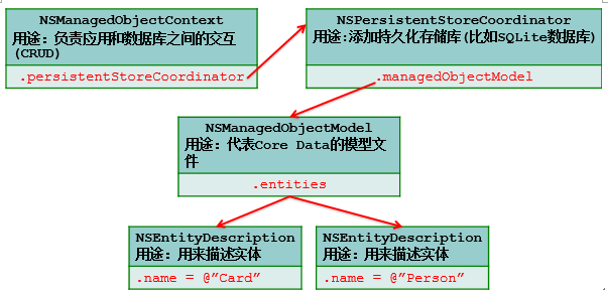
2、NSManagedObjectContext
负责应用与数据库之间的交互,增删改查基本操作都要用到
3、NSManagedObjectModel
被管理的数据模型,可以添加实体及实体的属性,若新建的项目带CoreData,即为XXX.xcdatamodeld
4、NSPersistentStoreCoordinator
数据库的连接器,设置数据存储的名字,位置,存储方式等
5、NSFetchRequest
获取数据时的请求
6、NSEntityDescription
用来描述实体
三、模型文件
在Core Data,需要进行映射的对象称为实体(entity),而且需要使用Core Data的模型文件来描述应用的所有实体和实体属性。
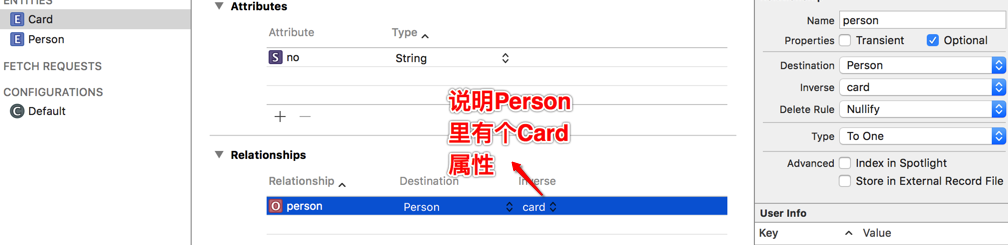
这里以Person和Card(身份证)2个实体为例子,先看看实体和实体属性之间的关联关系:
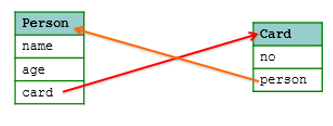
Person中有个Card属性,Card中有个Person属性,属于一对一双向关联。
四、使用方法
下面我们将针对Person和Card的关联关系为例来学习CoreData的使用方法:
1、创建CoreData工程及添加实体和属性
我们新建一个名为CoreDataTest工程,新建工程时勾选Use Core Data,则AppDelegate.h中:
Objective-C#import <UIKit/UIKit.h>
#import <CoreData/CoreData.h>
@interface AppDelegate : UIResponder <UIApplicationDelegate>
@property (strong, nonatomic) UIWindow *window;
@property (readonly, strong) NSPersistentContainer *persistentContainer;
- (void)saveContext;
@end在AppDelegate.m中(为了精简,去除了注释和没用到的方法):
Objective-C#import "AppDelegate.h"
@interface AppDelegate ()
@end
@implementation AppDelegate
- (void)applicationWillTerminate:(UIApplication *)application {
// Called when the application is about to terminate. Save data if appropriate. See also applicationDidEnterBackground:.
// Saves changes in the application's managed object context before the application terminates.
[self saveContext];
}
#pragma mark - Core Data stack
@synthesize persistentContainer = _persistentContainer;
- (NSPersistentContainer *)persistentContainer {
@synchronized (self) {
if (_persistentContainer == nil) {
_persistentContainer = [[NSPersistentContainer alloc] initWithName:@"CoreDataTest"];
[_persistentContainer loadPersistentStoresWithCompletionHandler:^(NSPersistentStoreDescription *storeDescription, NSError *error) {
if (error != nil) {
NSLog(@"Unresolved error %@, %@", error, error.userInfo);
abort();
}
}];
}
}
return _persistentContainer;
}
#pragma mark - Core Data Saving support
- (void)saveContext {
NSManagedObjectContext *context = self.persistentContainer.viewContext;
NSError *error = nil;
if ([context hasChanges] && ![context save:&error]) {
may be useful during development.
NSLog(@"Unresolved error %@, %@", error, error.userInfo);
abort();
}
}
@end不过,这里为了深入理解,我们不用AppDelegate中自动生成的一些方法和属性,我们从零开始自己写,等掌握具体用法后,你自然会知道如何用AppDelegate中自动生成的方法和属性。
建好后你会发现工程中多了CoreDataTest.xcdatamodeld,我们需要在这里添加实体(首字母大写)和实体的属性。

这里我们需要创建Person和Card的实体以及实体属性:


选中Person实体,在Person中添加card属性:
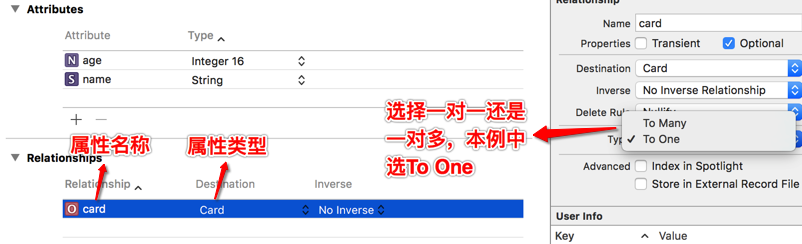
选中Card实体,在Card中添加person属性:
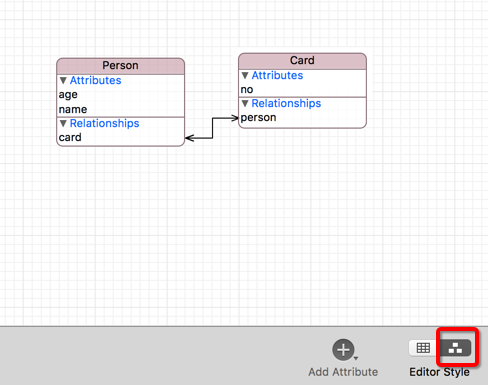
添加完成后,他们关系如下:
2、搭建上下文环境
Objective-C/**
搭建Core Data上下文环境
*/
-(void)initContext{
//从应用程序包中加载模型文件
NSManagedObjectModel *model = [NSManagedObjectModel mergedModelFromBundles:nil];
//传入模型,初始化NSPersistentStoreCoordinator:
NSPersistentStoreCoordinator *psc = [[NSPersistentStoreCoordinator alloc] initWithManagedObjectModel:model];
//构建SQLite文件路径:
NSString *docs =
[NSSearchPathForDirectoriesInDomains(NSDocumentDirectory, NSUserDomainMask, YES) lastObject];
NSURL *url = [NSURL fileURLWithPath:[docs stringByAppendingPathComponent:@"person.data"]];
//添加持久化存储库,这里使用SQLite作为存储库:
NSError *error = nil;
NSPersistentStore *store = [psc addPersistentStoreWithType:NSSQLiteStoreType configuration:nil URL:url options:nil error:&error];
if (store == nil) { // 直接抛异常
[NSException raise:@"添加数据库错误!" format:@"%@", [error localizedDescription]];
}else{
NSLog(@"添加数据库成功!");
}
//初始化上下文,设置persistentStoreCoordinator属性:
NSManagedObjectContext *context = [[NSManagedObjectContext alloc] initWithConcurrencyType:NSConfinementConcurrencyType];
context.persistentStoreCoordinator = psc;
}其中
持久化存储库的类型(addPersistentStoreWithType:参数):
(1)NSSQLiteStoreType SQLite数据库
(2)NSBinaryStoreType 二进制平面文件
(3)NSInMemoryStoreType 内存库,无法永久保存数据
ConcurrencyType可选项(initWithConcurrencyType:参数):
(1)NSConfinementConcurrencyType 这个是默认项,每个线程一个独立的Context,主要是为了兼容之前的设计。
(2)NSPrivateQueueConcurrencyType 创建一个private queue(使用GCD),这样就不会阻塞主线程。
(3)NSMainQueueConcurrencyType 创建一个main queue,使用主线程,会阻塞。
3、增:增加数据
Objective-C/**
增加数据
*/
-(void)addData{
//传入上下文,创建一个Person实体对象:
NSManagedObject *person =
[NSEntityDescription insertNewObjectForEntityForName:@"Person" inManagedObjectContext:_context];
//设置简单属性:
[person setValue:@"lifengfeng" forKey:@"name"];
[person setValue:[NSNumber numberWithInt:23] forKey:@"age"];
//传入上下文,创建一个Card实体对象:
NSManagedObject *card = [NSEntityDescription insertNewObjectForEntityForName:@"Card" inManagedObjectContext:_context];
[card setValue:@"1234567890" forKey:@"no"];
//设置Person和Card之间的关联关系:
[person setValue:card forKey:@"card"];
//利用上下文对象,将数据同步到持久化存储库:
NSError *error = nil;
BOOL success = [_context save:&error];
if (!success) {
[NSException raise:@"访问数据库错误!" format:@"%@", [error localizedDescription]];
}else{
NSLog(@"访问数据库成功!");
}
// 如果是想做更新操作:只要在更改了实体对象的属性后调用[context save:&error],就能将更改的数据同步到数据库
}4、删:删除数据
Objective-C/**
删除数据
*/
-(void)deleteData{
//建立请求,连接实体
NSFetchRequest *request = [[NSFetchRequest alloc] init] ;
NSEntityDescription *person = [NSEntityDescription entityForName:@"Person" inManagedObjectContext:_context];
request.entity = person;
//设置条件过滤(搜索name属性中包含”lifengfeng“的那条记录,注意等号必须加,可以有空格,也可以是==)
NSPredicate *predicate = [NSPredicate predicateWithFormat:@"name=%@", @"lifengfeng"];
request.predicate = predicate;
//遍历所有实体,将每个实体的信息存放在数组中
NSArray *arr = [_context executeFetchRequest:request error:nil];
//删除并保存
if(arr.count)
{
for (NSEntityDescription *p in arr)
{
[_context deleteObject:p];
NSLog(@"删除%@成功!",p.name);
}
//保存
[_context save:nil];
}
}5、改:修改数据
Objective-C/**
修改数据
*/
-(void)updateData{
//建立请求,连接实体
NSFetchRequest *request = [[NSFetchRequest alloc] init] ;
NSEntityDescription *person = [NSEntityDescription entityForName:@"Person" inManagedObjectContext:_context];
request.entity = person;
//设置条件过滤(搜索所有name属性不为“lifengfeng”的数据)
NSPredicate *predicate = [NSPredicate predicateWithFormat:@"name!=%@", @"lifengfeng"];
request.predicate = predicate;
//遍历所有实体,将每个实体的信息存放在数组中
NSArray *arr = [_context executeFetchRequest:request error:nil];
//更改并保存
if(arr.count)
{
for (NSEntityDescription *p in arr)
{
p.name = @"更改";
}
//保存
[_context save:nil];
}
else
{
NSLog(@"无检索");
}
}6、查:查询数据
/**
 查询数据
 */
-(void)queryData{

    //初始化一个查询请求:
    NSFetchRequest *request = [[NSFetchRequest alloc] init];

    //设置要查询的实体:
    NSEntityDescription *entity = [NSEntityDescription entityForName:@"Person" inManagedObjectContext:_context];
    request.entity = entity;

    //设置排序(按照age降序):
    NSSortDescriptor *sort = [NSSortDescriptor sortDescriptorWithKey:@"age" ascending:NO];
    request.sortDescriptors = [NSArray arrayWithObject:sort];

    //设置条件过滤(name like '%lifengfeng%'):
    //设置条件过滤时,数据库里面的%要用*来代替
    NSPredicate *predicate = [NSPredicate predicateWithFormat:@"name like %@", @"*lifengfeng*"];
    request.predicate = predicate;

    //执行请求:
    NSError *error = nil;
    NSArray *objs = [_context executeFetchRequest:request error:&error];
    if (error) {
        [NSException raise:@"查询错误" format:@"%@", [error localizedDescription]];
    }

    //遍历数据:
    for (NSManagedObject *obj in objs) {
        NSLog(@"name=%@", [obj valueForKey:@"name"]);
    }


}
Core Data的延迟加载
Core Data不会根据实体中的关联关系立即获取相应的关联对象,比如通过Core Data取出Person实体时,并不会立即查询相关联的Card实体;当应用真的需要使用Card时,才会查询数据库,加载Card实体的信息。本文示例项目源码下载:
云盘下载
原创文章,转载请注明: 转载自李峰峰博客
本文链接地址: iOS开发之CoreData