

设计模式解析之责任链模式
模式介绍
模式的定义
一个请求沿着一条“链”传递,直到该“链”上的某个处理者处理它为止。
模式的使用场景
一个请求可以被多个处理者处理或处理者未明确指定时。
UML类图
角色介绍
Client:客户端
Handler:抽象处理者
ConcreteHandler:具体处理者
模式简单实现
现实生活中关于责任者模式的例子数不胜数,最常见的就是工作中上下级之间的责任请求关系了。比如:
程序猿狗屎运被派出去异国出差一周,这时候就要去申请一定的差旅费了,你心里小算一笔加上各种车马费估计大概要个两三万,于是先向小组长汇报申请,可是大于一千块小组长没权利批复,于是只好去找项目主管,项目主管一看妈蛋这么狠要这么多我只能批小于五千块的,于是你只能再跑去找部门经理,部门经理看了下一阵淫笑后说没法批我只能批小于一万的,于是你只能狗血地去跪求老总,老总一看哟!小伙子心忒黑啊!老总话虽如此但还是把钱批给你了毕竟是给公司办事,到此申请处理完毕,你也可以屁颠屁颠地滚了。
如果把上面的场景应用到责任链模式,那么我们的request请求就是申请经费,组长主管经理老总们就是一个个具体的责任人他们可以对请求做出处理但是他们只能在自己的责任范围内处理该处理的请求,而程序猿只是个底层狗请求者向责任人们发起请求…………苦逼的猿。
实现源码
程序员抽象
/**
 * 程序猿抽象接口
 *
 * @author Aige{@link https://github.com/AigeStudio}
 *
 */
public abstract class ProgramApes {
    /**
     * 获取程序员具体的差旅费用
     *
     * @return 要多少钱
     */
    public abstract int getExpenses();
    /**
     * 获取差旅费申请
     *
     * @return Just a request
     */
    public abstract String getApply();
}
具体程序员
/**
 * Android程序猿类
 *
 * @author Aige{@link https://github.com/AigeStudio}
 *
 */
public class AndroidApe extends ProgramApes {
    private int expenses;// 声明整型成员变量表示出差费用
    private String apply = "爹要点钱出差";// 声明字符串型成员变量表示差旅申请
    /*
     * 含参构造方法
     */
    public AndroidApe(int expenses) {
        this.expenses = expenses;
    }
    @Override
    public int getExpenses() {
        return expenses;
    }
    @Override
    public String getApply() {
        return apply;
    }
}
把所有老大抽象为一个leader抽象类,在该抽象类中实现处理逻辑:
/**
 * 老大们的权利接口
 *
 * @author Aige{@link https://github.com/AigeStudio}
 *
 */
 /**
  * 领导人抽象类
  *
  * @author Aige{@link https://github.com/AigeStudio}
  *
  */
 public abstract class Leader {
     private int expenses;// 当前领导能批复的金额
     private Leader mSuperiorLeader;// 上级领导
     /**
      * 含参构造方法
      *
      * @param expenses
      *            当前领导能批复的金额
      */
     public Leader(int expenses) {
         this.expenses = expenses;
     }
     /**
      * 回应程序猿
      *
      * @param ape
      *            具体的程序猿
      */
     protected abstract void reply(ProgramApe ape);
     /**
      * 处理请求
      *
      * @param ape
      *            具体的程序猿
      */
     public void handleRequest(ProgramApe ape) {
         /*
          * 如果说程序猿申请的money在当前领导的批复范围内
          */
         if (ape.getExpenses() <= expenses) {
             // 那么就由当前领导批复即可
             reply(ape);
         } else {
             /*
              * 否则看看当前领导有木有上级
              */
             if (null != mSuperiorLeader) {
                 // 有的话简单撒直接扔给上级处理即可
                 mSuperiorLeader.handleRequest(ape);
             } else {
                 // 没有上级的话就批复不了老……不过在这个场景中总会有领导批复的淡定
                 System.out.println("Goodbye my money......");
             }
         }
     }
     /**
      * 为当前领导设置一个上级领导
      *
      * @param superiorLeader
      *            上级领导
      */
     public void setLeader(Leader superiorLeader) {
         this.mSuperiorLeader = superiorLeader;
     }
 }
这么一来,我们的领导老大们就有了实实在在的权利职责去处理底层苦逼程序猿的请求。OK,接下来要做的事就是让所有的领导继承该类:
小组长类:/** * 小组长类 * * @author Aige{@link https://github.com/AigeStudio} * */ public class GroupLeader extends Leader { public GroupLeader() { super(1000); } @Override protected void reply(ProgramApe ape) { System.out.println(ape.getApply()); System.out.println("GroupLeader: Of course Yes!"); } }项目主管类:
/**
 * 项目主管类
 *
 * @author Aige{@link https://github.com/AigeStudio}
 *
 */
public class Director extends Leader{
    public Director() {
        super(5000);
    }
    @Override
    protected void reply(ProgramApe ape) {
        System.out.println(ape.getApply());
        System.out.println("Director: Of course Yes!");
    }
}
部门经理类:
/**
 * 部门经理类
 *
 * @author Aige{@link https://github.com/AigeStudio}
 *
 */
public class Manager extends Leader {
    public Manager() {
        super(10000);
    }
    @Override
    protected void reply(ProgramApe ape) {
        System.out.println(ape.getApply());
        System.out.println("Manager: Of course Yes!");
    }
}
老总类:
/**
 * 老总类
 *
 * @author Aige{@link https://github.com/AigeStudio}
 *
 */
public class Boss extends Leader {
    public Boss() {
        super(40000);
    }
    @Override
    protected void reply(ProgramApe ape) {
        System.out.println(ape.getApply());
        System.out.println("Boss: Of course Yes!");
    }
}
最后,更新我们的场景类,将其从责任人的角色中解放出来:
/**
 * 场景模拟类
 *
 * @author Aige{@link https://github.com/AigeStudio}
 *
 */
public class Client {
    public static void main(String[] args) {
        /*
         * 先来一个程序猿 这里给他一个三万以内的随机值表示需要申请的差旅费
         */
        ProgramApe ape = new ProgramApe((int) (Math.random() * 30000));
        /*
         * 再来四个老大
         */
        Leader leader = new GroupLeader();
        Leader director = new Director();
        Leader manager = new Manager();
        Leader boss = new Boss();
        /*
         * 设置老大的上一个老大
         */
        leader.setLeader(director);
        director.setLeader(manager);
        manager.setLeader(boss);
        // 处理申请
        leader.handleRequest(ape);
    }
}
运行三次,下面是三次运行的结果(注:由于随机值的原因你的结果也许与我不一样):
爹要点钱出差
Boss: Of course Yes!
爹要点钱出差
Director: Of course Yes!
爹要点钱出差
Boss: Of course Yes!
总结
OK,这样我们就将请求和处理分离开来,对于程序猿来说,不需要知道是谁给他批复的钱,而对于领导们来说,也不需要确切地知道是批给哪个程序猿,只要根据自己的责任做出处理即可,由此将两者优雅地解耦。
Okhttp获取响应
流程图
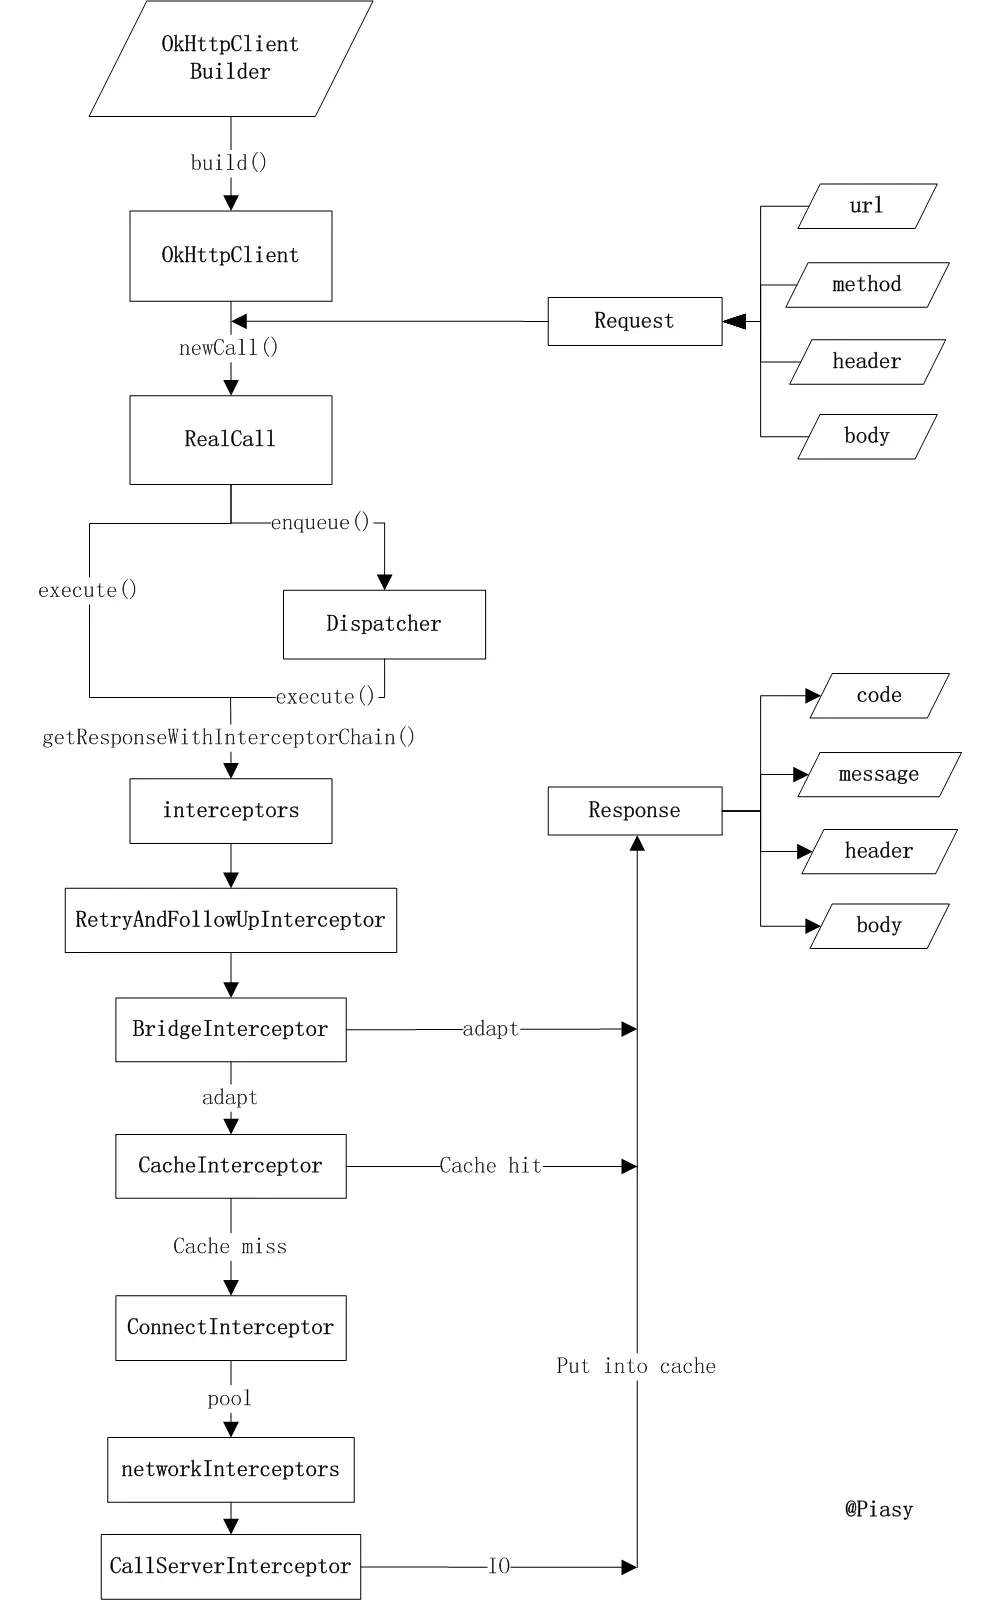
详解
在上一篇博客Okhttp源码学习(一)-同步和异步提交请求中介绍到了getResponseWithInterceptorChain()方法,本篇主要从这儿继续往下讲解。
getResponseWithInterceptorChain方法
Response getResponseWithInterceptorChain() throws IOException {
  // Build a full stack of interceptors.
  List interceptors = new ArrayList<>();
  //添加应用拦截器,就是我们创建okhttpclient时候自定义添加的
  interceptors.addAll(client.interceptors());
  //添加重试和重定向拦截器
  interceptors.add(retryAndFollowUpInterceptor);
  //添加转换拦截器
  interceptors.add(new BridgeInterceptor(client.cookieJar()));
  //添加缓存拦截器
  interceptors.add(new CacheInterceptor(client.internalCache()));
  //添加连接拦截器
  interceptors.add(new ConnectInterceptor(client));
  //添加网络拦截器
  if (!forWebSocket) {
    interceptors.addAll(client.networkInterceptors());
  }
  //发送和接收数据
  interceptors.add(new CallServerInterceptor(forWebSocket));
  //生成拦截器链
  Interceptor.Chain chain = new RealInterceptorChain(
      interceptors, null, null, null, 0, originalRequest);
  return chain.proceed(originalRequest);
}
从上面的代码可以看出,首先调用OkHttpClient的interceptor()方法获取所有应用拦截器,然后再加上RetryAndFollwoUpInterceptor、BridgeInterceptor、CacheInterceptor、ConnectInterceptor、如果不是WebSocket,还需要加上OkHttpClient的网络拦截器,最后再加上CallServerInterceptor,然后构造一个RealInterceptorChain对象,该类是拦截器链的具体实现,携带整个拦截器链,包含所有应用拦截器、OkHttp核心、所有网络拦截器和最终的网络调用者。
OkHttp的这种拦截器链采用的是责任链模式,这样的好处是将请求的发送和处理分开,并且可以动态添加中间的处理方实现对请求的处理、短路等操作。
RealInterceptorChain类
下面是RealInterceptorChain的定义,该类实现了Chain接口,在getResponseWithInterceptorChain调用时好几个参数都传的null,具体是StreamAllocation、httpCodec和Connection;其余的参数中index代表当前拦截器列表中的拦截器的索引。
/**
 * A concrete interceptor chain that carries the entire interceptor chain: all application
 * interceptors, the OkHttp core, all network interceptors, and finally the network caller.
 */
public final class RealInterceptorChain implements Interceptor.Chain {
  private final List interceptors;
  private final StreamAllocation streamAllocation;
  private final HttpCodec httpCodec;
  private final Connection connection;
  private final int index;
  private final Request request;
  private int calls;
  public RealInterceptorChain(List interceptors, StreamAllocation streamAllocation,
      HttpCodec httpCodec, Connection connection, int index, Request request) {
    this.interceptors = interceptors;
    this.connection = connection;
    this.streamAllocation = streamAllocation;
    this.httpCodec = httpCodec;
    this.index = index;
    this.request = request;
  }
  @Override public Connection connection() {
    return connection;
  }
  public StreamAllocation streamAllocation() {
    return streamAllocation;
  }
  public HttpCodec httpStream() {
    return httpCodec;
  }
  @Override public Request request() {
    return request;
  }
  //具体根据请求获取响应的实现,责任链模式的入口相当于前面讲的main
  @Override public Response proceed(Request request) throws IOException {
    return proceed(request, streamAllocation, httpCodec, connection);
  }
  public Response proceed(Request request, StreamAllocation streamAllocation, HttpCodec httpCodec,
      Connection connection) throws IOException {
    if (index >= interceptors.size()) throw new AssertionError();
    calls++;
    // If we already have a stream, confirm that the incoming request will use it.
    if (this.httpCodec != null && !sameConnection(request.url())) {
      throw new IllegalStateException("network interceptor " + interceptors.get(index - 1)
          + " must retain the same host and port");
    }
    // If we already have a stream, confirm that this is the only call to chain.proceed().
    if (this.httpCodec != null && calls > 1) {
      throw new IllegalStateException("network interceptor " + interceptors.get(index - 1)
          + " must call proceed() exactly once");
    }
    //调用拦截器链中余下的进行处理得到响应
    // Call the next interceptor in the chain.
    RealInterceptorChain next = new RealInterceptorChain(
        interceptors, streamAllocation, httpCodec, connection, index + 1, request);
    //Interceptor是拦截器的抽象
    Interceptor interceptor = interceptors.get(index);
    //执行当前具体拦截器的intercept方法(每种拦截器intercept具体实现后面详解)
    Response response = interceptor.intercept(next);
    // Confirm that the next interceptor made its required call to chain.proceed().
    if (httpCodec != null && index + 1 < interceptors.size() && next.calls != 1) {
      throw new IllegalStateException("network interceptor " + interceptor
          + " must call proceed() exactly once");
    }
    // Confirm that the intercepted response isn't null.
    if (response == null) {
      throw new NullPointerException("interceptor " + interceptor + " returned null");
    }
    return response;
  }
  private boolean sameConnection(HttpUrl url) {
    return url.host().equals(connection.route().address().url().host())
        && url.port() == connection.route().address().url().port();
  }
}
主要看proceed方法,该方法是具体根据请求获取响应的实现。因为一开始httpCodec为null,所以前面的判断都无效,然后先创建next拦截器链,主需要把索引置为index+1即可;然后获取第一个拦截器,调用其intercept方法。
现在假设没有添加应用拦截器和网络拦截器,那么这第一个拦截器将会是RetryAndFollowUpInterceptor。
RetryAndFollowUpInterceptor
RetryAndFollowUpInterceptor拦截器会从错误中恢复以及重定向。如果Call被取消了,那么将会抛出IoException。下面是其intercept方法实现:
@Override public Response intercept(Chain chain) throws IOException {
  Request request = chain.request();
  streamAllocation = new StreamAllocation(
      client.connectionPool(), createAddress(request.url()), callStackTrace);
  int followUpCount = 0;
  Response priorResponse = null;
  while (true) {
    //如果取消了,那么释放流以及抛出异常
    if (canceled) {
      streamAllocation.release();
      throw new IOException("Canceled");
    }
    Response response = null;
    boolean releaseConnection = true;
    try {
      //调用拦截器链余下的得到响应
      response = ((RealInterceptorChain) chain).proceed(request, streamAllocation, null, null);
      releaseConnection = false;
    } catch (RouteException e) {
      // The attempt to connect via a route failed. The request will not have been sent.
      if (!recover(e.getLastConnectException(), false, request)) {
        throw e.getLastConnectException();
      }
      releaseConnection = false;
      continue;
    } catch (IOException e) {
      // An attempt to communicate with a server failed. The request may have been sent.
      boolean requestSendStarted = !(e instanceof ConnectionShutdownException);
      if (!recover(e, requestSendStarted, request)) throw e;
      releaseConnection = false;
      continue;
    } finally {
      // We're throwing an unchecked exception. Release any resources.
      if (releaseConnection) {
        streamAllocation.streamFailed(null);
        streamAllocation.release();
      }
    }
    // Attach the prior response if it exists. Such responses never have a body.
    if (priorResponse != null) {
      response = response.newBuilder()
          .priorResponse(priorResponse.newBuilder()
                  .body(null)
                  .build())
          .build();
    }
    //得到重定向请求
    Request followUp = followUpRequest(response);
    //如果不存在重定向请求,直接返回响应
    if (followUp == null) {
      if (!forWebSocket) {
        streamAllocation.release();
      }
      return response;
    }
    closeQuietly(response.body());
    if (++followUpCount > MAX_FOLLOW_UPS) {
      streamAllocation.release();
      throw new ProtocolException("Too many follow-up requests: " + followUpCount);
    }
    if (followUp.body() instanceof UnrepeatableRequestBody) {
      streamAllocation.release();
      throw new HttpRetryException("Cannot retry streamed HTTP body", response.code());
    }
    //判断重定向请求和前一个请求是否是同一个主机,如果是的话,可以共用一个连接,否则需要重新创建连接
    if (!sameConnection(response, followUp.url())) {
      streamAllocation.release();
      streamAllocation = new StreamAllocation(
          client.connectionPool(), createAddress(followUp.url()), callStackTrace);
    } else if (streamAllocation.codec() != null) {
      throw new IllegalStateException("Closing the body of " + response
          + " didn't close its backing stream. Bad interceptor?");
    }
    request = followUp;
    priorResponse = response;
  }
}
从上面的代码可以看出,创建了streamAllocation对象,streamAllocation负责为连接分配流,接下来调用传进来的chain参数继续获取响应,可以看到如果获取失败了,在各个异常中都会调用recover方法尝试恢复请求,从响应中取出followUp请求,如果有就检查followUpCount,如果符合要求并且有followUp请求,那么需要继续进入while循环,如果没有,则直接返回响应了。首先不考虑有后续请求的情况,那么接下来调用的将会是BridgeInterceptor。
BridgeInterceptor
BridgeInterceptor从用户的请求构建网络请求,然后提交给网络,最后从网络响应中提取出用户响应。从最上面的图可以看出,BridgeInterceptor实现了适配的功能。下面是其intercept方法:
@Override public Response intercept(Chain chain) throws IOException {
  Request userRequest = chain.request();
  Request.Builder requestBuilder = userRequest.newBuilder();
  RequestBody body = userRequest.body();
  //如果存在请求主体部分,那么需要添加Content-Type、Content-Length首部
  if (body != null) {
    MediaType contentType = body.contentType();
    if (contentType != null) {
      requestBuilder.header("Content-Type", contentType.toString());
    }
    long contentLength = body.contentLength();
    if (contentLength != -1) {
      requestBuilder.header("Content-Length", Long.toString(contentLength));
      requestBuilder.removeHeader("Transfer-Encoding");
    } else {
      requestBuilder.header("Transfer-Encoding", "chunked");
      requestBuilder.removeHeader("Content-Length");
    }
  }
  if (userRequest.header("Host") == null) {
    requestBuilder.header("Host", hostHeader(userRequest.url(), false));
  }
  //OkHttp默认使用HTTP持久连接
  if (userRequest.header("Connection") == null) {
    requestBuilder.header("Connection", "Keep-Alive");
  }
  // If we add an "Accept-Encoding: gzip" header field we're responsible for also decompressing
  // the transfer stream.
  boolean transparentGzip = false;
  if (userRequest.header("Accept-Encoding") == null && userRequest.header("Range") == null) {
    transparentGzip = true;
    requestBuilder.header("Accept-Encoding", "gzip");
  }
  List cookies = cookieJar.loadForRequest(userRequest.url());
  if (!cookies.isEmpty()) {
    requestBuilder.header("Cookie", cookieHeader(cookies));
  }
  if (userRequest.header("User-Agent") == null) {
    requestBuilder.header("User-Agent", Version.userAgent());
  }
  Response networkResponse = chain.proceed(requestBuilder.build());
  HttpHeaders.receiveHeaders(cookieJar, userRequest.url(), networkResponse.headers());
  Response.Builder responseBuilder = networkResponse.newBuilder()
      .request(userRequest);
  if (transparentGzip
      && "gzip".equalsIgnoreCase(networkResponse.header("Content-Encoding"))
      && HttpHeaders.hasBody(networkResponse)) {
    GzipSource responseBody = new GzipSource(networkResponse.body().source());
    Headers strippedHeaders = networkResponse.headers().newBuilder()
        .removeAll("Content-Encoding")
        .removeAll("Content-Length")
        .build();
    responseBuilder.headers(strippedHeaders);
    responseBuilder.body(new RealResponseBody(strippedHeaders, Okio.buffer(responseBody)));
  }
  return responseBuilder.build();
}
从上面的代码可以看出,首先获取原请求,然后在请求中添加头,比如Host、Connection、Accept-Encoding参数等,然后根据看是否需要填充Cookie,在对原始请求做出处理后,使用chain的procced方法得到响应,接下来对响应做处理得到用户响应,最后返回响应。接下来再看下一个拦截器CacheInterceptor的处理。
CacheInterceptor
CacheInterceptor尝试从缓存中获取响应,如果可以获取到,则直接返回;否则将进行网络操作获取响应。CacheInterceptor使用OkHttpClient的internalCache方法的返回值作为参数。下面先看internalCache方法:
InternalCache internalCache() {
  return cache != null ? cache.internalCache : internalCache;
}
而Cache和InternalCache都是OkHttpClient.Builder中可以设置的,而其设置会互相抵消,代码如下:
/** Sets the response cache to be used to read and write cached responses. */
void setInternalCache(InternalCache internalCache) {
  this.internalCache = internalCache;
  this.cache = null;
}
public Builder cache(Cache cache) {
  this.cache = cache;
  this.internalCache = null;
  return this;
}
>默认的,如果没有对Builder进行缓存设置,那么cache和internalCache都为null,那么传入到CacheInterceptor中的也是null,下面是CacheInterceptor的intercept方法:
```java
@Override public Response intercept(Chain chain) throws IOException {
  //得到候选响应
  Response cacheCandidate = cache != null
      ? cache.get(chain.request())
      : null;
  long now = System.currentTimeMillis();
  //根据请求以及候选响应得出缓存策略
  CacheStrategy strategy = new CacheStrategy.Factory(now, chain.request(), cacheCandidate).get();
  Request networkRequest = strategy.networkRequest;
  Response cacheResponse = strategy.cacheResponse;
  if (cache != null) {
    cache.trackResponse(strategy);
  }
  if (cacheCandidate != null && cacheResponse == null) {
    closeQuietly(cacheCandidate.body()); // The cache candidate wasn't applicable. Close it.
  }
  //不适用网络响应,但是缓存中没有缓存响应,返回504错误
  // If we're forbidden from using the network and the cache is insufficient, fail.
  if (networkRequest == null && cacheResponse == null) {
    return new Response.Builder()
        .request(chain.request())
        .protocol(Protocol.HTTP_1_1)
        .code(504)
        .message("Unsatisfiable Request (only-if-cached)")
        .body(Util.EMPTY_RESPONSE)
        .sentRequestAtMillis(-1L)
        .receivedResponseAtMillis(System.currentTimeMillis())
        .build();
  }
  //返回缓存响应
  // If we don't need the network, we're done.
  if (networkRequest == null) {
    return cacheResponse.newBuilder()
        .cacheResponse(stripBody(cacheResponse))
        .build();
  }
  //进行网络操作得到网络响应
  Response networkResponse = null;
  try {
    networkResponse = chain.proceed(networkRequest);
  } finally {
    // If we're crashing on I/O or otherwise, don't leak the cache body.
    if (networkResponse == null && cacheCandidate != null) {
      closeQuietly(cacheCandidate.body());
    }
  }
  //如果该响应之前存在缓存响应,那么需要进行缓存响应的有效性验证以及更新
  // If we have a cache response too, then we're doing a conditional get.
  if (cacheResponse != null) {
    if (networkResponse.code() == HTTP_NOT_MODIFIED) {
      Response response = cacheResponse.newBuilder()
          .headers(combine(cacheResponse.headers(), networkResponse.headers()))
          .sentRequestAtMillis(networkResponse.sentRequestAtMillis())
          .receivedResponseAtMillis(networkResponse.receivedResponseAtMillis())
          .cacheResponse(stripBody(cacheResponse))
          .networkResponse(stripBody(networkResponse))
          .build();
      networkResponse.body().close();
      // Update the cache after combining headers but before stripping the
      // Content-Encoding header (as performed by initContentStream()).
      cache.trackConditionalCacheHit();
      cache.update(cacheResponse, response);
      return response;
    } else {
      closeQuietly(cacheResponse.body());
    }
  }
  Response response = networkResponse.newBuilder()
      .cacheResponse(stripBody(cacheResponse))
      .networkResponse(stripBody(networkResponse))
      .build();
  if (HttpHeaders.hasBody(response)) {
    CacheRequest cacheRequest = maybeCache(response, networkResponse.request(), cache);
    response = cacheWritingResponse(cacheRequest, response);
  }
  return response;
}
从上面的代码可以看出,首先尝试从缓存中根据请求取出相应,然后创建CacheStrategy对象,该对象有两个字段networkRequest和cahceResponse,其中networkRequest不为null则表示需要进行网络请求,cacheResponse表示返回的或需要更新的缓存响应,为null则表示请求没有使用缓存。下面是对这两个字段的不同取值返回不同的响应:
- networkRequest\==null&& cacheResponse==null:表示该请求不需要使用网络但是缓存响应不存在,则返回504错误的响应;
- networkRequest\==null&&cacheRequest!=null:表示该请求不允许使用网络,但是因为有缓存响应的存在,所以直接返回缓存响应
- networkRequest!=null:表示该请求强制使用网络,则调用拦截器链中其余的拦截器继续处理得到networkResponse,得到网络响应后,又分为两种情况处理:
- cacheResponse!=null: 缓存响应之前存在,如果之前的缓存还有效的话,那么需要更新缓存,返回组合后的响应
- cacheResponse==null: 之前没有缓存响应,则将组合后的响应直接写入缓存即可。
下面继续看如果networkRequest为null的情况,那么需要继续调用拦截器链,那么下一个拦截器是ConnectInterceptor。
ConnectInterceptor
打开一个到目标服务器的连接。intercept方法的实现如下:
@Override public Response intercept(Chain chain) throws IOException {
  RealInterceptorChain realChain = (RealInterceptorChain) chain;
  Request request = realChain.request();
  StreamAllocation streamAllocation = realChain.streamAllocation();
  //创建具体的Socket连接,传入proceed中的后两个参数不再为null
  // We need the network to satisfy this request. Possibly for validating a conditional GET.
  boolean doExtensiveHealthChecks = !request.method().equals("GET");
  HttpCodec httpCodec = streamAllocation.newStream(client, doExtensiveHealthChecks);
  RealConnection connection = streamAllocation.connection();
  return realChain.proceed(request, streamAllocation, httpCodec, connection);
}
在RetryAndFollowUpInterceptor中,创建了StreamAllocation并将其传给了后面的拦截器链,所以这儿得到的StreamAllocation就是那时传入的,接下来是获取httpCodec对象以及RealConnection对象,然后继续交给下面的拦截器处理,至此,下一个拦截器中proceed中的后三个参数均不为null了。其中httpCodec接口可以认为是该连接的输入输出流,可以从中读响应,也可以写请求数据。
在看最后一个拦截器之前,我们再看一次RealInterceptorChain的proceed方法,因为此时的httpCodec和Connection均不为null。下面是proceed方法的实现:
//具体根据请求获取响应的实现,责任链模式的入口相当于前面讲的main
@Override public Response proceed(Request request) throws IOException {
  return proceed(request, streamAllocation, httpCodec, connection);
}
public Response proceed(Request request, StreamAllocation streamAllocation, HttpCodec httpCodec,
    Connection connection) throws IOException {
  if (index >= interceptors.size()) throw new AssertionError();
  calls++;
  // If we already have a stream, confirm that the incoming request will use it.
  if (this.httpCodec != null && !sameConnection(request.url())) {
    throw new IllegalStateException("network interceptor " + interceptors.get(index - 1)
        + " must retain the same host and port");
  }
  // If we already have a stream, confirm that this is the only call to chain.proceed().
  if (this.httpCodec != null && calls > 1) {
    throw new IllegalStateException("network interceptor " + interceptors.get(index - 1)
        + " must call proceed() exactly once");
  }
  //调用拦截器链中余下的进行处理得到响应
  // Call the next interceptor in the chain.
  RealInterceptorChain next = new RealInterceptorChain(
      interceptors, streamAllocation, httpCodec, connection, index + 1, request);
  //Interceptor是拦截器的抽象
  Interceptor interceptor = interceptors.get(index);
  //执行当前具体拦截器的intercept方法(每种拦截器intercept具体实现后面详解)
  Response response = interceptor.intercept(next);
  // Confirm that the next interceptor made its required call to chain.proceed().
  if (httpCodec != null && index + 1 < interceptors.size() && next.calls != 1) {
    throw new IllegalStateException("network interceptor " + interceptor
        + " must call proceed() exactly once");
  }
  // Confirm that the intercepted response isn't null.
  if (response == null) {
    throw new NullPointerException("interceptor " + interceptor + " returned null");
  }
  return response;
}
从上面的代码可以可以看出,调用sameConnection方法比较这是请求的URL与初始的是否相同,如果不同,则直接异常,因为相同的主机和端口对应的连接可以重用,而ConnectInterceptor已经创建好了Connection,所以这时如果URL主机和端口不匹配的话,不会再创建新的Connection而是直接抛出异常。这就说明网络拦截器中不可以将请求修改成与原始请求不同的主机和端口,否则就会抛出异常。其次,每个网络拦截器只能调用一次proceed方法,如果调用两次或以上次数,就会抛出异常。
在处理完网络拦截器后,会调用最后一个拦截器CallServerInterceptor。
CallServerInterceptor
CallServerInterceptor是拦截器链中最后一个拦截器,负责将网络请求提交给服务器。它的intercept方法实现如下:
@Override public Response intercept(Chain chain) throws IOException {
  HttpCodec httpCodec = ((RealInterceptorChain) chain).httpStream();
  StreamAllocation streamAllocation = ((RealInterceptorChain) chain).streamAllocation();
  Request request = chain.request();
  long sentRequestMillis = System.currentTimeMillis();
  //将请求头部信息写出
  httpCodec.writeRequestHeaders(request);
  //判断是否需要将请求主体部分写出
  if (HttpMethod.permitsRequestBody(request.method()) && request.body() != null) {
    Sink requestBodyOut = httpCodec.createRequestBody(request, request.body().contentLength());
    BufferedSink bufferedRequestBody = Okio.buffer(requestBodyOut);
    request.body().writeTo(bufferedRequestBody);
    bufferedRequestBody.close();
  }
  httpCodec.finishRequest();
  //读取响应首部
  Response response = httpCodec.readResponseHeaders()
      .request(request)
      .handshake(streamAllocation.connection().handshake())
      .sentRequestAtMillis(sentRequestMillis)
      .receivedResponseAtMillis(System.currentTimeMillis())
      .build();
  int code = response.code();
  if (forWebSocket && code == 101) {
    // Connection is upgrading, but we need to ensure interceptors see a non-null response body.
    response = response.newBuilder()
        .body(Util.EMPTY_RESPONSE)
        .build();
  } else {
    response = response.newBuilder()
        .body(httpCodec.openResponseBody(response))
        .build();
  }
  //如果服务端不支持持久连接
  if ("close".equalsIgnoreCase(response.request().header("Connection"))
      || "close".equalsIgnoreCase(response.header("Connection"))) {
    streamAllocation.noNewStreams();
  }
  if ((code == 204 || code == 205) && response.body().contentLength() > 0) {
    throw new ProtocolException(
        "HTTP " + code + " had non-zero Content-Length: " + response.body().contentLength());
  }
  return response;
}
从上面的代码中可以看出,首先获取httpCodec对象,然后调用writeRequestHeaders方法写入请求的头部,然后判断是否需要写入请求的body部分,最后调用finishRequest()方法将所有数据刷新给底层的Socket,接下来尝试调用readResponseHeaders()方法读取响应的头部,然后再调用openResponseBody()方法得到响应的body部分,最后返回响应。
可以看到CallServerInterceptor完成了最终的发送请求和接受响应。至此,整个拦截器链就分析完了,而得到原始响应后,前面的拦截器又分别做了不同的处理,ConnectInterceptor没有对响应进行处理,CacheInterceptor根据请求的缓存控制判断是否需要将响应放入缓存或更新缓存,BridgeInterceptor将响应去除部分头部信息得到用户的响应,RetryAndFollowUpInterceptor根据响应中是否需要重定向判断是否需要进行新一轮的请求。在这边我们需要明白一点,OkHttp的底层是通过Java的Socket发送HTTP请求与接受响应的(这也好理解,HTTP就是基于TCP协议的),但是OkHttp实现了连接池的概念,即对于同一主机的多个请求,其实可以公用一个Socket连接,而不是每次发送完HTTP请求就关闭底层的Socket,这样就实现了连接池的概念。而OkHttp对Socket的读写操作使用的OkIo库进行了一层封装。
应用拦截器
- 不需要考虑失败重试以及重定向。 因为位于RetryAndFollowupInterceptor之前,那是RetryAndFollowupInterceptor负责的事情
- 只会被调用一次,即使响应是从缓存中得到的,因为位于RetryAndFollowupInterceptor之前。
- 观察请求的原始意图,不关注比如说”If-None-Match”头参数。 因为位于拦截器链的顶端,所以观察请求的原始意图。
- 如果不调用chain.proceed方法那么将会造成短路。 如果不调用chain的proceed方法,那么请求就不会继续往下面的拦截器链传递,自然后面的拦截器链将失效。
- 可以多次调用chain的procced来重试请求。
网络拦截器
- 可以处理中间的响应,比如重试的响应或重定向的响应,因为在RetryAndFollowupInterceptor之后。 在CallServerInterceptor得到响应后,首先会交给网络拦截器处理响应,自然可以处理中间状态的响应。
- 不调用缓存响应,短路网络操作。 在进行网络操作前短路,不将请求交给CallServerInterceptor。
- 观察传递到网络上的数据。 因为位于CallServerInterceptor拦截器之前
- 可以得到携带请求的Connection对象。 因为在ConnectInterceptor拦截器之后,所以可以得到在ConnectInterceptor中创建的Connection对象。
文章作者:Hpw123
发布时间:2016-12-29, 00:32:32
最后更新:2016-12-29, 15:39:57
原始链接:hpw123.coding.me/2016/12/29/…
许可协议: "署名-非商用-相同方式共享 4.0" 转载请保留原文链接及作者。
