

本文已经翻译成中文《如何提高安卓代码的质量和语法》,欢迎参加「掘金翻译计划」,翻译优质的技术文章。
In this article, I will present different ways of improving your Android code with automatic tools such as Checkstyle[4], Findbugs[5], PMD[6], and of course Android Lint[7]. Test your code in an automated way can be very useful, especially when you are working with teammates, in order to maintain a rigorous syntax through your code, and avoid a lot of bad practices and errors. I will explain precisely how to use these tools directly through your Gradle build script, and how to configure them at your convenience.
Fork the example !
I strongly recommend you to fork the following project[8], since all the examples I will present come from it. At the same time, you will be able to test yourself these quality tools.
About Gradle tasks
The concept of task (in the Gradle meaning) is a fundamental for the understanding of this article (and how write Gradle script in a more general way). I strongly recommend you to take a look at the documentation of Gradle about tasks (this one[9] and this one[10]). This documentation is full of examples, so its very easy to dive in. So now I suppose you forked my repo, you imported the project into your Android Studio, and you are familiar with Gradle tasks. If not, don’t worry, I will make my best to make my explanations meaningful ;).
About the hierarchy of my demo project :
Since you can split your gradle script in many files, I currently have 3 gradles files :
- The one in the root folder[11], which is more or less just about configuration for the project (which maven repos to use, which Gradle version to use….).
- The one in the subfolder app[12], which is a very classic gradle file to build an Android application.
- The one in the subfolder config[13], on which we will focus on, since I use this one to retain and configure all my quality tools for my project.
Checkstyle
Presentation
“Checkstyle is a development tool to help programmers write Java code that adheres to a coding standard. It automates the process of checking Java code to spare humans of this boring (but important) task.”
As said by the developers of Checkstyle, this tool help you to define and maintain in a very precise and flexible way the coding standards of a project. When you launch Checkstyle, it will parse your Java code and will inform you about all the errors found according the configuration provided.
The Gradle way
The following code show you the basic configuration to use Checkstyle in your project (as a Gradle task) :
task checkstyle(type: Checkstyle) {
configFile file("${project.rootDir}/config/quality/checkstyle/checkstyle.xml") // Where my checkstyle config is...
configProperties.checkstyleSuppressionsPath = file("${project.rootDir}/config/quality/checkstyle/suppressions.xml").absolutePath // Where is my suppressions file for checkstyle is...
source 'src'
include '**/*.java'
exclude '**/gen/**'
classpath = files()
}
So, basically this task will analyse your code according to the checkstyle.xml and the suppressions.xml. To execute it through Android Studio, just launch the task checkstyle from the gradle panel :
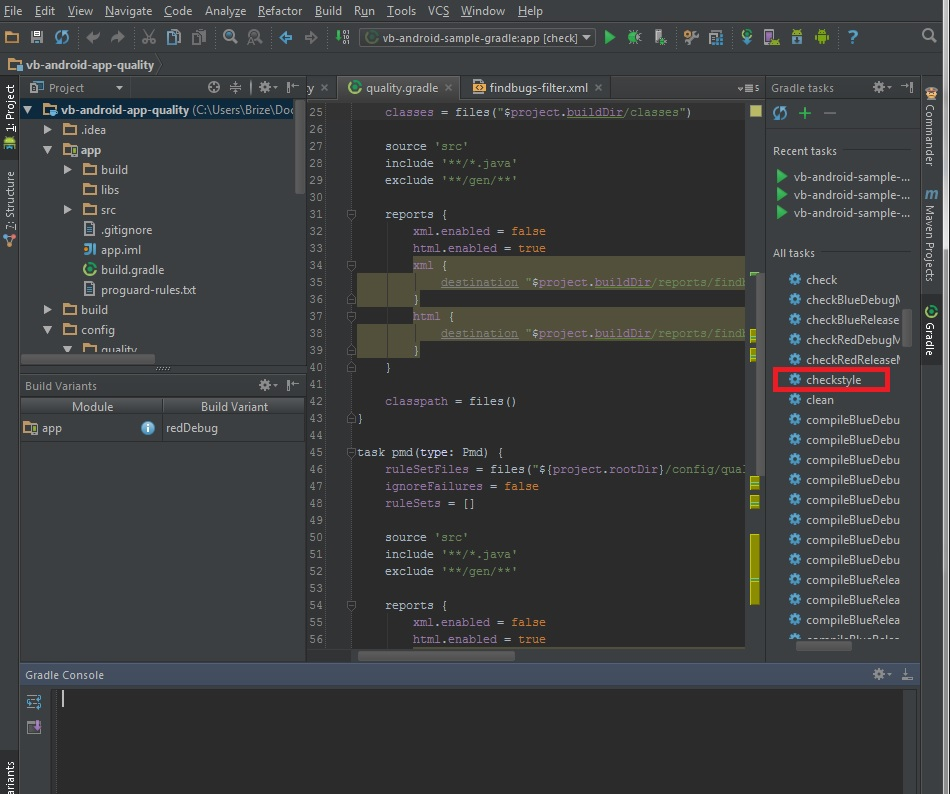
How to execute your gradle task checkstyle
After running checkstyle, you will have a report describing each problem founded in your project. That’s pretty straightforward.
If you want to do more configurations on checkstyle, just refer to the documentation [15] ;).
Tricks for checkstyle
Checkstyle will detect a huge amount of problems, especially if you use a lot of rules, like in the case you want a very precise syntax. Even if I use checkstyle through Gradle, for example before my pushs, I recommend you to also use the plugin checkstyle for IntellJ/Android Studio (you can directly install it from Android Studio through the panel File/Settings/Plugins). This way you will be able to apply checkstyle to your project according the same configs files as specified for Gradle, but more than that, you will have access to the results directly in Android Studio, with hyperlinks to the problems in your code, which is pretty useful (The Gradle way is still very important since you can use it through automated build system like Jenkins).
Findbugs
 [16]
[16]Presentation
Does Findbugs need a presentation? I guess the name is meaningful. “FindBugs uses static analysis to inspect Java bytecode for occurrences of bug patterns.” Findbugs basically just need the bytecode of a program to do the analysis, so it is very easy to use. It will detect common error such as wrong boolean operator. Findbugs is also able to detect error due to misunderstood of language features, such as reassignment of parameters in Java (which is not really possible since it parameters are passed by values).
The Gradle way
The following code show you the basic configuration for use Findbugs in your project (as a Gradle task) :
task findbugs(type: FindBugs) {
ignoreFailures = false
effort = "max"
reportLevel = "high"
excludeFilter = new File("${project.rootDir}/config/quality/findbugs/findbugs-filter.xml")
classes = files("${project.rootDir}/app/build/classes")

source 'src'
include '**/*.java'
exclude '**/gen/**'

reports {
xml.enabled = false
html.enabled = true
xml {
destination "$project.buildDir/reports/findbugs/findbugs.xml"
}
html {
destination "$project.buildDir/reports/findbugs/findbugs.html"
}
}

classpath = files()
}
So it looks a lot like the Checkstyle task. Since Findbugs support HTML and XML reports, I pick the HTML since the report is more readable. Moreover, you just need to bookmark the report location to have a quick access to it. This task will also failed if an error in Findbgus is detected (still producing a report). To execute the Findbugs task, that’s exactly like for the Checkstyle task (except that the name of the task is “findbugs”).
Tricks for Findbugs
I strongly recommend to use a findbugs-filter, since Android project are slightly different from Java project. You can take example on this one[17] (the one of the example project). It will basically ignore the R file and your Manifest file. By the way, since Findbugs analyse your bytecode, you need to compile at least one time your code to be able to test it.
 [19]
[19]Presentation
Funny fact of this tool : there is not a real name for PMD. On the offcicial website you will find very interesting names propositions as :
- Pretty Much Done
- Project Meets Deadline
In the facts, PMD is a very powerful tool which works a little bit like Findbugs, but inspect directly the source code, and not the bytecode (btw. PMD can work with plenty of languages). The goal is globally the same, find patterns which can lead to bugs using static analysis. So why use Findbugs and PMD at the same time ? Well, even if Findbugs and PMD share globally the same goals, their inspecting methods are different. So PMD can sometimes find bugs which Findbugs wont, and vice versa.
The Gradle way
The following code show you the basic configuration for use PMD in your project (as a Gradle task) :
task pmd(type: Pmd) {
ruleSetFiles = files("${project.rootDir}/config/quality/pmd/pmd-ruleset.xml")
ignoreFailures = false
ruleSets = []

source 'src'
include '**/*.java'
exclude '**/gen/**'

reports {
xml.enabled = false
html.enabled = true
xml {
destination "$project.buildDir/reports/pmd/pmd.xml"
}
html {
destination "$project.buildDir/reports/pmd/pmd.html"
}
}
}
For PMD, this is also almost the same as Findbugs. PMD can produce HTML or XML reports, so again I pick the HTML format. I strongly recommend you to use your own custom rulesets file as I’m doing in this example (check this file[20]). So of course, take a look at the documentation about custom ruleset[21]. I recommend you that because PMD can be a lot more controversial than Findbugs. For example, it will basically warn you if you not collapse “if statement”, or if you have empty “if statement”. I’m really thinking that’s the job of you and your teammates to define, if these rules are right, or not, for your project. I know I prefer to not collapse if statement since, I think this is a lot less readable. To execute the PMD task, that’s exactly like for the Checkstyle task (except that the name of the task is “pmd”).
Tricks for PMD
As I recommend you to not use the default ruleSet, you need to add this line (already added above) :
ruleSets = []Otherwise, since the default value is the basic ruleset, the basic ruleset will always be executed alongside with your custom ruleset. So if you say in your custom ruleset to not use specific rules in the basic ruleset, they still will be considered.
Android Lint
Presentation
“The Android lint tool is a static code analysis tool that checks your Android project source files for potential bugs and optimization improvements for correctness, security, performance, usability, accessibility, and internationalization.”
As the official site said, Android Lint is another static analysis tool, dedicated this time to Android. It is extremely powerful, and can give great piece of advice to improve the quality of your code.
The Gradle way
android {
lintOptions {
abortOnError true

lintConfig file("${project.rootDir}/config/quality/lint/lint.xml")

// if true, generate an HTML report (with issue explanations, sourcecode, etc)
htmlReport true
// optional path to report (default will be lint-results.html in the builddir)
htmlOutput file("$project.buildDir/reports/lint/lint.html")
}
I recommend you to use a separate file to define which rules to use or not. This website[22] defines all the rules from the latest ADT version. The lint file of my demo project contains all these rules (ADT 21) with the “severity” level at “ignore” except for this article :
- IconDensities : This rule ensure that you define each image resource in each density (except ldpi).
- IconDipSize : This rule ensure that you define rightfully the resource for each dip (in other terms, check if you did not put the same image resource for each density, without re-sized it).
So you can reuse this lint file and activate all the rules you want. To execute the Android Lint task, that’s exactly like for the Checkstyle task (except that the name of the task is “lint”).
Tricks for Android Lint
No special tricks for android lint, just keep in mind that Android Lint will always test all the rules except the one set with a “severity” level at “ignore”. So if new rules are released with new version of ADT, they will be examined, and not ignored.
One task to rule them all
Now, you have all the keys to use 4 quality tools for your projects. But obviously it would be better if we could use these 4 tools at the same time. You can add dependency between your gradle tasks, like for example when you execute one task, the others ones are executed after the completion of the first one. Usually with Gradle, you add dependencies of your quality tools with the “check” task :
check.dependsOn 'checkstyle', 'findbugs', 'pmd', 'lint'
Now, when executing the “check” tasks, Checkstyle, Findbugs, PMD, and Android Lint will be executed. That’s a great way of checking the quality of what you are doing before / commiting / pushing / ask merge request :).
You can find a full example of all these tasks in the following gradle file[23]. You can separate all the quality configurations and gradle files from the source as you can see in the demo example, where everything is packaged in the “config/quality” folder.
Conclusion
As presented in this article, the use of quality tools for Android is very easy with Gradle. More than using quality tools locally to check your project on your own computer, these tools can be used in automated build plateform like Jenkins/Hudson, allowing you to automate the process of quality, alongside with your automated build process. To execute all the tests I presented from the CLI, like to execute it on Jenkins/Hudson, simply execute :
gradle checkPlease feel free to comment this article, or ask any questions relative to quality for Android 
