MediaCodec 是 Android 音视频开发中不可能绕过的环节,但它真的不太好用,小水坑太多。今天我们就趟趟小水坑,走进科学,oh,不,走进 MediaCodec。
欢迎转载,但请务必带上本人信息,谢谢!链接地址:http://www.woaitqs.cc/2018/11/26/how-to-use-mediacodec-correctly/
MediaCodec Introduction
MediaCodec 是 Android 多媒体支持框架中的一员,其他还包括 MediaExtractor、MediaSync、MediaMuxer、MediaDrm 等等,负责编解码相关的工作。接下来我们简单地介绍下 MediaCodec 是如何工作的。
工作流程
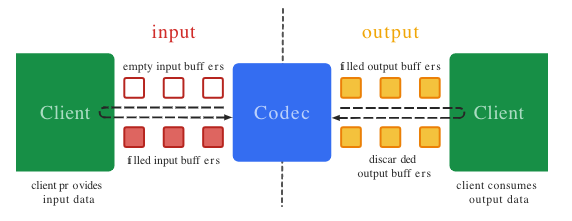
In broad terms,编解码器处理输入数据并产生输出数据,MediaCodec 使用输入输出缓存,异步处理数据。简要地说,一般的处理步骤如下
-
请求一个空的输入 input buffer
-
填入数据、并将其交给 MediaCodec
-
MediaCodec 处理数据后,将处理后的数据放在一个空的 output buffer
-
获取填充数据了的 output buffer,得到其中的数据,然后将其返还给 MediaCodec。
下图是对步骤的阐释
支持的数据类型
我们的大脑不是万能的,MediaCodec 也不是什么数据都能支持的。一般在有限的范围内运转的系统,稳定且可靠,嘿嘿嘿。MediaCodec 支持三种数据格式,下面分别介绍:
-
Compressed Data既然是编解码器,那么势必会处理对应视频、音频格式的压缩数据,也就是 Encode 的输出数据、Decoder的输入数据。我们将这一类数据,统称为压缩数据。压缩数据格式,取决于 MediaFormat | Android Developers。对于视频数据而言,通常是一帧数据;音频数据,一般是单个处理单元(包括多少微秒的数据)。一般情况下,除非指定为
BUFFER_FLAG_PARTIAL_FRAME,否则不会出现半个帧的情况。 -
Raw Audio Buffers编解码器,需要编码对应的音频数据,那么就肯定会处理音频格式数据,也就是 PCM 数据。对于音频编码格式,只有 ENCODING_PCM_16BIT 确认被各 System \ Rom 支持哦。
这里简要滴摘录下 Wiki 上关于 PCM 数据的定义。
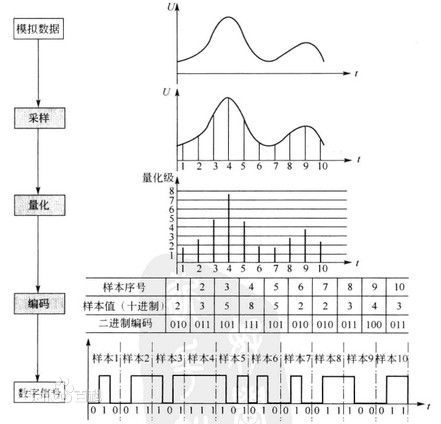
PCM就是把一个时间连续,取值连续的模拟信号变换成时间离散,取值离散的数字信号后在信道中传输。简而言之PCM就是对模拟信号先抽样,再对样值幅度量化,编码的过程。例如听到的声音就是模拟信号,然后对声音采样,量化,编码产生数字信号。相对自然界声音信号,任何音频编码都是有损的,在计算机应用中,能达到高保真的就是PCM编码,因此PCM约定成俗成了无损编码,对于声音而言,我们通常采用PCM编码。
-
Raw Video Buffersa. Native raw video format. 也就是MediaCodecInfo.CodecCapabilities.COLOR_FormatSurface,注意这种格式,并不是所有 Android 手机都支持的哦。b. YUV buffers. 可以用在 Surface 格式,或者 ByteBuffer 格式中。Google 表示在 API 22 以后,所有机型都保证支持 YUV 4:2:0 格式。c. Other formats. 这就看厂商心情了,可以通过 MediaCodecInfo.CodecCapabilities 来进行查询。
状态机
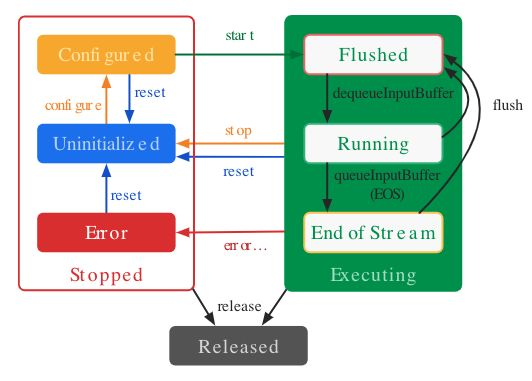
MediaCodec 大体上分为三种状态、Stopped、Executing和 Released。状态机工作图如上,其后就是很具体的调用细节了。
具体的状态切换就不翻译了,大家可以通过上面的图,结合英文看一看。
When you create a codec using one of the factory methods, the codec is in the Uninitialized state. First, you need to configure it via configure(…), which brings it to the Configured state, then call start() to move it to the Executing state. In this state you can process data through the buffer queue manipulation described above.
The Executing state has three sub-states: Flushed, Running and End-of-Stream. Immediately after start() the codec is in the Flushed sub-state, where it holds all the buffers. As soon as the first input buffer is dequeued, the codec moves to the Running sub-state, where it spends most of its life. When you queue an input buffer with the end-of-stream marker, the codec transitions to the End-of-Stream sub-state. In this state the codec no longer accepts further input buffers, but still generates output buffers until the end-of-stream is reached on the output. You can move back to the Flushed sub-state at any time while in the Executing state using flush().
Call stop() to return the codec to the Uninitialized state, whereupon it may be configured again. When you are done using a codec, you must release it by calling release().
On rare occasions the codec may encounter an error and move to the Error state. This is communicated using an invalid return value from a queuing operation, or sometimes via an exception. Call reset() to make the codec usable again. You can call it from any state to move the codec back to the Uninitialized state. Otherwise, call release() to move to the terminal Released state.
MediaCodec Usage Tips
接下来讲讲,如何用正确的姿势(知识)来使用 MediaCodec,毕竟这家伙在不同手机、不同系统上面都表现不同。对它的正确使用,不太考验技术,更考验经验和细心。
Create Instance
首先是如何创建 MediaCodec,在创建 MediaCodec 时,需要弄清楚自己是想创建 Encoder 还是 Decoder。
在知晓 Media Types 的情况下,可通过 createDecoderByType, createEncoderByType, createByCodecName 方法来获取实例。
问题在于如何确定手机是否支持该 MimeType 呢?在 API 21 上,可以使用 MediaCodecList.findDecoderForFormat、MediaCodecList.findEncoderForFormat 这两个方法来进行获取,如果有满足需求的Codec,会返回对应 MimeType。这里需要说明的是,需要在 LOLLIPOP 版本上,::清除掉 Format 中关于 KEY_FRAME_RATE 的设置::,无疑这是一个小坑。
Android 底层的多媒体框架采用了 OpenMax 标准,但具体的硬件编解码功能,则是有各个产商负责的,这就导致不同手机可能差异很多,也是 Android 多媒体框架兼容性问题大的根源。那么我们如何来处理哪怕仅仅是创建就会碰到的兼容性问题呢?
以下,包括接下来章节的内容,大部分都是通过官方的 Compatibility Definition Document 和 Supported media formats | Android Developers 来作为参考的,后面就不重复解释了。
Audio Codec
遇事不决,看下面的图
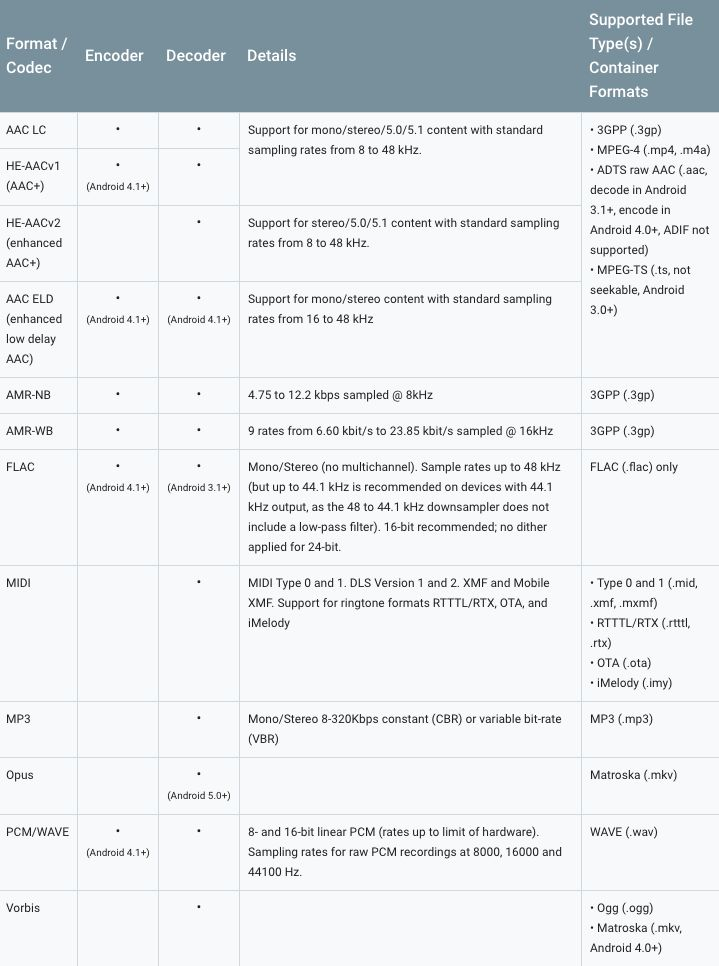
从上图可以看到,对于大部分音频解码而言,都是支持的。在实际开发中,当解码一个音频的时候,不用做什么特殊处理,处理好可能的 Crash,正常解码就行。反倒是,在音频编码的时候需要注意。对于有录音Mic权限的手机而言,官方保证支持 PCM/WAVE 可以用于编码,但我们对这个的使用较少。另外可以看到我们熟悉的 MP3 格式,并不在支持之列哟。我们使用的是另一种几乎所有设备都支持的编码格式,m4a,其 MimeType 就是 “::audio/mp4a-latm::”。
m4a 听上去很奇怪,其实就是 MPEG-4 Audio 的简写。苹果公司为了区分包含视频、音频的MP4文件与只有音频的MP4文件,对后者进行了单独命名::.m4a::,这种格式对现今绝大部分移动设备都支持。M4A is a file extension for an audio file encoded with advanced audio coding (AAC) which is a lossy compression. M4A was generally intended as the successor to MP3, which had not been originally designed for audio only but was layer III in an MPEG 1 or 2 video files. M4A stands for MPEG 4 Audio.
Video Codec
同样遇事不决,看下面的图
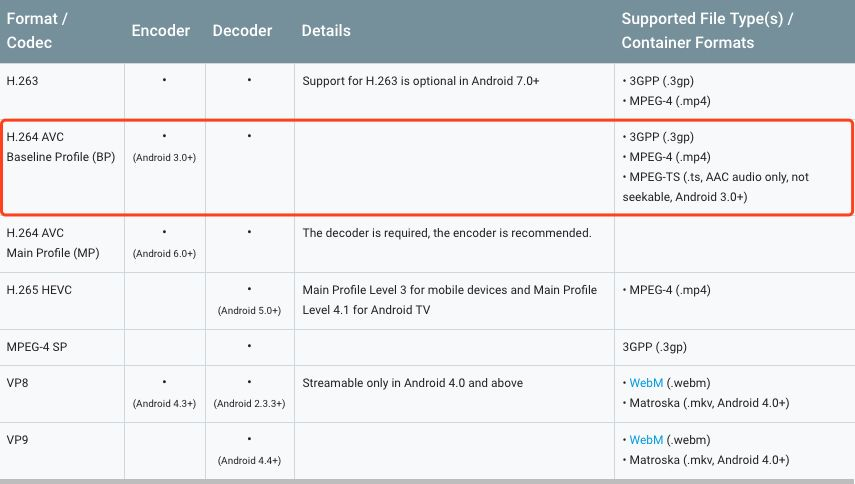
VP8/9 适用性没有 H.264 来的广,就略过不谈了;263 在 7.0 以上才可以用而且没有H.264来的广;265相关的,Android 不太支持。最后也就剩下 H.264 AVC 啦。关于 H.264 AVC Main Profile (MP) 与 H.264 AVC Main Profile (HP) 了,得在更高阶的 Android 系统(7.0 +) 才开始支持,而且会有一定的兼容性问题,这个在后面会专门提及。综合起来呢,要先做到最全的兼容性,让几乎在所有机型上都能运作,选用 H.264 BaseLine 作为编码器,是一个不错的选择。
Configuration
在创建好 MediaCodec 过后,需要对其进行配置,这样 MediaCodec 的状态就可以由 uninitiated 变成 configured。
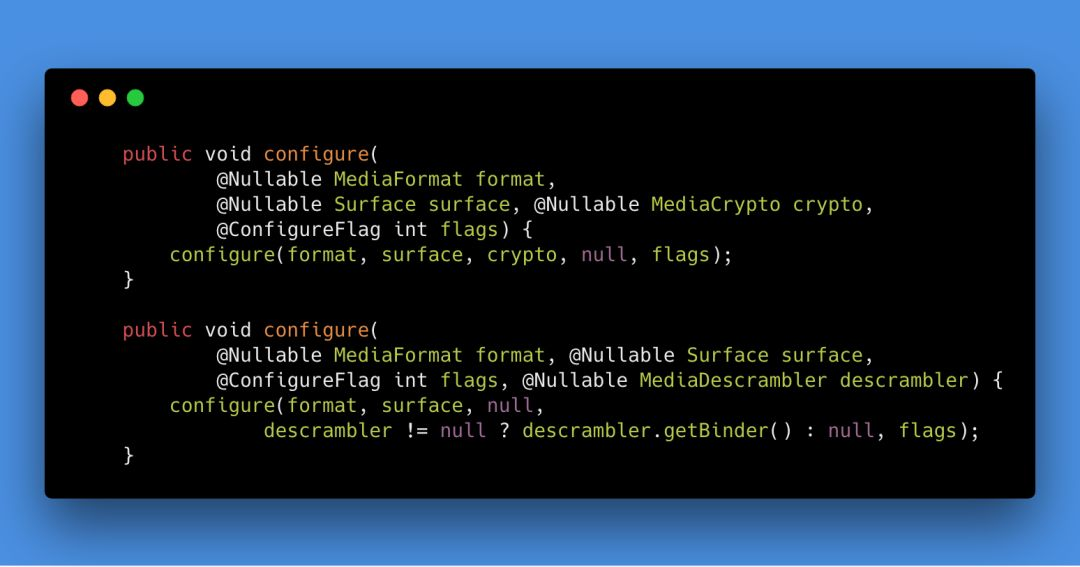
这里最重要的参数是 MediaFormat,要敲黑板啦!
-
某些 MediaFormat 没有设置的话,会导致 MediaCodec 抛出 IllegalStateException 哦!all keys not marked optional are mandatory !!
-
参数设置不对,也可能会抛出异常哦。比如设置一个超出手机能力范围外的分辨率。
Video 所必须的 Format Setting。
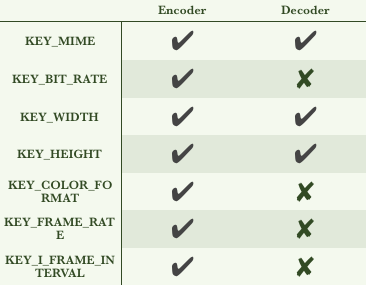
Audio 所必须的 Format Setting。
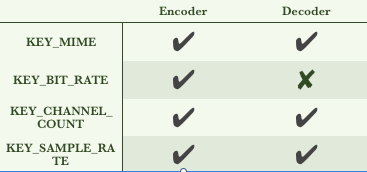
下面说几个需要特别注意的几个设置项。
KEY_WIDTH 与 KEY_HEIGHT
在编码的时候,请务必保证两者是16的整数倍。
KEY_BIT_RATE & KEY_FRAME_RATE
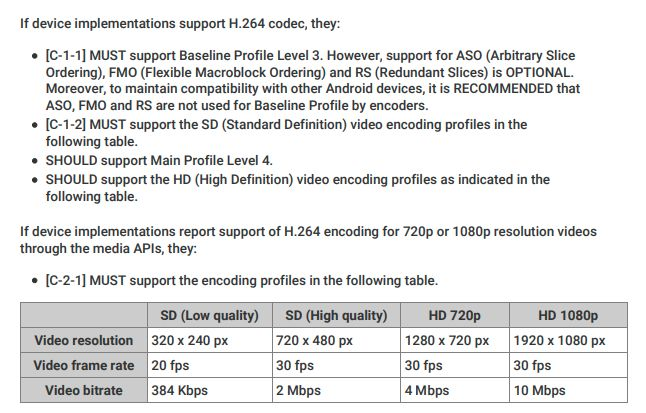
BIT_RATE 没有什么太大的坑,注意下单位就好 bits/seconds. 下面的图展示了,官方要求设备对于不同分辨率下需要支持的最低分辨率。
FRAME_RATE 也同样,几乎都被要求支持至少 30 FPS。(但实际能否达到 30 FPS 的效果,就很难说了,此外 FPS 的设置还会和 Camera 预览的亮度有一定关系哦,结合光影的秘密 | Coding And Living | Qisen Tang - Android Developer 体会一下)

KEY_COLOR_FORMAT
CDD 文档中要求,::If device implementations include a video decoder or encoder,Video encoders and decoders MUST support YUV420 flexible color format(COLOR_FormatYUV420Flexible)::。COLOR_FormatYUV420Flexible 是在 API 21 才开始引入的,而且是一种 魔法格式,可以代表很多格式。
Chroma planes are subsampled by 2 both horizontally and vertically. Use this format with Image. This format corresponds to ImageFormat.YUV_420_888, and can represent the COLOR_FormatYUV411Planar, COLOR_FormatYUV411PackedPlanar, COLOR_FormatYUV420Planar, COLOR_FormatYUV420PackedPlanar, COLOR_FormatYUV420SemiPlanar and COLOR_FormatYUV420PackedSemiPlanar formats.虽然这种格式被21版本后所有手机都支持,但使用的时候需要结合 Image | Android Developers 来使用,getOutputImage / getInputImage。
在更低的版本时,需要设置具体的 Color_Format,基本上大部分设备都支持 COLOR_FormatYUV420SemiPlanar 或者 COLOR_FormatYUV420Planar。我们只需要处理这两种 Color_Format 就可以了。
这里还有一个坑,是在某些设备上 ColorFormat 所表示的格式可能是反的,比如NV12 与 NV21。建议尽可能地使用前面章节提到的Surface input API 来规避这些问题。
KEY_I_FRAME_INTERVAL
通常的方案是设置为 1s,对于图片电影等等特殊情况,这里可以设置为 0,表示希望每一帧都是 KeyFrame。
但要想达到精确的帧率控制不太现实,尽量使用 Surface,尽量在流程中不占用过多资源,没有明显卡顿耗时,这样得出的帧率相对更好一些。
KEY_PROFILE & KEY_LEVEL
这里设置编码级别,注意这里 Profile 必须和 level 配对,下面的代码是一个简单的示例。
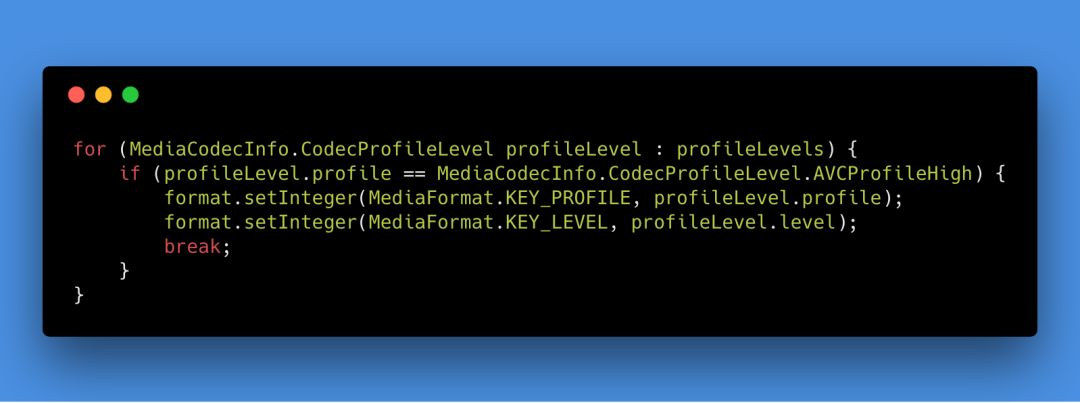
这里 Profile 级别的设置是一个深坑。
-
深坑 NO.1 -> 在 Android 7.0 以前,不管你怎么设置 Profile 级别,最后都会使用 BaseLine,因为这在源码里面写死了。。。
-
深坑 NO.2 -> Main 或者 High Profile 能够带来更高的压缩比和其他好处,但并不意味着它的兼容性就很好。在某杂粮手机,Oppo手机的部分机型中,使用 High Profile 会导致 pts 和 dts 时间不一致,从而在播放的时候会画面来回跳动。(至今不知道怎么爬出这个坑,还是老实用回 BaseLine 了)
尽管如此,还是建议大家尽量使用 High/Main 这样的 Profile,新方案新技术,只有使用才能发挥价值。
额外地说一下,我们开发录音功能时,使用 AudioRecorder,并将相应的数据送给编码器。这里在配置 AudioRecorder 时,最好将 PCM 的格式设置为 ::ENCODING_PCM_16BIT::,采样率设置为 ::44100Hz:: (44100 is currently the only rate that is guaranteed to work on all devices),声道设置为::单声道:: ({@link AudioFormat#CHANNEL_IN_MONO} is guaranteed to work on all devices)。用 Android 多媒体框架就应该求生欲极强。
KEY_IS_ADTS
A key mapping to a value of 1 if the content is AAC audio and audio frames are prefixed with an ADTS header. The associated value is an integer (0 or 1). This key is only supported when decoding content, it cannot be used to configure an encoder to emit ADTS output.
这个设置项只在解码音频的时候才有用,单独拎出来还是因为其有坑。通常情况下,我们不需要去理会 ADTS,直接使用回调中的 Format 就可以了。但在魅族某些机型上,Format 可能会有错误,对于这种情况时,还是手动设置 KEY_IS_ADTS 为 1 比较好。
Other Tips
真正在使用 MediaCodec 的时候,还会遇到一些小坑,接下来简单地介绍下。(具体怎么用 MediaCodec ,网上很多资料就不讲啦)
-
保证 output 数据与 muxer 数据,在同一个线程上,否则可能出现花屏等现象。
-
createInputSurface() 需要在 configure 之后,与 start 之前,否贼可能创建失败。
-
处理数据时,需要处理 position 与 offset。
还有一些其他 Tips,诸君一起来更新呀~
参考资料
-
Android MediaCodec stuff
-
Android Compatibility Definition Document
-
MediaCodec | Android Developers
-
tests/tests/media/src/android/media/cts - platform/cts - Git at Google
-
GitHub - OnlyInAmerica/HWEncoderExperiments: Deprecated ( See https://github.com/Kickflip/kickflip-android-sdk for my current work). Experiments with Android 4.3’s MediaCodec and MediaMuxer
-
GitHub - videolan/vlc: VLC media player - All pull requests are ignored, please follow https://wiki.videolan.org/Sending_Patches_VLC/
-
tests/tests/media/src/android/media/cts - platform/cts - Git at Google
文档信息
-
版权声明:自由转载-非商用-非衍生-保持署名(创意共享3.0许可证)
-
发表日期:2018年11月26日
-
社交媒体:weibo.com/woaitqs
-
Feed订阅:www.woaitqs.cc/feed.xml