

关于session和token的使用,网上争议一直很大。 总的来说争议在这里:
- session是空间换时间,而token是时间换空间。session占用空间,但是可以管理过期时间,token管理部了过期时间,但是不占用空间.
- sessionId失效问题和token内包含。
- session基于cookie,app请求并没有cookie 。
- token更加安全(每次请求都需要带上)。
第一章顺风车:SpringBoot 整合 Security(一)实现用户认证并判断返回json还是view
第二章顺风车:SpringBoot 整合 Security(二)实现验证码登录
开始正文了...
本文大概流程:
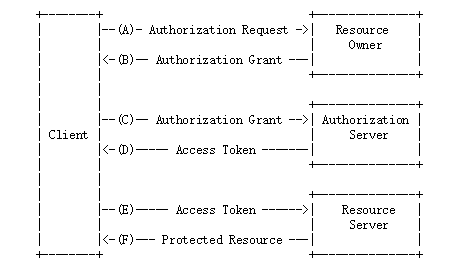
oauth2流程简介
百度百科:baike.baidu.com/item/OAuth2…
详情请参考文档:tools.ietf.org/html/rfc674…
授权类型介绍(四种授权):oauth.net/2/grant-typ…
我在这里只介绍常用的密码授权。
Oauth2 密码授权流程
在oauth2协议里,每一个应用都有自己的一个clientId和clientSecret(需要去认证方申请),所以一旦想通过认证,必须要有认证方下发的clientId和secret。
原理这块确实很麻烦,希望不理解的多看看参考文档。
1. pom
        <!--security-->
        <dependency>
            <groupId>org.springframework.boot</groupId>
            <artifactId>spring-boot-starter-security</artifactId>
        </dependency>
        <dependency>
            <groupId>org.springframework.security.oauth</groupId>
            <artifactId>spring-security-oauth2</artifactId>
        </dependency>
2. 项目架构介绍
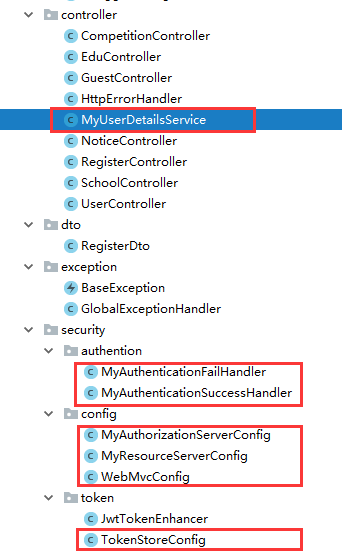
我们需要这七个类来完成。
3. UserDetail实现认证第一步
MyUserDetailsService.java
/**
 * Created by Fant.J.
 */
@Component
public class MyUserDetailsService implements UserDetailsService {

    @Reference(version = "2.0.0")
    private UserService userService;

    @Override
    public UserDetails loadUserByUsername(String username) throws UsernameNotFoundException {
        String passwd = "";
        System.out.println("收到的账号"+username);
        if (CheckFormat.isEmail(username)){
             passwd = userService.selectPasswdByEmail(username);
        }else if (CheckFormat.isPhone(username)){
             passwd = userService.selectPasswdByPhone(username);
        }else {
            throw new RuntimeException("登录账号不存在");
        }
        System.out.println("查到的密码"+passwd);
        return new User(username, passwd, AuthorityUtils.commaSeparatedStringToAuthorityList("ROLE_USER"));
    }
}
这里重写了security认证UserDetailsService 的接口方法,添加了自定义数据库密码的查询和校验。
为什么我把它放在了controller包了呢,因为我用的dubbo,@Reference注解扫描包是controller。这注解在别的包下失效。没搞过dubbo的朋友就把它当作是调用service层就行。
4. 认证成功/失败处理器
这部分在security的整合(一)就有,这里稍有改动。
改动一:去掉了返回view还是json的判断,统一返回json。 改动二:修改登陆成功处理器,添加oauth2 客户端的认证。
MyAuthenticationFailHandler.java
/**
 * 自定义登录失败处理器
 * Created by Fant.J.
 */
@Component
public class MyAuthenticationFailHandler extends SimpleUrlAuthenticationFailureHandler {

    private Logger logger = LoggerFactory.getLogger(getClass());

    @Override
    public void onAuthenticationFailure(HttpServletRequest request, HttpServletResponse response, AuthenticationException exception) throws IOException, ServletException {

        logger.info("登录失败");
            //设置状态码
            response.setStatus(500);
            response.setContentType("application/json;charset=UTF-8");
            //将 登录失败 信息打包成json格式返回
            response.getWriter().write(JSON.toJSONString(ServerResponse.createByErrorMessage(exception.getMessage())));
    }
}
MyAuthenticationSuccessHandler.java
/**
 * Created by Fant.J.
 */
@Component
public class MyAuthenticationSuccessHandler extends SavedRequestAwareAuthenticationSuccessHandler {
    private Logger logger = LoggerFactory.getLogger(getClass());

    @Autowired
    private ClientDetailsService clientDetailsService;

    @Autowired
    private AuthorizationServerTokenServices authorizationServerTokenServices;


    @Override
    public void onAuthenticationSuccess(HttpServletRequest request, HttpServletResponse response, Authentication authentication) throws IOException, ServletException {
        logger.info("登录成功");


        String header = request.getHeader("Authorization");
        if (header == null && !header.startsWith("Basic")) {
            throw new UnapprovedClientAuthenticationException("请求投中无client信息");
        }
        String[] tokens = this.extractAndDecodeHeader(header, request);

        assert tokens.length == 2;

        //获取clientId 和 clientSecret
        String clientId = tokens[0];
        String clientSecret = tokens[1];

        //获取 ClientDetails
        ClientDetails clientDetails = clientDetailsService.loadClientByClientId(clientId);

        if (clientDetails == null){
            throw new UnapprovedClientAuthenticationException("clientId 不存在"+clientId);
            //判断  方言  是否一致
        }else if (!StringUtils.equals(clientDetails.getClientSecret(),clientSecret)){
            throw new UnapprovedClientAuthenticationException("clientSecret 不匹配"+clientId);
        }
        //密码授权 模式, 组建 authentication
        TokenRequest tokenRequest = new TokenRequest(MapUtils.EMPTY_MAP,clientId,clientDetails.getScope(),"password");

        OAuth2Request oAuth2Request = tokenRequest.createOAuth2Request(clientDetails);
        OAuth2Authentication oAuth2Authentication = new OAuth2Authentication(oAuth2Request,authentication);

        OAuth2AccessToken token = authorizationServerTokenServices.createAccessToken(oAuth2Authentication);

        //判断是json 格式返回 还是 view 格式返回
        //将 authention 信息打包成json格式返回
        response.setContentType("application/json;charset=UTF-8");
        response.getWriter().write(JSON.toJSONString(ServerResponse.createBySuccess(token)));
    }


    /**
     * 解码请求头
     */
    private String[] extractAndDecodeHeader(String header, HttpServletRequest request) throws IOException {
        byte[] base64Token = header.substring(6).getBytes("UTF-8");

        byte[] decoded;
        try {
            decoded = Base64.decode(base64Token);
        } catch (IllegalArgumentException var7) {
            throw new BadCredentialsException("Failed to decode basic authentication token");
        }

        String token = new String(decoded, "UTF-8");
        int delim = token.indexOf(":");
        if (delim == -1) {
            throw new BadCredentialsException("Invalid basic authentication token");
        } else {
            return new String[]{token.substring(0, delim), token.substring(delim + 1)};
        }
    }
}
描述:
从request的请求头中拿到Authorization信息,根据clientId获取到secret和请求头中的secret信息做对比,如果正确,组建一个新的TokenRequest类,然后根据前者和clientDetails创建OAuth2Request对象,然后根据前者和authentication创建OAuth2Authentication对象。最后通过AuthorizationServerTokenServices和前者前者创建OAuth2AccessToken对象。然后将token返回。
提示:
密码授权,我们在请求token的时候,需要一个包含clientid和clientSecret的请求头还有三个参数。
- 请求头:Authorization -> Basic aW50ZXJuZXRfcGx1czppbnRlcm5ldF9wbHVz 。注意是Basic 开头然后是clientid:clientScret 格式进行base64加密后的字符串。
- 请求参数:username和password是必须要的参数,值对应的就是账号密码,还有给可有可无的就是scope,它来声明该用户有多大的权限,默认是all。grant_type也是默认的参数,默认是password,它表示你以哪种认证模式来认证。
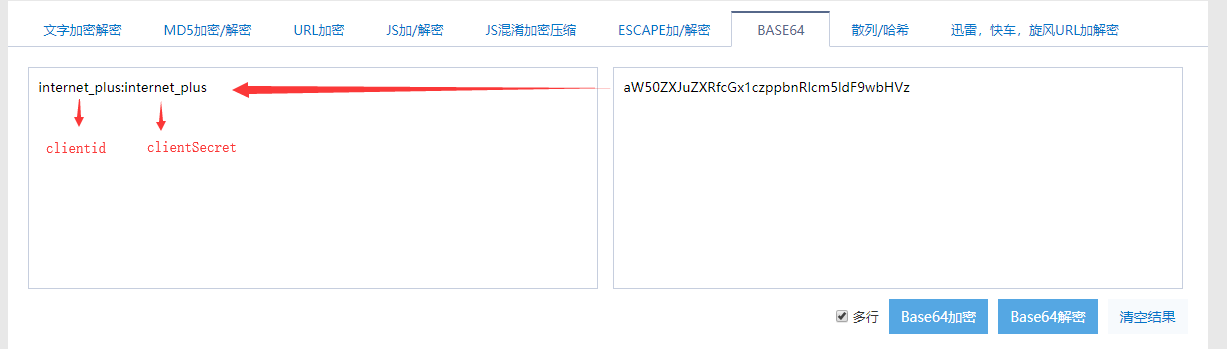 这是请求头解密现场
5. 配置认证/资源服务器
MyResourceServerConfig.java
/**
 * 资源服务器
 * Created by Fant.J.
 */
@Configuration
@EnableResourceServer
public class MyResourceServerConfig extends ResourceServerConfigurerAdapter {

    @Autowired
    private MyAuthenticationSuccessHandler myAuthenticationSuccessHandler;
    @Autowired
    private MyAuthenticationFailHandler myAuthenticationFailHandler;
    @Override
    public void configure(HttpSecurity http) throws Exception {
        //表单登录 方式
        http.formLogin()
                .loginPage("/authentication/require")
                //登录需要经过的url请求
                .loginProcessingUrl("/authentication/form")
                .successHandler(myAuthenticationSuccessHandler)
                .failureHandler(myAuthenticationFailHandler);

        http
                .authorizeRequests()
                .antMatchers("/user/*")
                .authenticated()
                .antMatchers("/oauth/token").permitAll()
                .anyRequest()
                .permitAll()
                .and()
                //关闭跨站请求防护
                .csrf().disable();
    }
}
我这里只需要认证/user/*开头的url。@EnableResourceServer这个注解就决定了这十个资源服务器。它决定了哪些资源需要什么样的权限。
MyAuthorizationServerConfig.java
/**
 * 认证服务器
 * Created by Fant.J.
 */
@Configuration
@EnableAuthorizationServer
public class MyAuthorizationServerConfig extends AuthorizationServerConfigurerAdapter {


    @Autowired
    private AuthenticationManager authenticationManager;

    @Autowired
    private UserDetailsService userDetailsService;

    @Override
    public void configure(AuthorizationServerSecurityConfigurer security) throws Exception {
        super.configure(security);
    }

    /**
     * 客户端配置(给谁发令牌)
     * @param clients
     * @throws Exception
     */
    @Override
    public void configure(ClientDetailsServiceConfigurer clients) throws Exception {
        clients.inMemory().withClient("internet_plus")
                .secret("internet_plus")
                //有效时间 2小时
                .accessTokenValiditySeconds(72000)
                //密码授权模式和刷新令牌
                .authorizedGrantTypes({"refresh_token","password"})
                .scopes( "all");
    }

    @Override
    public void configure(AuthorizationServerEndpointsConfigurer endpoints) throws Exception {
        endpoints
                .authenticationManager(authenticationManager)
                .userDetailsService(userDetailsService);
        }
    }
}
@EnableAuthorizationServer就代表了它是个认证服务端。
一般来讲,认证服务器是第三方提供的服务,比如你想接入qq登陆接口,那么认证服务器就是腾讯提供,然后你在本地做资源服务,但是认证和资源服务不是非要物理上的分离,只需要做到逻辑上的分离就好。
认证服务中,我们获取到ClientDetailsServiceConfigurer 并设置clientId和secret还有令牌有效期,还有支持的授权模式,还有用户权限范围。
执行
好了,启动项目。
1. 给/oauth/token 发送post请求获取token
请求头:Authorization:Basic +clientid:secret 的base64加密字符串 (认证服务器中设置的client信息) 请求参数:username password (用户登陆账号密码)
{
    "data": {
        "refreshToken": {
            "expiration": 1528892642111,
            "value": "xxxxxx-xxxxxx-xxxxx-xxxxxxxx"
        },
        "scope": [
            "all"
        ],
        "tokenType": "bearer",
        "value": "xxxxxx-xxxxxx-xxxxx-xxxxxxxx"
    },
    "status": 200,
    "success": true
}
2. 给/oauth/token 发送post请求刷新token
请求头: 不需要 请求参数:
- grant_type:refresh_token
- refresh_token:获取token时返回的refreshToken的value
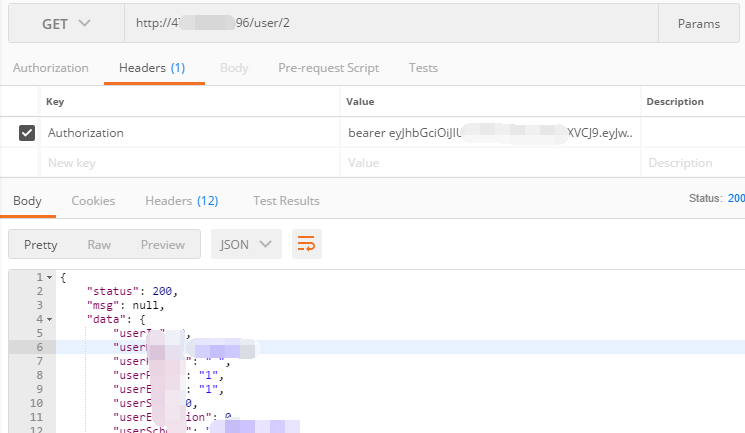
3. 访问受保护的资源,比如/user/2
类型:get请求 请求头:Authorization: bearer + tokenValue
介绍下我的所有文集:
流行框架
SpringCloud
springboot
nginx
redis
底层实现原理:
Java NIO教程
Java reflection 反射详解
Java并发学习笔录
Java Servlet教程
jdbc组件详解
Java NIO教程
Java语言/版本 研究
